Building a website used to mean months of work, expensive developers, and countless revisions. Not anymore.
With AI tools, you can launch a professional website in hours or days instead of months, even if you’ve never written a line of code.
But here’s the catch: AI won’t do everything for you. You still need a solid website plan for your business.
This guide walks you through planning and building a website with AI from start to finish. It uses real examples from a test project I built for Ace Plumbing, a fictional Sydney-based plumbing business. By the end, you’ll know exactly how to leverage AI to fill your skill gaps while maintaining control over your brand and business.
1. Secure your brand name and digital presence
Before you build anything, lock down your brand’s digital real estate. This includes your website address, social media handles, and business profiles.
You don’t want to build a beautiful website only to discover someone else owns the domain you need or has claimed your business name on Instagram.
Here’s what to secure:
- Domain name: This is your website’s address. Use our guide on the best domain registrars to search for and purchase your domain. Keep it short, memorable, and ideally a .com if available.
- Social media profiles: Claim your handles on major platforms (Facebook, Instagram, LinkedIn, Twitter). Even if you won’t use them immediately, reserve them now.
- Business listings: Set up your Google Business Profile, Bing Places, and relevant industry directories. These boost local SEO and help customers find you on search engines and maps.
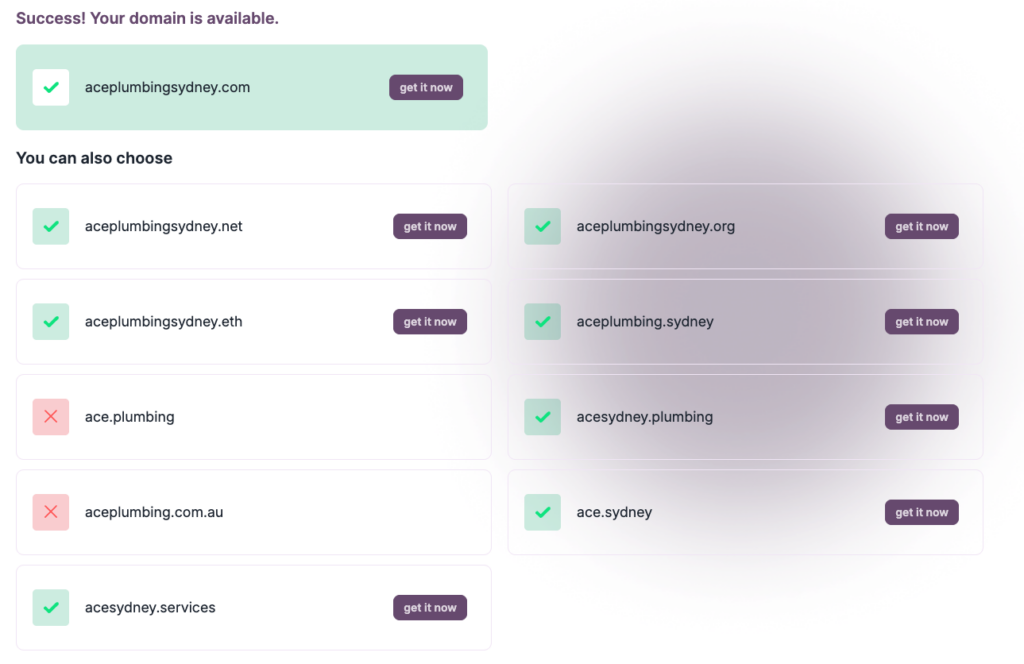
If you’re still settling on a brand name but not sure if it’s taken, you can use a free platform like Brandsnag to check. For example, these are the website domains available for my test project:
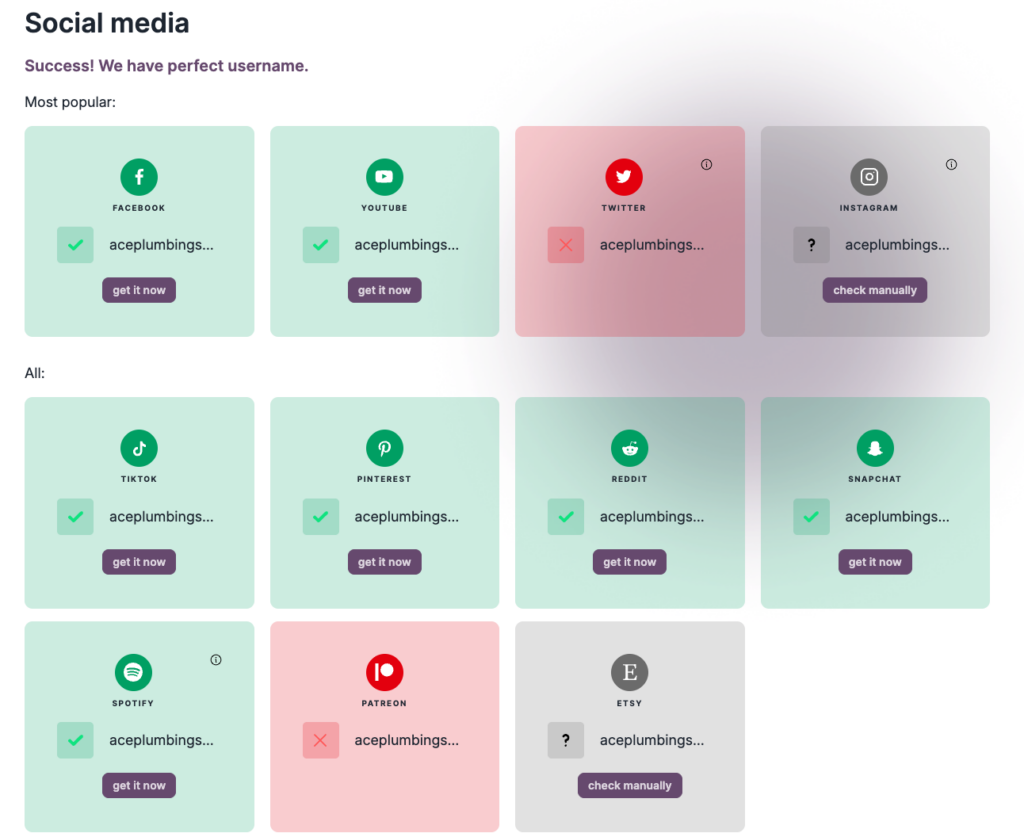
And these are the social platforms it is available on:
Pro tip: Use a consistent name across all platforms if available. This builds brand recognition and makes it easier for customers to find you everywhere.
2. Create your brand identity
Your brand identity is more than just a pretty logo. It’s the visual and emotional personality of your business, and AI can help you develop it faster than ever.
Start by defining:
- Color palette: 2-3 primary colors that reflect your brand’s personality. I like using Coolors.co to find a color combo I like.
- Typography: Choose readable fonts that match your brand voice. FontPair features many free fonts and shows you how they pair with each other.
- Logo and tagline: A memorable visual mark and a short phrase that captures what you do.
- Tone of voice: How your brand sounds in writing (professional? friendly? authoritative?)
There are many free AI logo generators you can try out until you find one you like. Most of them are fairly basic, but you can get a decent-looking logo in under five minutes to get you started and invest in a professional design once your business is able to afford it.
For example, here’s an accelerated GIF of how I generated a logo for Ace Plumbing using Looka:
All up, including the indecision around colors, fonts and icons I liked, it took under five minutes to create this decent-looking logo:
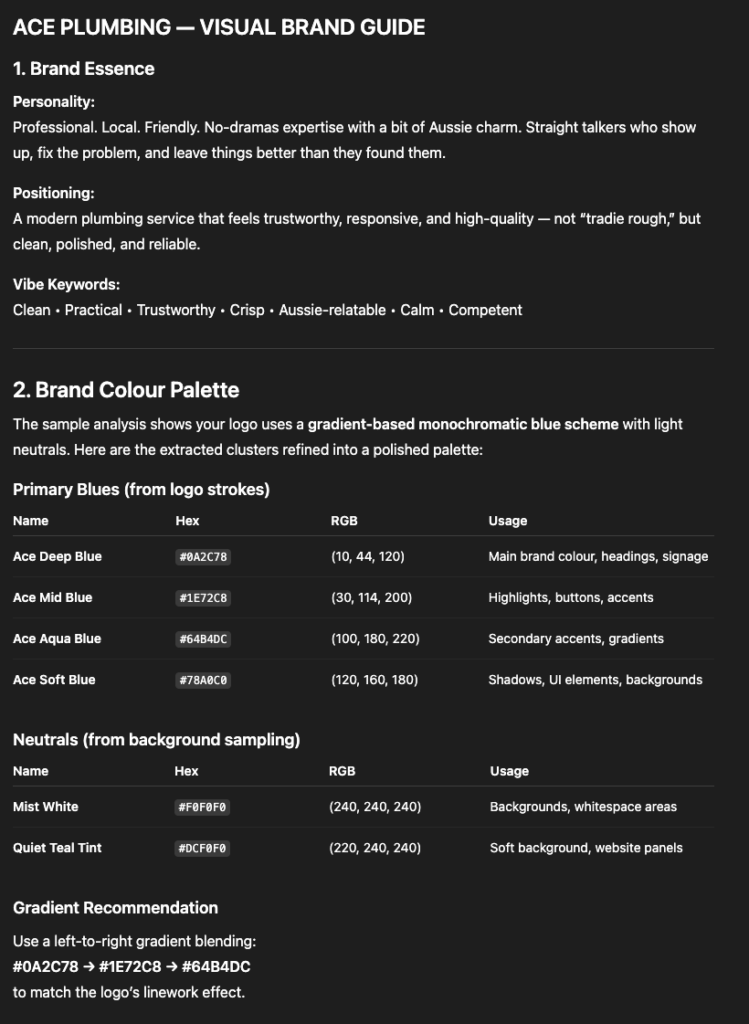
If you want to create a more detailed brand guide, you can try out any chat-based AI tool. For example, ChatGPT will give you a text-based version that you can use in your prompt within your website-building platform:
Or you can use a vibe coding platform, like Lovable or Base 44, to get a visual version:

You’ll probably also need to do some manual work yourself to fill in gaps. For instance, Base 44 can’t design a logo or add custom fonts. So, you’ll need to supply these elements yourself to polish up your website’s design.
But all things considered, you can get at least 80% of the way there for free and without needing design skills.
3. Define your core message and unique selling propositions
Your website has about three seconds to tell visitors why they should care. That’s why you need crystal-clear messaging that communicates your value instantly.
I’d recommend that you don’t use AI just yet, as you want it to be real and authentic. AI will just give you mediocre ideas based on what everyone else says. Nothing to truly make you stand out.
So, take the time to think about what truly makes you different from your competition. What are the decision-making factors that make your customers buy? How can you deliver all of the things they’re looking for better than anyone else around?
Every business is in business for a reason. If customers didn’t like what the business was doing, they wouldn’t buy its products or services.
So take the time to figure out these elements for your business so you can put them front and center.
For example, for Ace Plumbing, customers want quality, reliability, punctuality, and affordability. Here are some catchy benefits and selling propositions that emerge from these values:
- 60-minute response time, guaranteed
- $0 call-out fee, day or night
- 5-star rated by 500+ Sydney locals
- Available 24/7, no extra fees
- 15+ years serving Sydney
- Licensed & fully insured
These USPs appear throughout the website, including in the hero section, service descriptions, and footer.
They reinforce what makes Ace Plumbing different at every touchpoint.
Write yours down before building. These will guide your content creation and help AI tools generate copy that actually reflects your brand values.
If you’re stuck for ideas, you can check out:
- Google Ads: Search your main product or service on Google and check out how competitors represent their benefits and reasons why customers should pick them.
- Competitor websites: Look at your competitors’ websites and see what benefits they add throughout their content.
- Testimonials: Check yours and those of your competitors, whatever you have available, to see what customers value most. Mimic the language they use on your website, too.
4. Plan your core functionality
Different websites need different features. An e-commerce store needs a shopping cart and checkout. A service business needs contact forms and click-to-call buttons.
Define what your site must do before choosing a platform to build on.
Common functionality to consider:
- E-commerce: Product catalog, shopping cart, payment processing, inventory management
- Service bookings: Calendar integration (like Calendly), appointment scheduling
- Lead generation: Contact forms, quote request forms, newsletter signup
- Customer engagement: Live chat, click-to-call buttons, FAQ sections
- Marketing integration: Email marketing (like Mailchimp), CRM connections, analytics
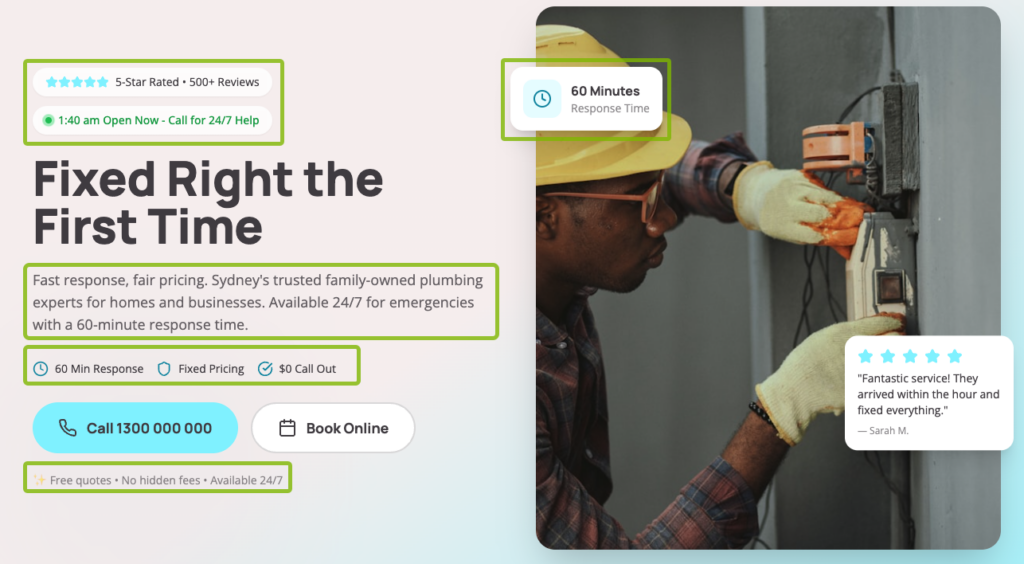
For Ace Plumbing, the main goal is to drive phone calls, so I prioritized click-to-call buttons in prominent sections on the website, like the menu:

The hero section:
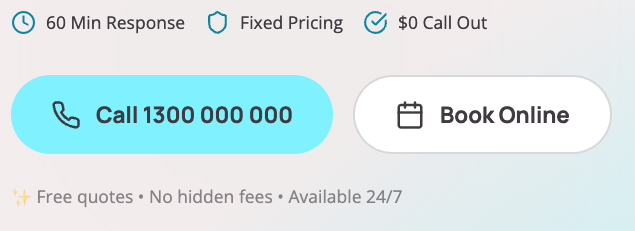
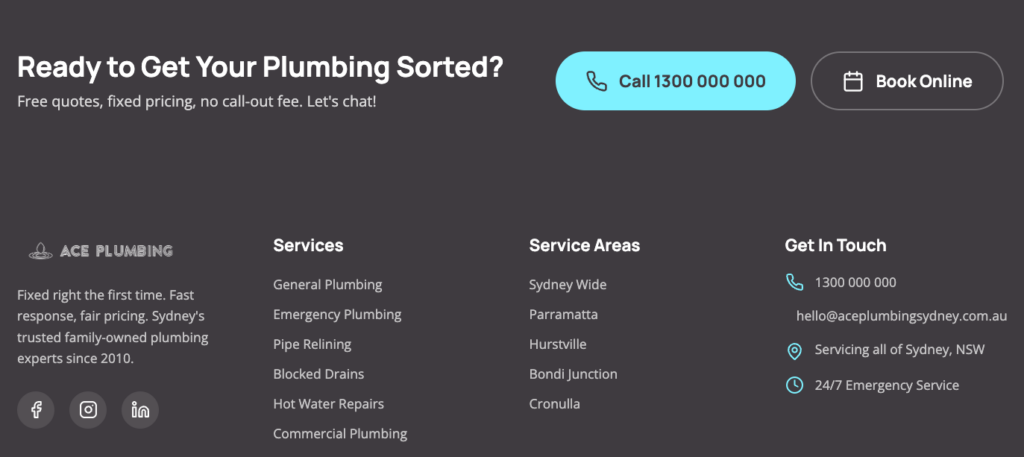
The footer:
And throughout the content to break up long pages (as needed).
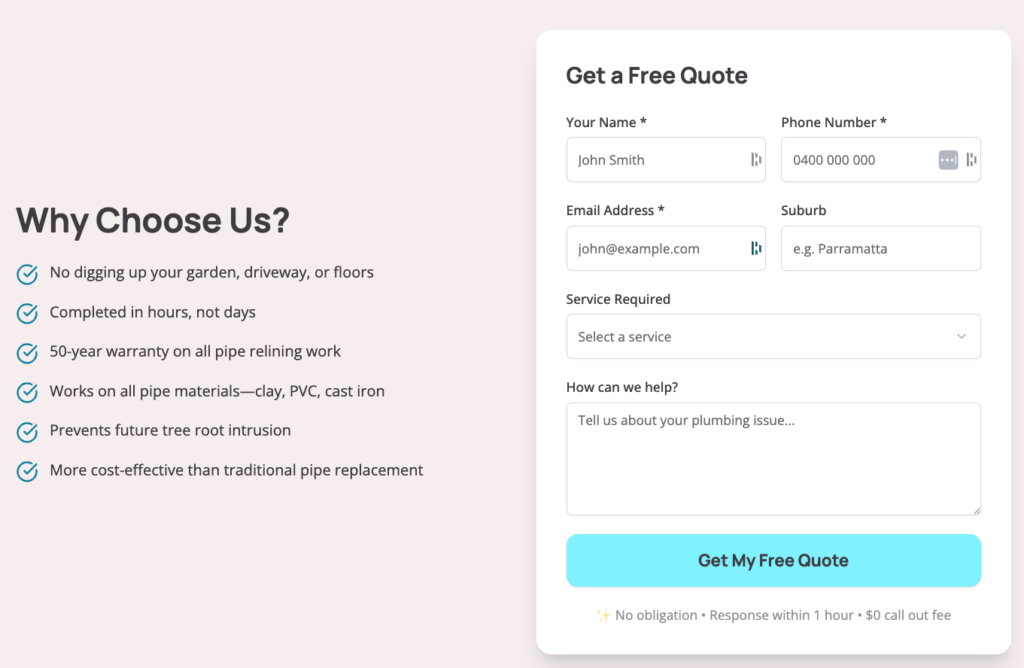
I also included forms to capture enquiries from people who didn’t want to call. These were placed further down the page for people who weren’t yet ready to call:
Some extra bells and whistles I could have added include:
- Live chat or text messaging app: This is handy for trades businesses, so all enquiries get forwarded to their phone, even when they’re on a job.
- Testimonials widget: This helps add social proof to show the business is locally trusted.
- Availability indicator: Since the business offers 24/7 services, indicating that it is open for business anytime someone is browsing the website could lead to more conversions.
Make a list of must-have features versus nice-to-haves for your site. Also consider integrations with existing platforms you use. For instance, if you already have a booking app or a payment processor, you’ll probably need to connect your website to it.
This helps you evaluate website builders and ensures you don’t waste time on a platform that can’t deliver what you need.
5. Select your website builder: AI vs. traditional platforms
This is the biggest decision you’ll make. Do you use an AI website builder that generates everything for you, or stick with a traditional platform that gives you more control?
I have tried out dozens of AI website builders lately. The ones that perform the best for user experience tend to be vibe coding platforms like Lovable and Base 44. (Check out the study I ran putting 19 website builders to the test).
However, since they’re newer platforms on the market, they don’t offer the same level of security, support, and features as established website builders like WordPress or Wix.
Here are some pros and cons to help you decide which way to go.
AI website builders
I’ve mainly used Base 44 to build Ace Plumbing, and here are the things I’ve noticed about it:
Pros:
- Build a whole website from a single mega-prompt
- Easily work in iterations with follow-up prompts
- Automatically generate text and images
- Generate modern, design-forward aesthetics
- Quickly get something live (within hours, not months)
Cons:
- Limited SEO capabilities (JavaScript-heavy sites can struggle with indexing)
- No code access or editing flexibility
- You don’t own the code (significant business risk)
- No drag-and-drop editing after generation
- Difficult to secure without coding knowledge
- Limited third-party integrations
Your mileage may vary if you choose a different AI platform. They all have their quirks.
Traditional Platforms
If you require security and stable features for your website, a traditional platform (like WordPress, Wix, or Squarespace) may present fewer business risks. However, the tradeoff is usually that AI features are often limited and not as intuitive.
Pros:
- Built-in security and hosting
- Extensive plugin/app libraries for added functionality
- Much better for SEO with or without established plugins
- Drag-and-drop design control is available in most
- Large, established support communities
- Many platforms now have AI features built in
Cons:
- Steeper learning curve
- Harder to leverage AI comprehensively
- Requires more manual work
- WordPress requires a separate hosting setup
The verdict
For most small businesses, traditional platforms that are adding AI features offer the best balance of control, security, and growth potential. Especially with WordPress, you’re not locked into a proprietary system, and you get better long-term SEO results.
If I were building Ace Plumbing for real, my choice would be to design the aesthetics in Base 44 and then copy it in WordPress with a drag-and-drop builder like Elementor.
That said, I also tried using a hybrid solution ZipWP (which uses AI and Elementor to build a website in minutes). However, I found the design was fairly simple and not as customized as Base 44’s.
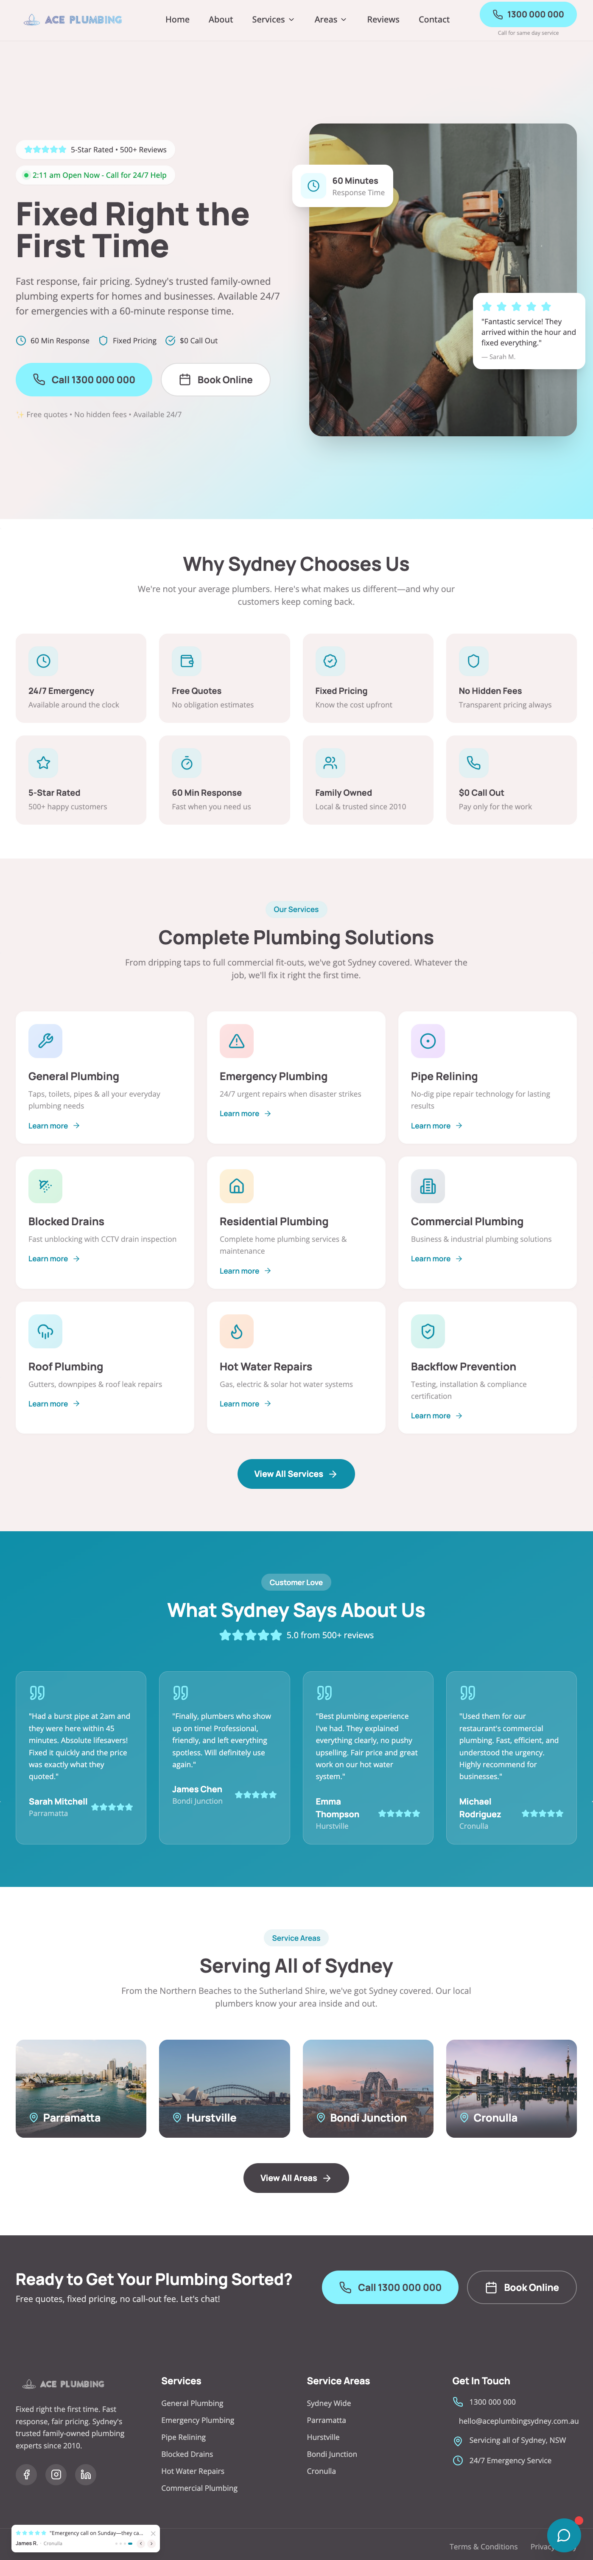
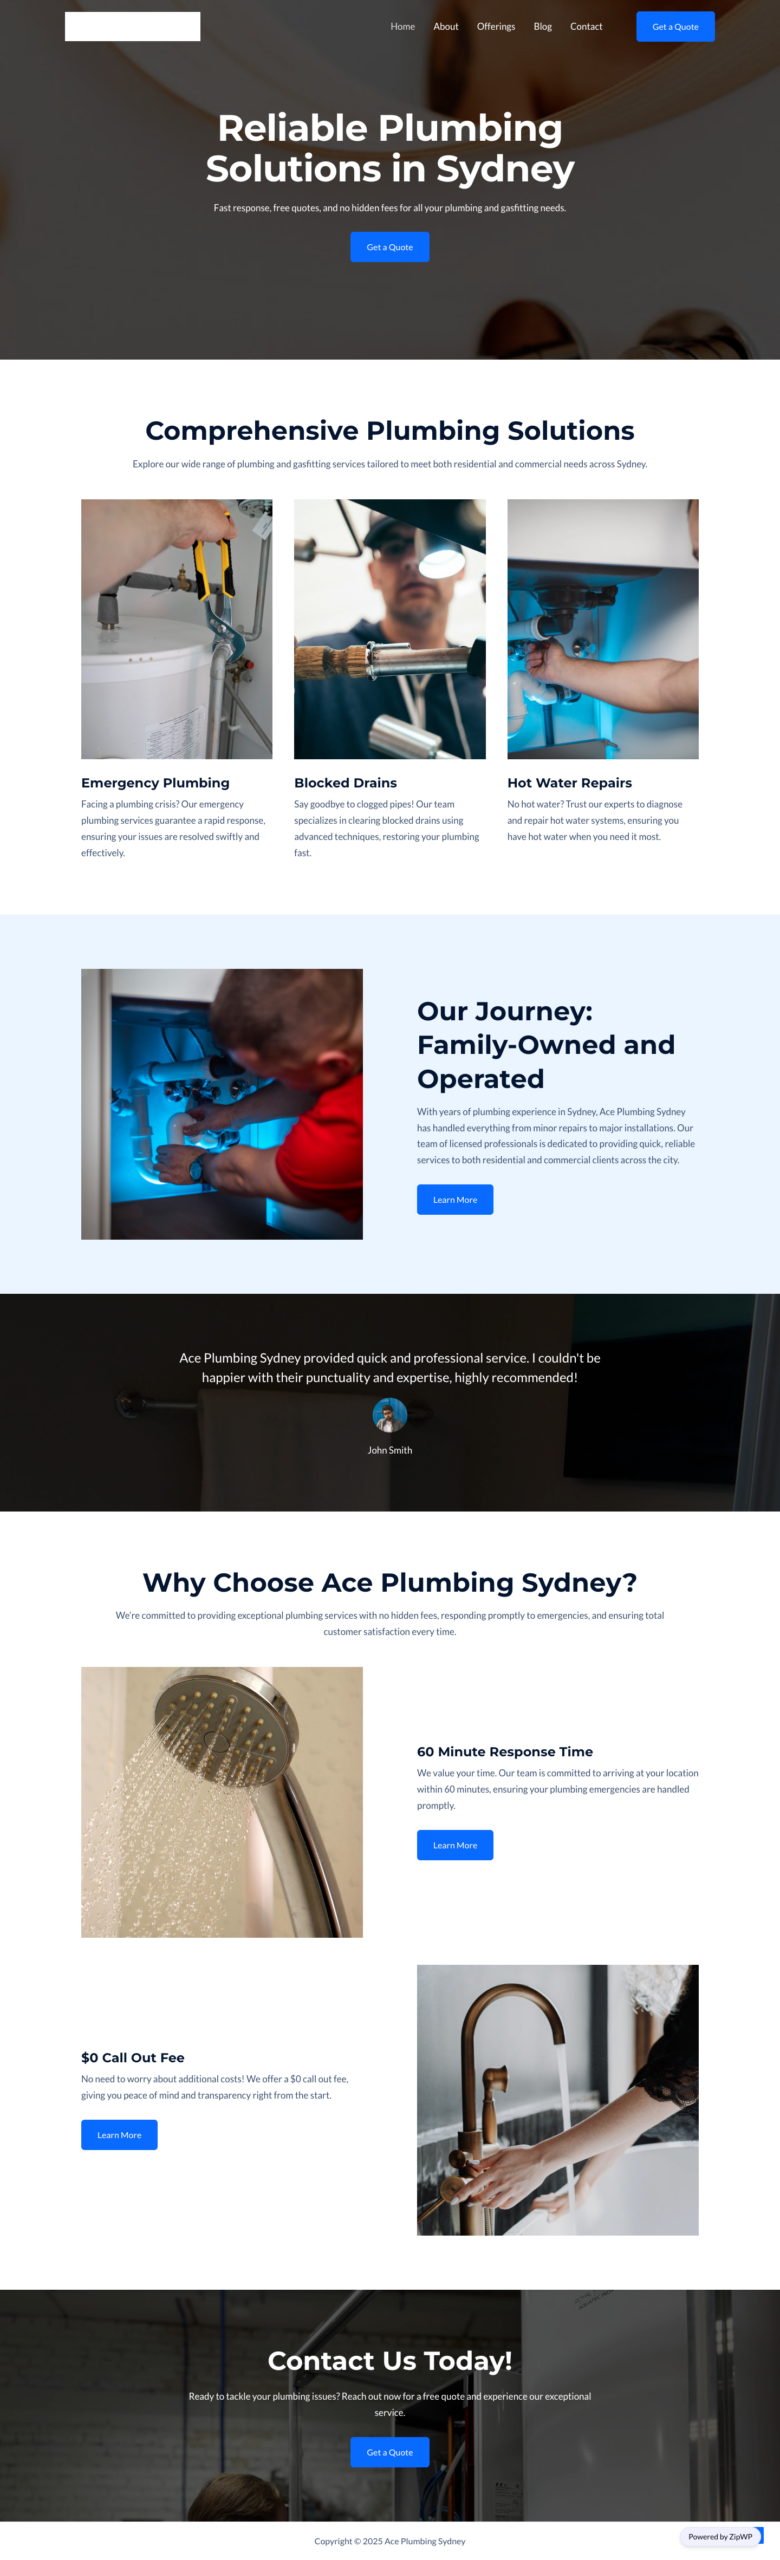
For example, this is the design Base 44 generated (including all content and images) from my starting prompt:
By contrast, here’s ZipWP’s design:
I used the same prompt for both sites. There’s a lot of detail here (which you’ll also be able to add to your prompts in the next steps).
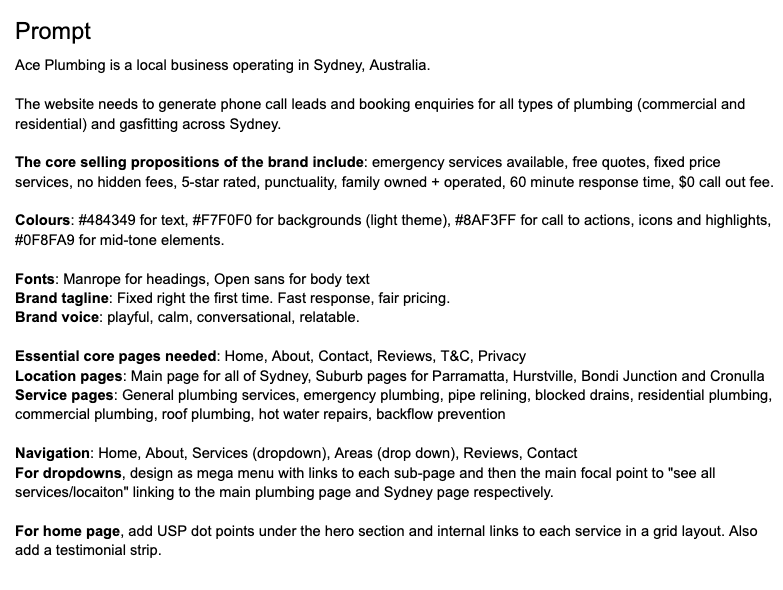
Since ZipWP had a character limit for the prompt, I had to keep it minimal and ask for as many features and pages with as few words as possible.
However, given the same prompt, Base 44 created 21 pages along with the images and content for all. It maintained a clean, professional, and on-brand aesthetic throughout.
ZipWP did not customize the design to the prompt I supplied. It created only five pages and did not match the navigation or design to my expectations, so a lot of manual design would be needed to get it up to scratch.
There’s no right or wrong solution here. It’s just a matter of your skills, preferences, and what features your website requires.
6. Figure out your SEO requirements
SEO (search engine optimization) helps people find your website on search engines. Without it, you’re invisible to potential customers actively searching for what you offer.
You can use many AI tools to find the exact products and services people search for on Google.
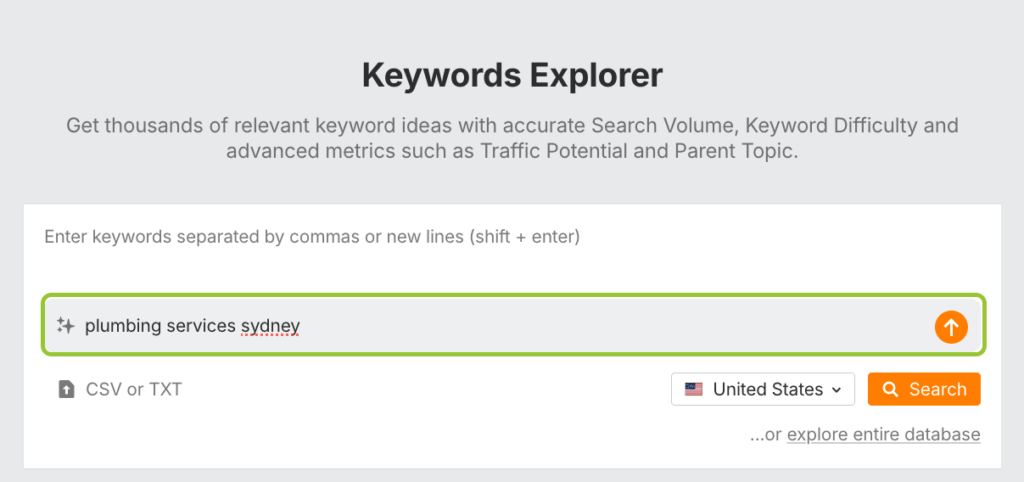
For example, I used Ahrefs’ AI keyword suggestion tool in Keywords Explorer:
It generated many service ideas that I thought could make great pages for the website. This is how I came up with what service pages I added to the prompt I shared earlier:
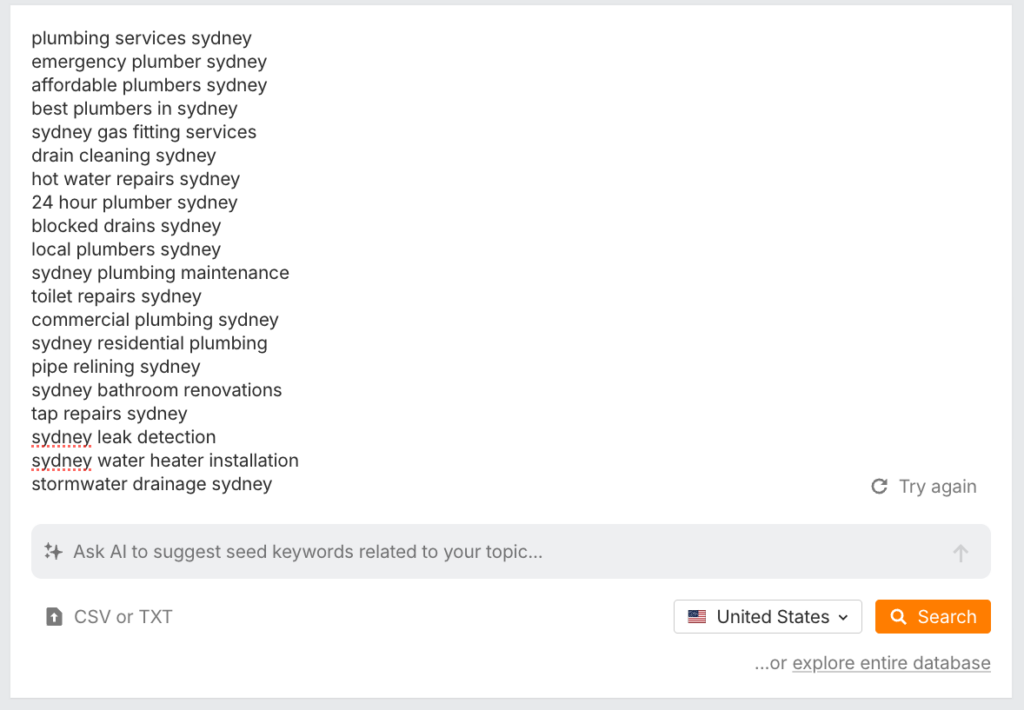
You could try this yourself using Ahrefs’ free keyword generator tool if you don’t already have an account.
If you’d like a more in-depth, advanced SEO approach, you could also use AI to build an end-to-end strategy for you. For instance, I tried out SEO Strategy Builder for this purpose.
It created an entire information architecture and a reasonably advanced SEO strategy after I input some basic info about the business (like its goals, industry, and some keyword ideas). Here’s a snapshot:
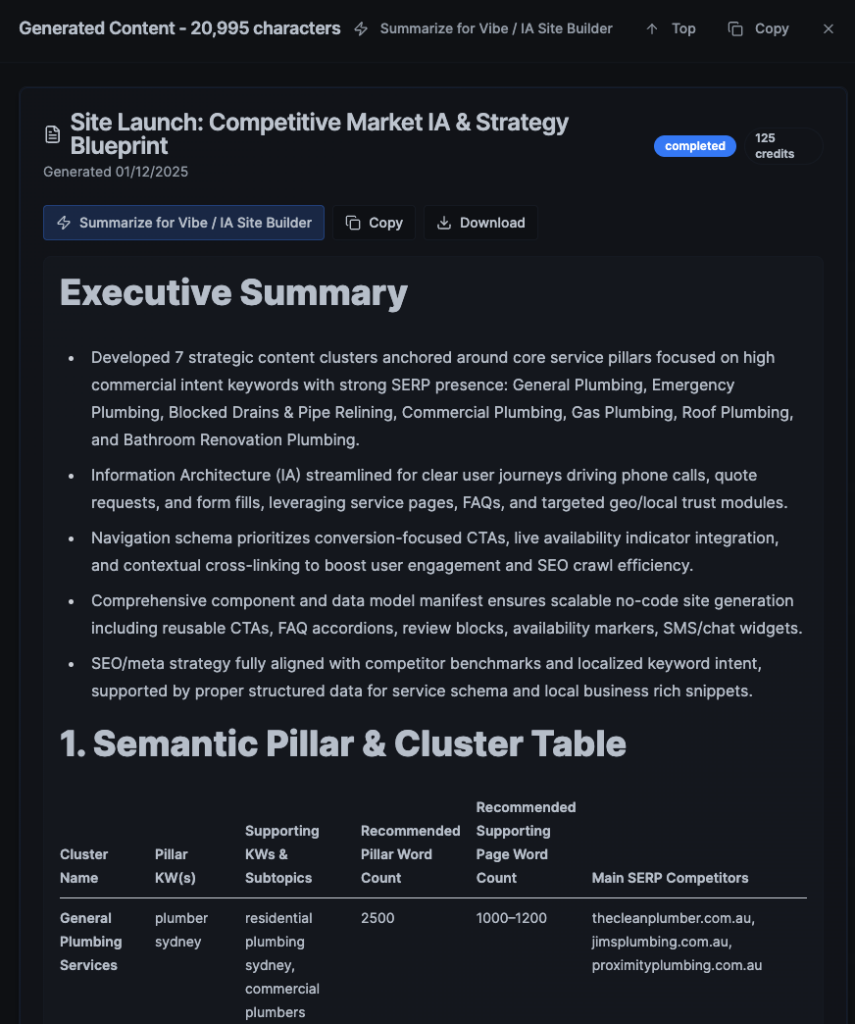
If you’re using a vibe coding platform, you can simply copy the entire prompt and start building a well-optimized website even if you don’t know anything about SEO.
Some platforms may have a character limit for prompts, so you can also try using ChatGPT to condense a 20,000-character prompt into 3,000 if needed.
7. Gather all necessary assets
AI can generate a lot, but not everything. If you think you’ll need custom images, videos, or other assets, now’s the time to create them or gather them.
What to gather:
- Logo files (PNG with transparent background, SVG if available)
- Brand photos (team photos, work photos, facility images)
- Videos (if available)
- Testimonials and reviews
- Certifications and licenses
- Existing content (service descriptions, company history)
You can also use AI to generate some of these assets if you don’t already have them. For example, I used Veo to create four mini videos that I stitched together into this:

It’s not perfect, especially with the text on the van at the end.
However, you can take a few 5-second videos on your phone and stitch them together into something like this using AI video tools. AI can also help fill in the blanks by generating B-roll footage.
- Use AI for: B-roll footage, generic background images, anything unbranded
- Avoid AI for: Team photos, branded signage, footage, or pictures with text
It’s not a bad way to start if you’re on a low budget. Some simple AI-generated assets could easily make your website feel more professional.
8. Map out your pages and content structure
You’ve now got everything you need to start building the structure of your website. It’s like putting together the frame of a house.
If you gathered some SEO keywords, you can use these to plan what pages you’ll launch with. But you’ll also need some other core pages that probably won’t have keywords either.
Here are some ideas of what you could launch with depending what type of site you’re building.
Core pages:
- Home
- About
- Contact
- Reviews
- Portfolio
- Case Studies
Landing pages:
- Product pages (for ecommerce)
- Service pages (for service business)
- Location pages (for local business)
Hub pages:
- Product collections
- Services hub
- Locations hub
- Blog hub
Articles and resources:
- Blog posts
- News articles
- Press releases
- Whitepapers
Legal pages:
- Terms & Conditions
- Privacy Policy
- Disclaimers
- Cookie Policy
Here’s a demo of what it might look like altogether for an ecommerce site:
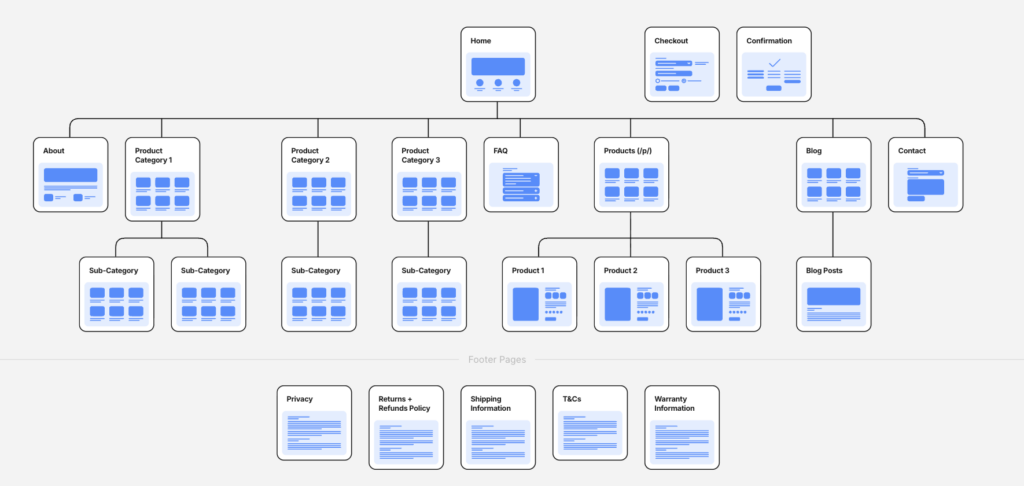
And for a local service business:

Most of your SEO pages will be landing pages, hub pages, and blog posts.
For example, for Ace Plumbing, most pages I planned were for services like:
- Pipe relining
- Blocked drains
- Emergency plumbing
- Commercial plumbing etc.
In terms of design, all of these pages will follow the same template.
The only things changing will be the content so that we can target service-specific keywords. The same applies to location pages; they will all follow a single template to simplify the process.
If you’re not sure what pages to start with, you can ask ChatGPT or Claude. You can even give them your list of keywords or links to competitor websites and ask what the most important pages are that you could start building.
Even if you’re not building your final site with a vibe coding platform like Base 44, I’d recommend you prompt it to create a prototype for you. Simply adding the list of your pages to the prompt is enough for it to do the heavy lifting by creating the design and content for all pages at once. (It created 21 pages for Ace Plumbing in under 10 minutes!)
Then you can copy it into wherever your website will actually be built.
9. Map out your navigation
Your website’s navigation is how visitors (and search engines) move from one page to the next on your website.
For example, the main menu of a website is the most important element of navigation:

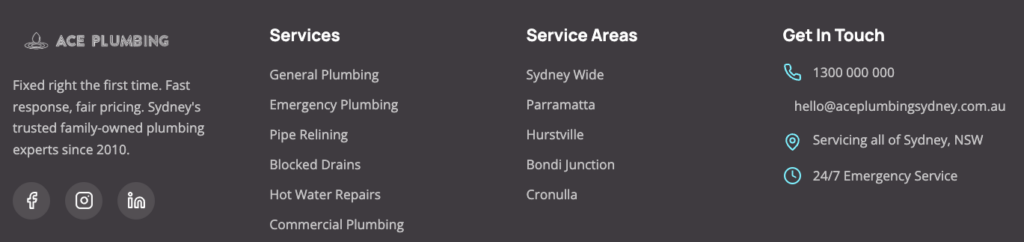
But elements like the footer are also part of your site’s navigation since they contain links to important pages:
Other navigation elements you can consider include:
- Sidebars: Very handy on blogs or internal content
- Table of Contents: Convenient for long pages with many headings
- Filters: Best for sites with many listings (like ecommerce or marketplaces)
- Search bar: Useful for large websites with many pages
- Breadcrumbs: Great for sites with many categories and sub-categories
- Internal links: Useful for all pages since they link to other pages on your website
Think about each page and the logical next steps people may want to take. For example, for Ace Plumbing, it might be that people find the service pages first if they’ve come from a Google search. In which case, their next step (if they don’t call right away) might be to visit the home page or the about page.
So we need to make links to those pages easily accessible from all service pages.
Put the pages most people will want to visit in your main menu. Keep it to 6-8 items maximum (for best user experience). Use dropdowns for extensive subcategories.
Always include a prominent call-to-action (phone number, contact button, or booking link).
Anything important that doesn’t fit in this main menu, you can add to the footer instead. Make sure you also add critical business information here, like your legal pages, contact details, opening hours, and links to social media.
10. Fine-tune each page with conversion-optimized sections
Now comes the detailed work. Chances are that when using AI, it does a decent job to get you started, but it’s not 100% what you’re after.
So, spend some time now tweaking all the details until you’re happy with them.
Start with one page at a time and work from the top down. Some common things you may want to improve:
- Adding more detailed sections to each page’s design
- Adding more content on SEO pages so they can actually rank
- Adding more trust and credibility signals (like USPs, reviews and awards)
- Changing the images, fonts, or other assets on the page
- Tweaking the sizing, spacing, or layout of sections
- Adding more conversion elements and call-to-action buttons on long pages
- Adapting the order of sections so they flow better
- Rewriting the content so it better aligns with your brand
Use Base 44 or similar for layout and design tweaks, use Claude for better content generation, and use specialist image or video tools (like Google’s Nano Banana and Veo) if you want better visuals.
Make sure you also preview your site on multiple devices before going live. Over 60% of web traffic comes from mobile, so mobile optimization is non-negotiable for modern websites.
But above all, keep in mind that websites aren’t meant to be built once and forgotten. That’s not how the best websites work. A good habit to get into is improving things in iterations. Maybe you launch a new page today, or add a new component to your about page tomorrow.
Do what you can, when you can. Treat it like a living document worth updating so that it stays fresh over time.
11. Publish your website
You’ve built it, now it’s time to make it live!
If you’ve been building directly on the platform where your website will live, there will usually be a big “Publish” button or similar. Click it for each page and then use an incognito window in your browser to check it worked. (This may take up to 48 hours on some platforms, so be patient.)
If you’ve been using a vibe coding platform to build a prototype you want to copy, here are your next steps:
If you’re using WordPress
- Choose a hosting provider (where your website files will live)
- Install WordPress through your hosting dashboard
- Connect your domain to your hosting account, following the host’s instructions
- Install a theme (like Astra or GeneratePress) and Elementor for drag-and-drop design
- Build your pages using your designs and content
- Click “Publish” when ready
You can also use platforms like ZipWP that can handle some of these steps automatically for you.
If you’re using a traditional builder (like Wix or Squarespace)
- Sign up and choose a plan
- Connect your domain (purchased from Namecheap or included)
- Select a design template or build from scratch
- Add your content and customize the design with the drag-and-drop tools
- Preview across devices (mobile, tablet, desktop)
- Hit “Publish”
If you’re using an AI builder
- Sign up for a paid account (to remove the AI tool’s branding and unlock more features)
- Connect your domain so your site matches your brand completely
- Secure your website with an SSL certificate using Let’s Encrypt (or similar)
- Check settings to ensure that your website is set to “public” mode and doesn’t require a login
- Hit the “Publish” button
12. Add tracking and analytics
You’ve launched, but your work isn’t done. To monitor how well your website is performing, you’ll need to set up some website analytics and performance tracking.
These tools help you:
- Understand how visitors interact with your site
- See which pages get visited the most
- See which pages people convert on the most
- Track growth and website traffic over time
- Analyze where people discover your website the most (e.g., Google, social media, paid ads)
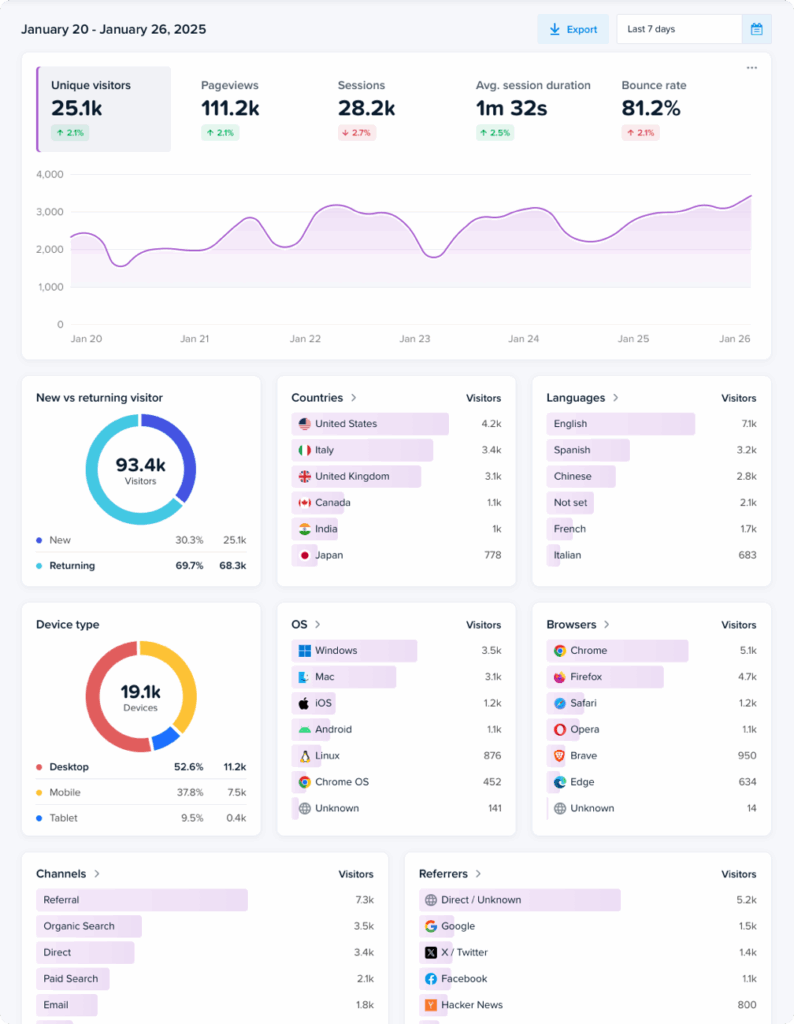
Thankfully, Crazy Egg Web Analytics makes this very easy to check. Its dashboards are easy to navigate, so you can quickly see how your website is performing:
Or you can check out our guide on the best web analytics tools to find the right solution for your needs.
For installation, like Crazy Egg, most analytics platforms simply need you to copy a small piece of tracking code and add it to the <head> section of your website.
Beyond basic web analytics, consider these tools to optimize more elements of your site’s performance:
- Website optimization tools: Help you improve conversion rates and user experience
- Landing page services: Essential if you’re running paid advertising campaigns
- A/B testing platforms: Test different versions of pages to see which performs better
- Usability testing tools: Get real user feedback on your site’s design and functionality
Check your analytics weekly for the first month, then monthly once you understand baseline traffic patterns. Use the insights to refine messaging, adjust calls to action, and improve underperforming pages.
Final thoughts: Plan, build, iterate
Building a website with AI involves using various AI tools strategically to fill skill gaps while maintaining control over your brand and business goals.
The most successful websites aren’t built once and forgotten. They’re living assets that evolve based on real user behavior and feedback.
Start with a solid plan (steps 1-5), build methodically (steps 6-9), and commit to ongoing optimization (steps 10-12). AI accelerates the process, but your strategic thinking is what makes it effective.