This guide will teach you how to use the best tools to quickly create forms and embed them on your website, whether it’s a plain HTML / PHP website or a WordPress website.
We’ll begin by using some third-party companies, like Survey Monkey and Google Forms, to quickly create a form as fast as possible. We won’t spend any time customizing colors or anything like that. This is a how to get it done QUICKLY guide. Then we’ll show how to create your own form either in WordPress or in straight PHP code. The final section is about getting that form on your site.
Creating a Form in Survey Monkey
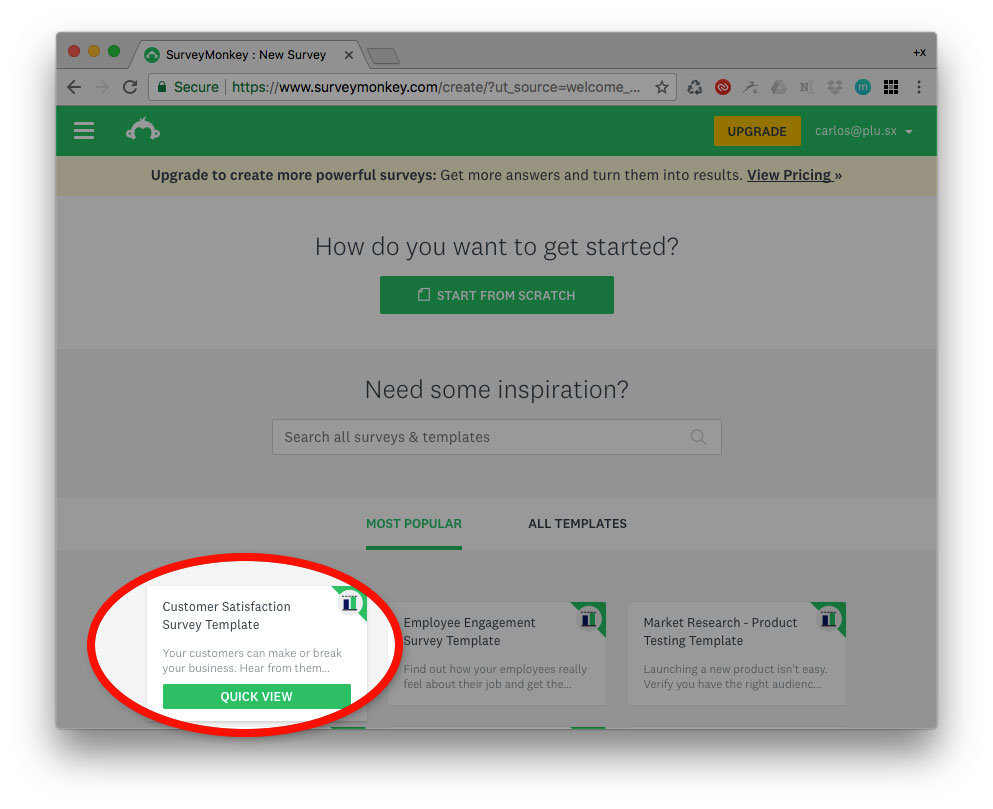
First, go to surveymonkey.com and log in to your account, or sign up for a new account. If prompted, fill out the initial questions so that you get to the first screen in their system (see figure below). You can then either choose to start from scratch, or choose a template. Choose the first template as shown in the figure, so that we can show you how to embed it on your website as quickly as possible 🙂
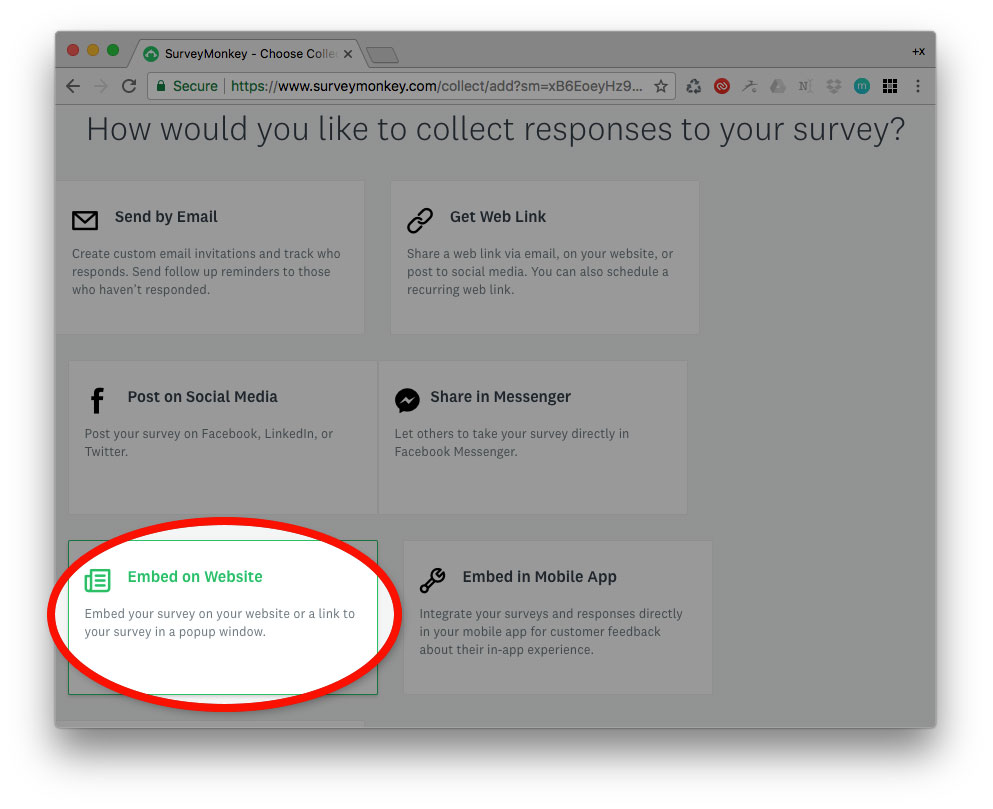
Next, you’ll be presented with a bunch of choices on how to distribute your form to the world. Let’s choose, of course, “embed on website” (see figure below). Later you can try out the other distribution methods.
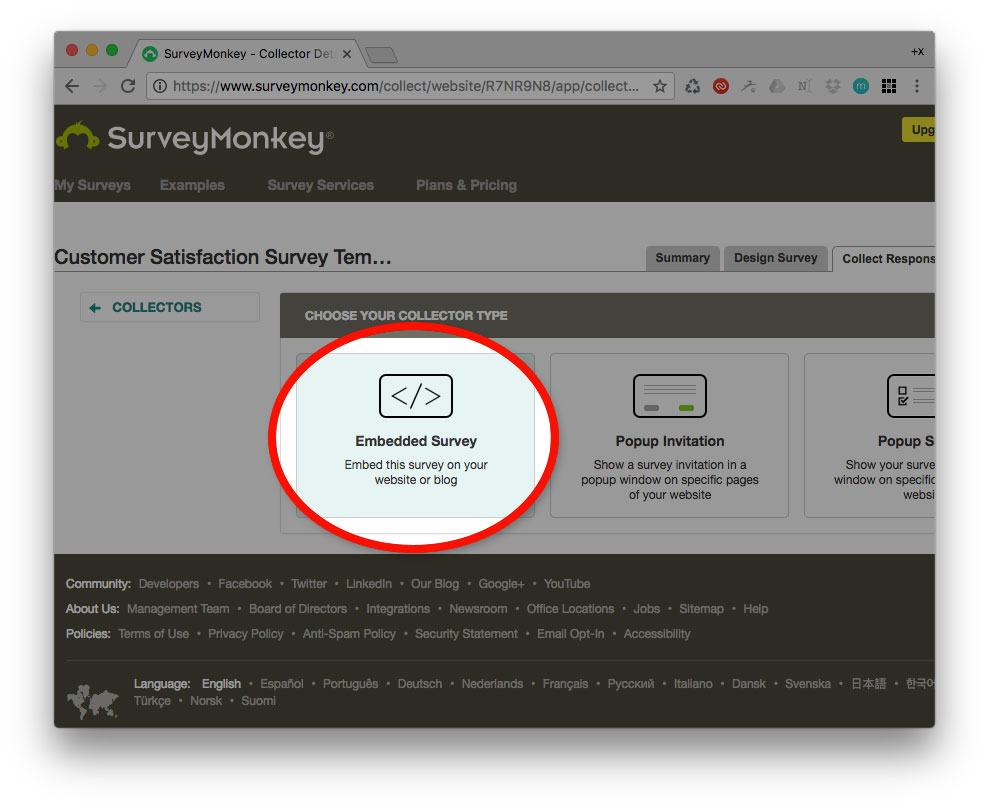
Next, you’ll want to choose “Embedded Survey” (see figure below).
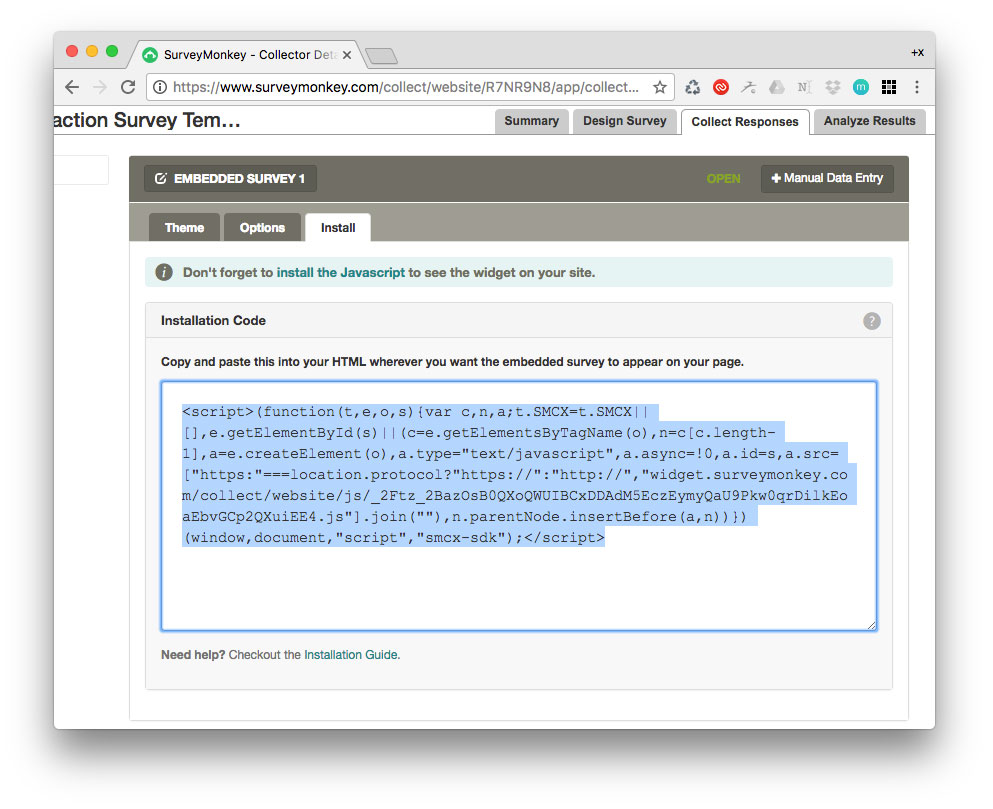
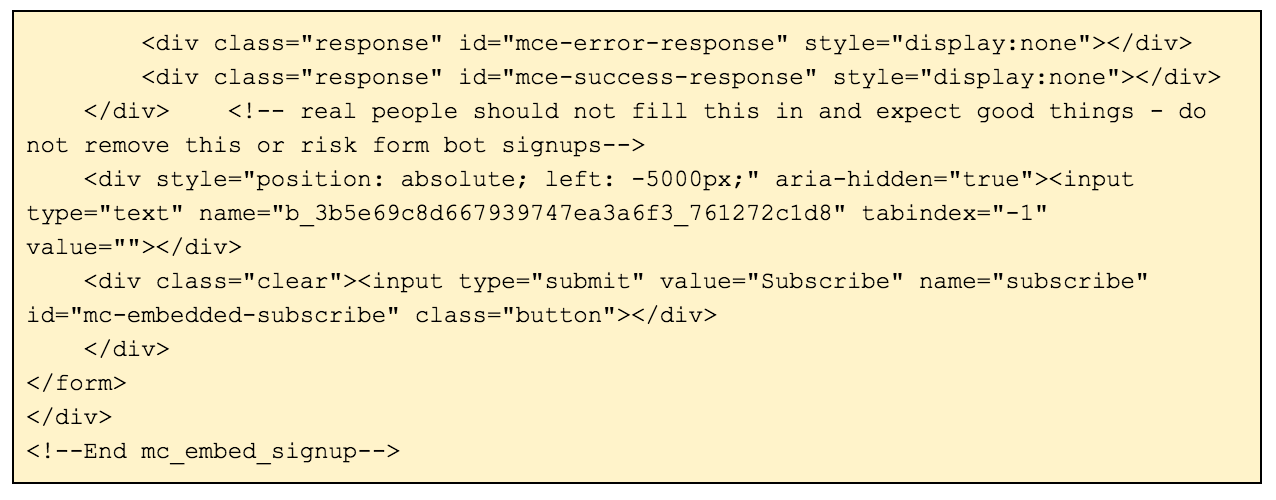
Finally, you’ll see the javascript code that will activate your new survey form! Click once on the block of code and its text will highlight as depicted in the figure below. When it’s highlighted, just hit Ctrl+C (or Cmd+C on Apple PCs) to copy it.
We will be pasting this code into your website in the Embedding section below, and we’ll cover doing it on both a plain HTML5 website and a WordPress website!
Creating a Form in Google Forms
In order to access Google Forms, you’ll first need a free Gmail account. If you don’t have a Gmail account that is… unfortunate. But even if you don’t want to have a Gmail address for email purposes, you can create a free account just for the sake of logging into all of Google’s myriad of services. This is a prerequisite for this section. I’ll assume you are able to log into Google Drive with your Google Account username, which is most likely your Gmail address.
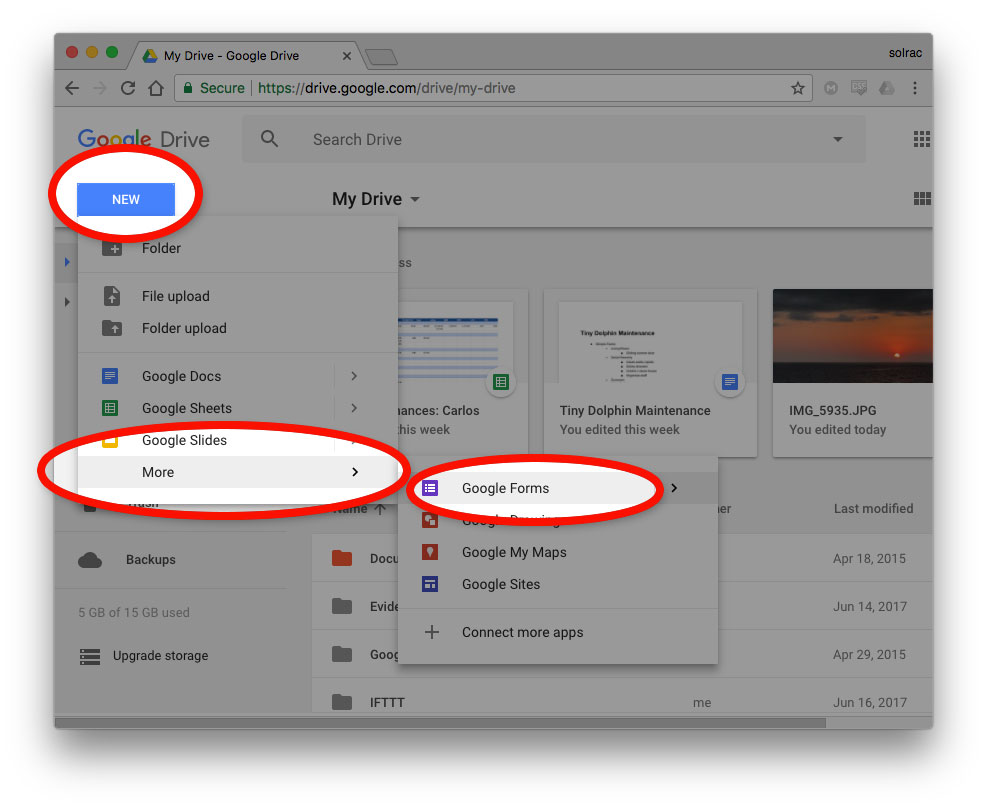
First, go to this URL: https://drive.google.com. Once you’re logged into Google Drive, you’ll see the following screen shown below. You’ll want to click on “NEW,” then “More,” then “Google Forms” (as depicted in red in the figure below.)
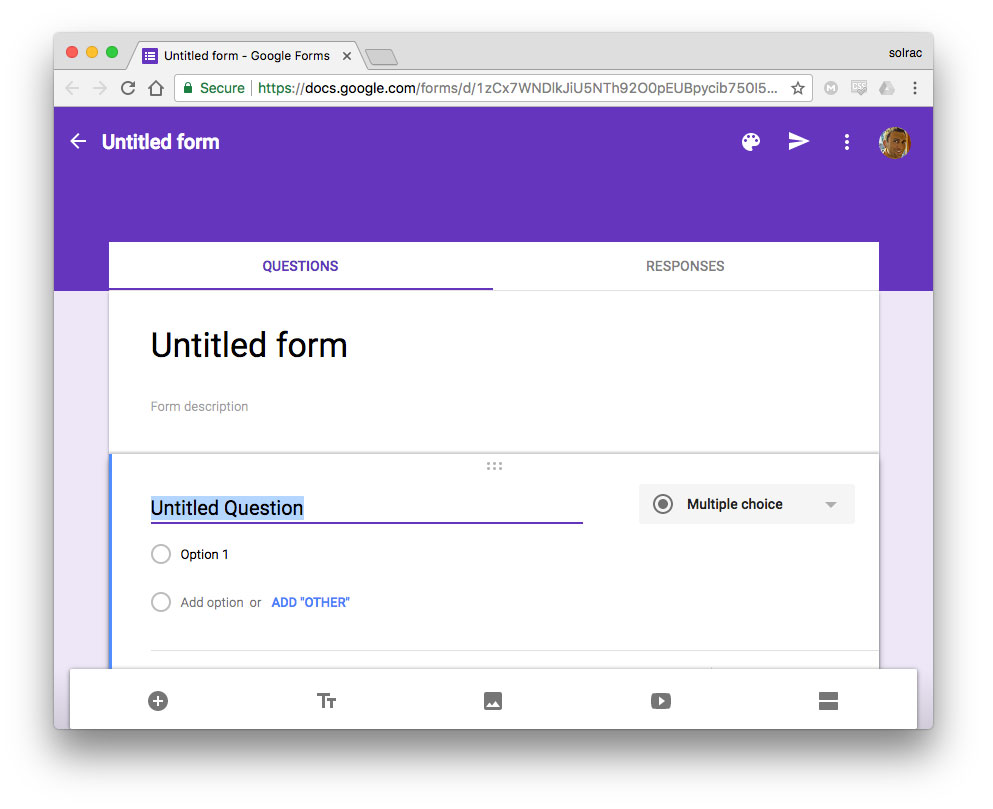
And voila! You are instantly taken to a form, ready to customize, as shown in the next figure below. No setup process. No “wizard.” I really love this part of Google Forms. You instantly go straight to the matter at hand. And you simply click on the areas you want to edit and type right into the screen. Where it says “Untitled Form,” just click on it and give it a name.
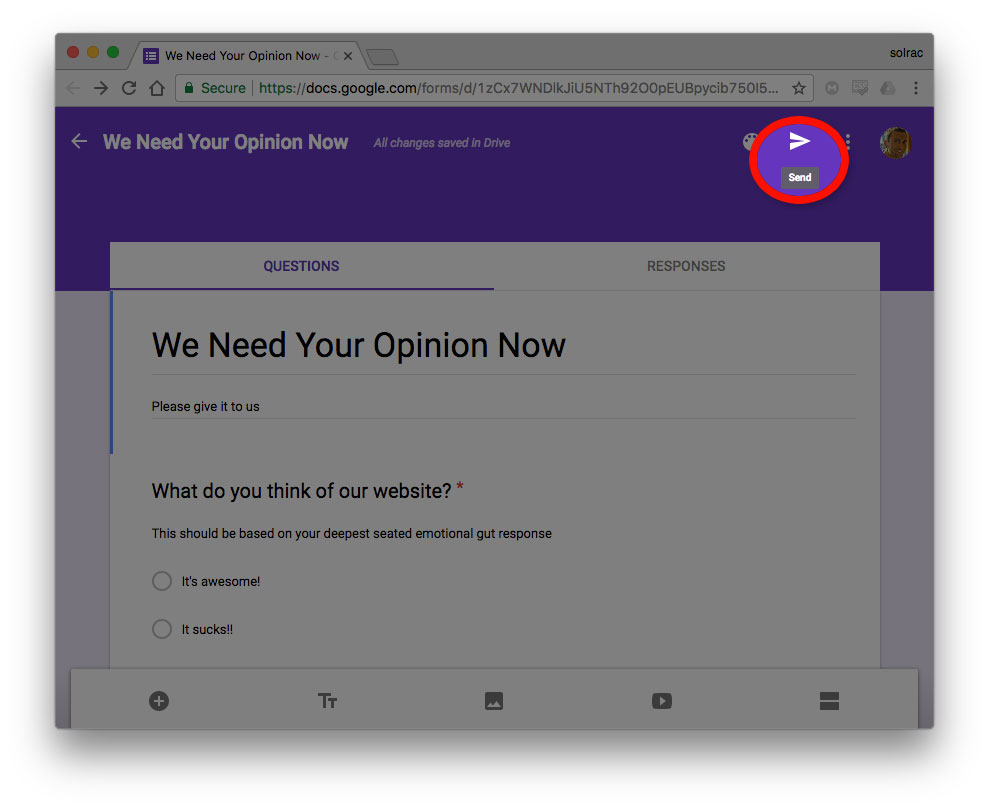
Next, click the “Send” button, shown in red in the next figure. Notice also the sample names I gave to all the form sections just by clicking on them and typing.
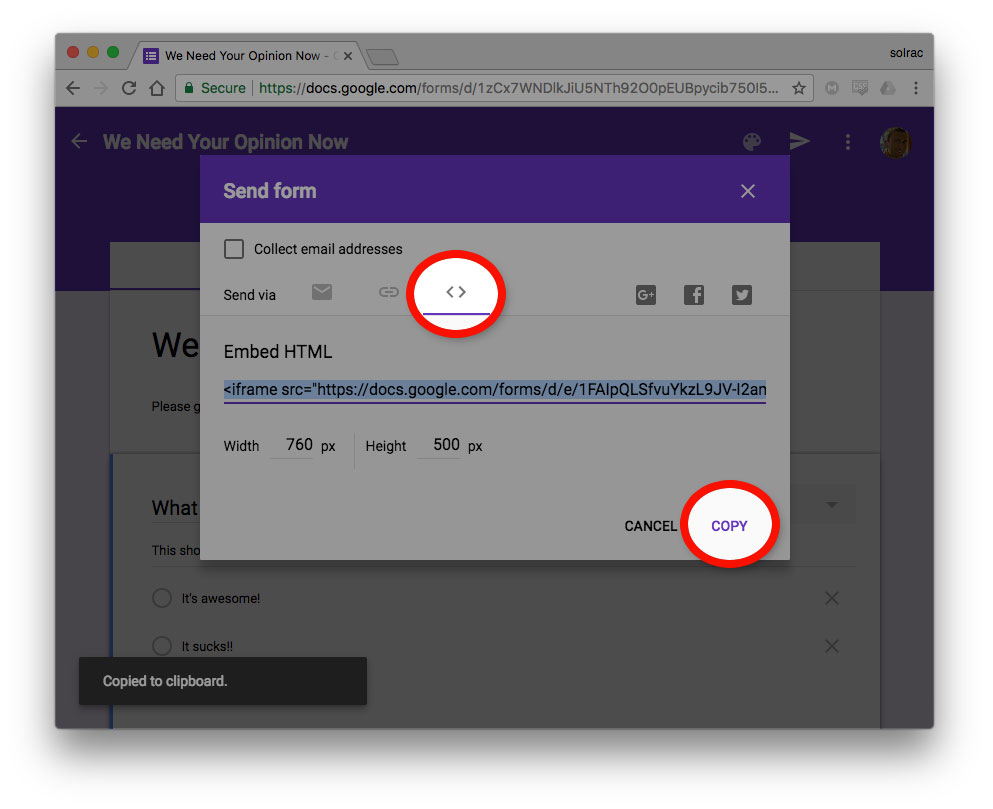
Finally, you will reach the “Send form” dialog box, where, as shown in the red highlights, you’ll first want to click on the “< >” button to access the HTML embed code, then just click on the “COPY” button at the lower right of this dialog. This will copy the embed code to your clipboard.
That’s it! You’ll paste it into your website in the Embedding section below, and we’ll cover doing it on both a plain HTML5 website and a WordPress website!
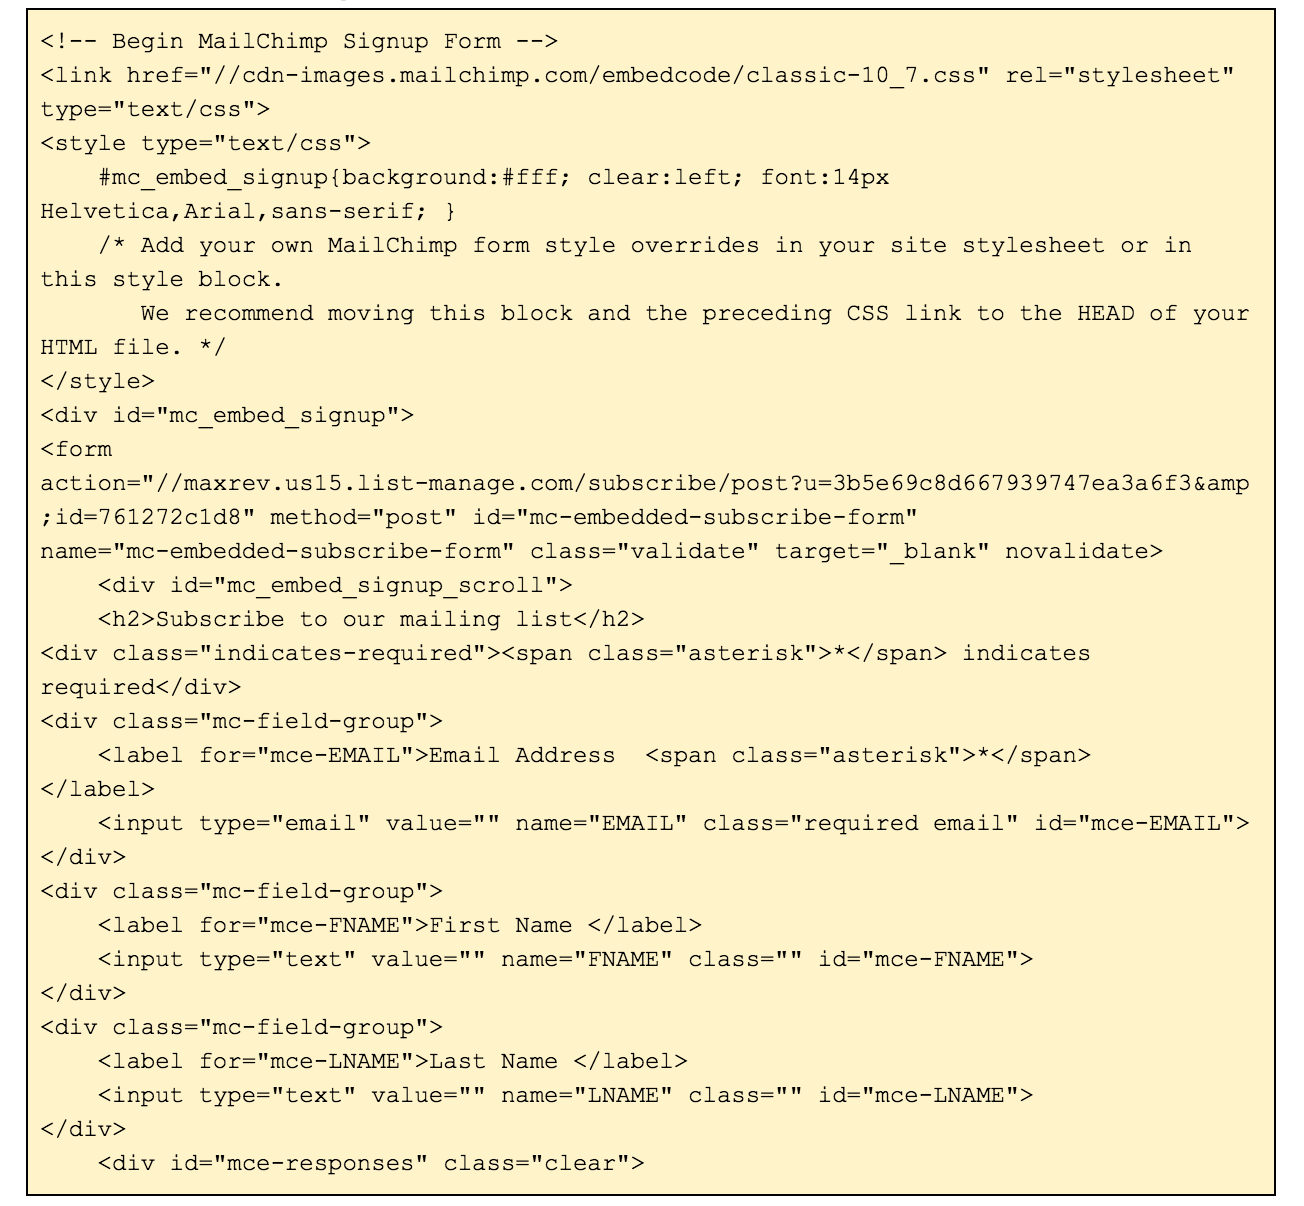
Creating a Form in MailChimp
First, go to MailChimp and log in, or create a free account. MailChimp is totally focused on email collection forms only. That means we’ll be creating a simple form that visitors to your website use to sign up to your list, after which you can send them all weekly or monthly newsletters, updates, etc. MailChimp is one of the best, cleanest, and easiest to use email list providers out there.
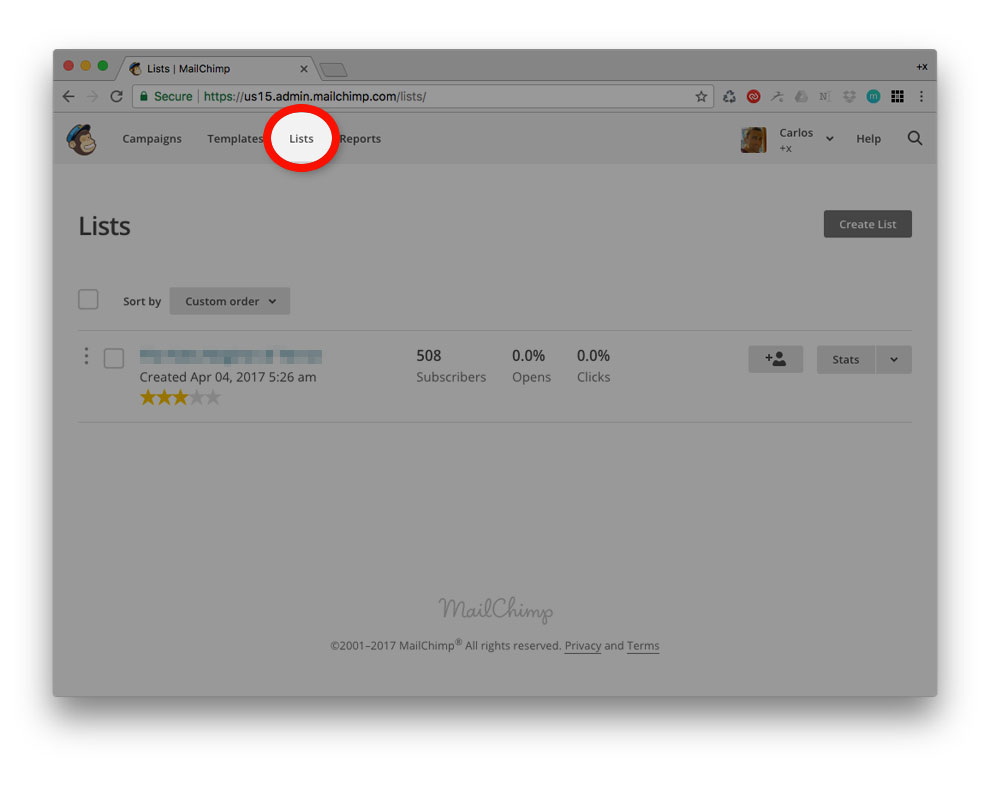
Once you’ve logged in, you’ll want to click on “Lists” on the upper left menu (see screen below). Then click on the “Create List” button to the right. You’ll be taken to a simple form you must fill out to create your mailing list. Fill this out and click “Next” to finish this step.
Now you can see your new list on the screen. Scroll down and click on “Create a signup form” to proceed (see screen below).
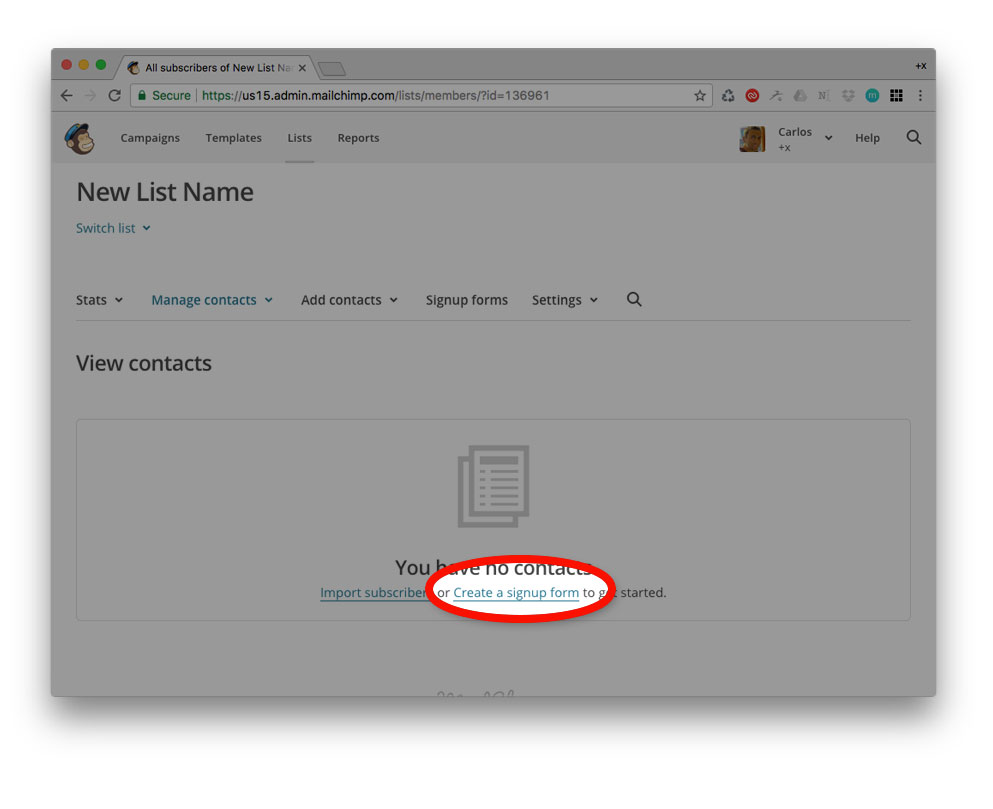
On the next screen, you’ll want to click on the “Select” button to the right of “Embedded Forms” (see screenshot below).
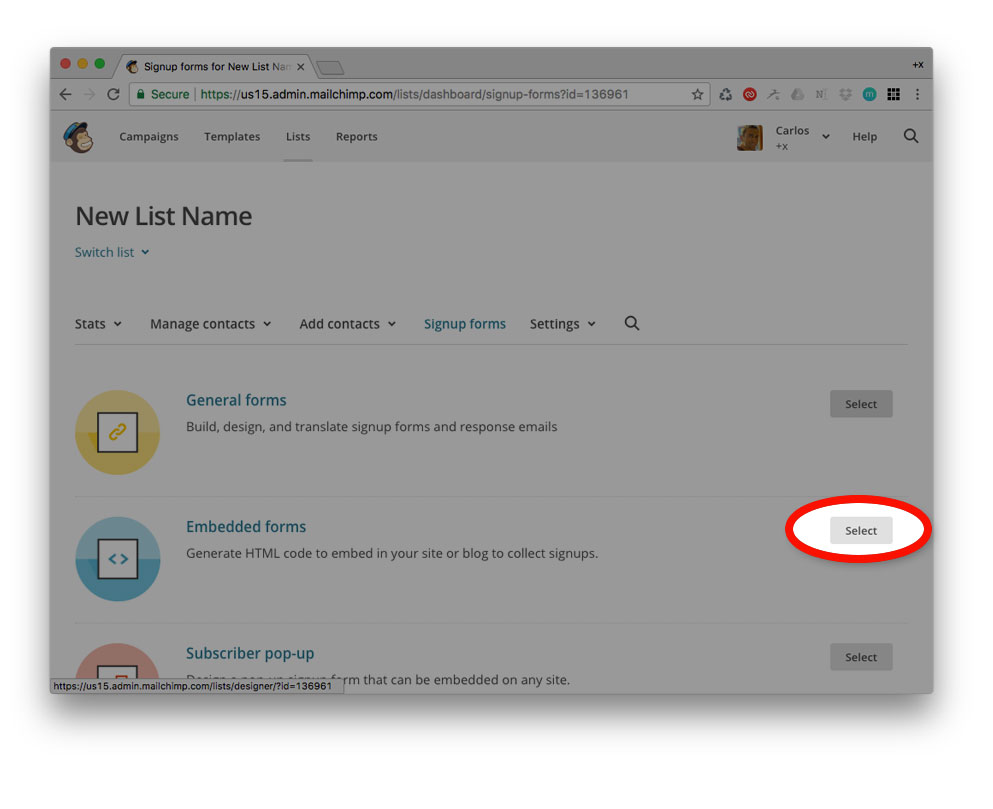
Finally, you’ll reach the form customization screen (see below)! For the purposes of this guide, let’s just leave it as is. Scroll down and click on the code (highlighted in blue in the screenshot) and copy it to your clipboard.
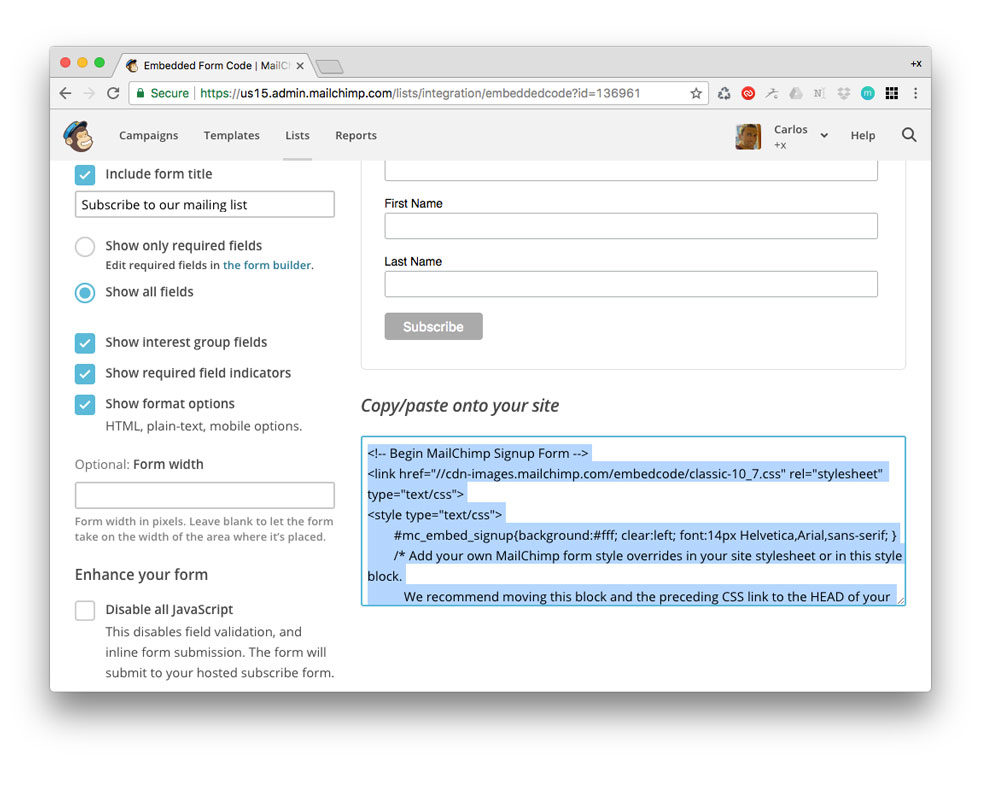
That’s it! You’ll paste this code into your website in the Embedding section below, and we’ll cover doing it on both a plain HTML5 website and a WordPress website!
Creating a Form in WordPress
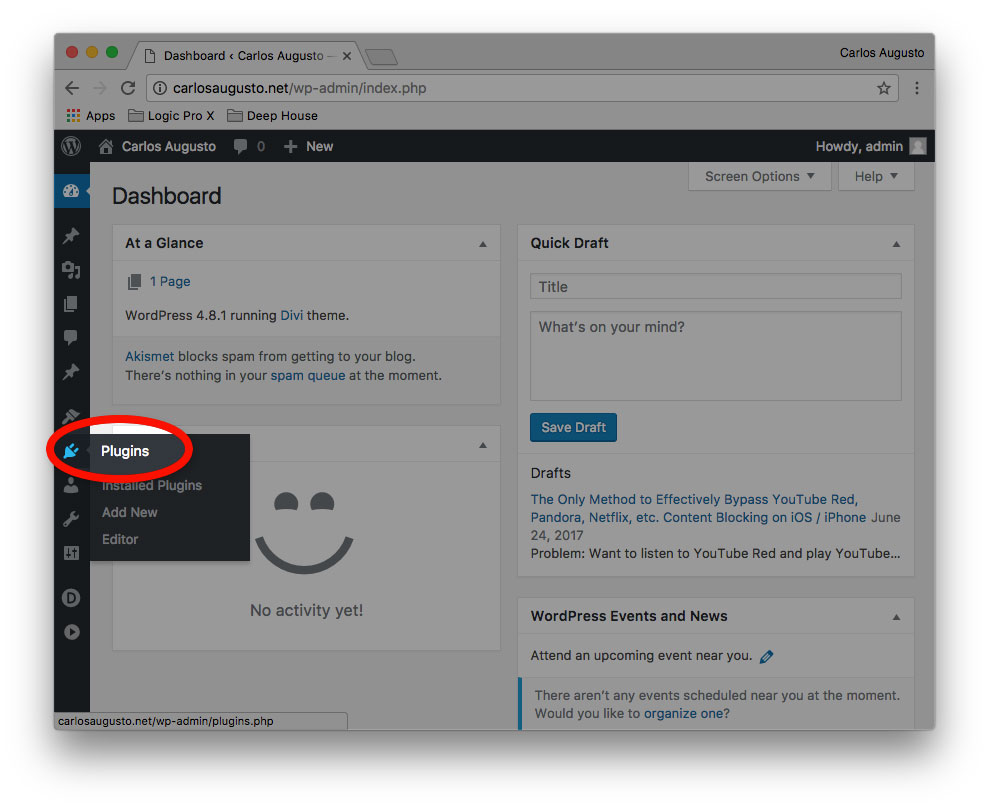
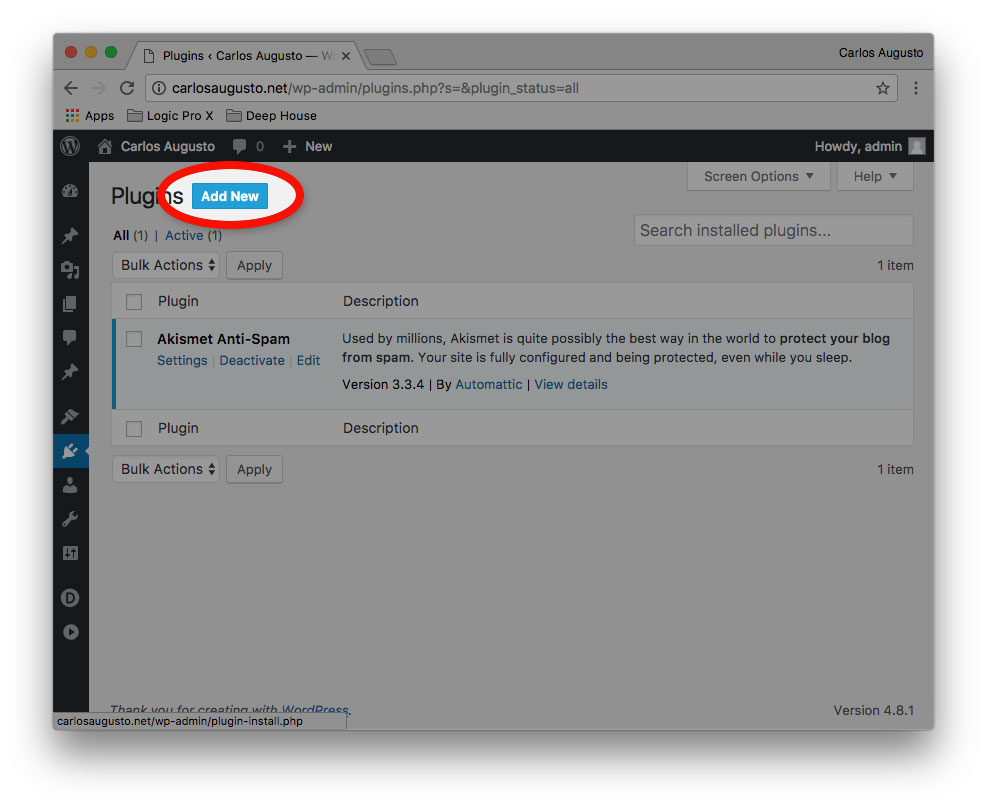
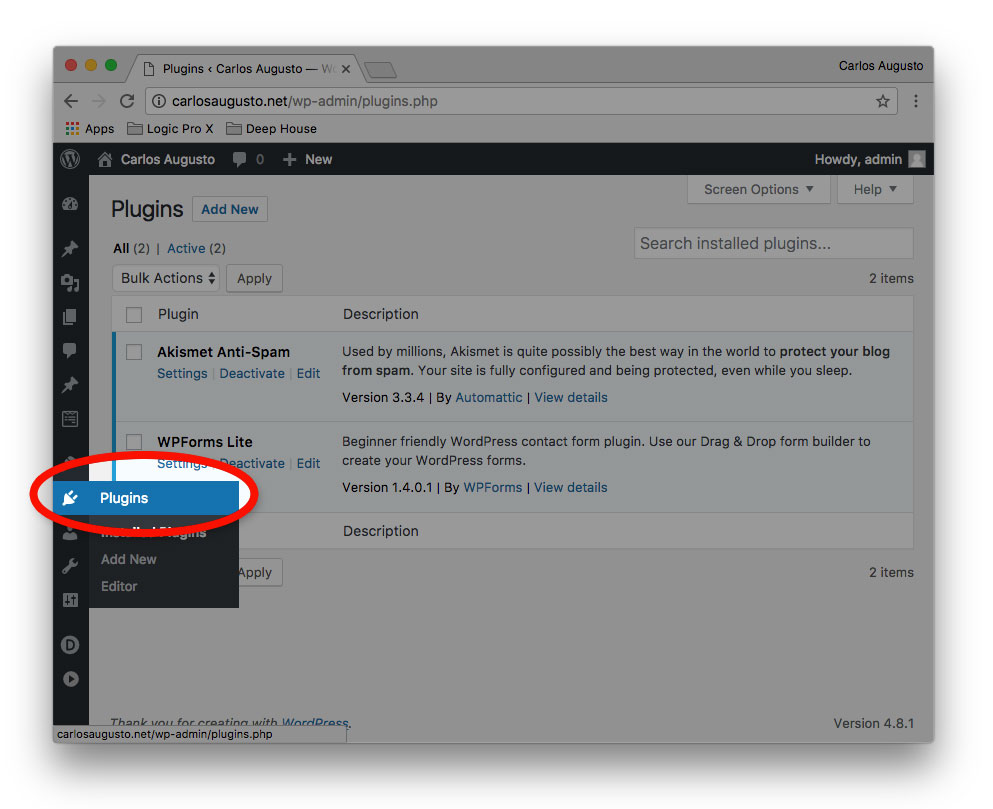
Here’s a quick tutorial on the quickest and easiest way to create a form in WordPress. This guide assumes you already have a WordPress site set up. We’ll start at the dashboard, the screen you see upon logging into your WordPress admin area. First, on the left sidebar menu, click on “plugins” (as highlighted in red below).
We recommend WPForms or Formidable Forms for WordPress.
On the very next screen, make sure you click the blue “Add New” button (as highlighted in red below) to go to the correct plugin installation screen.
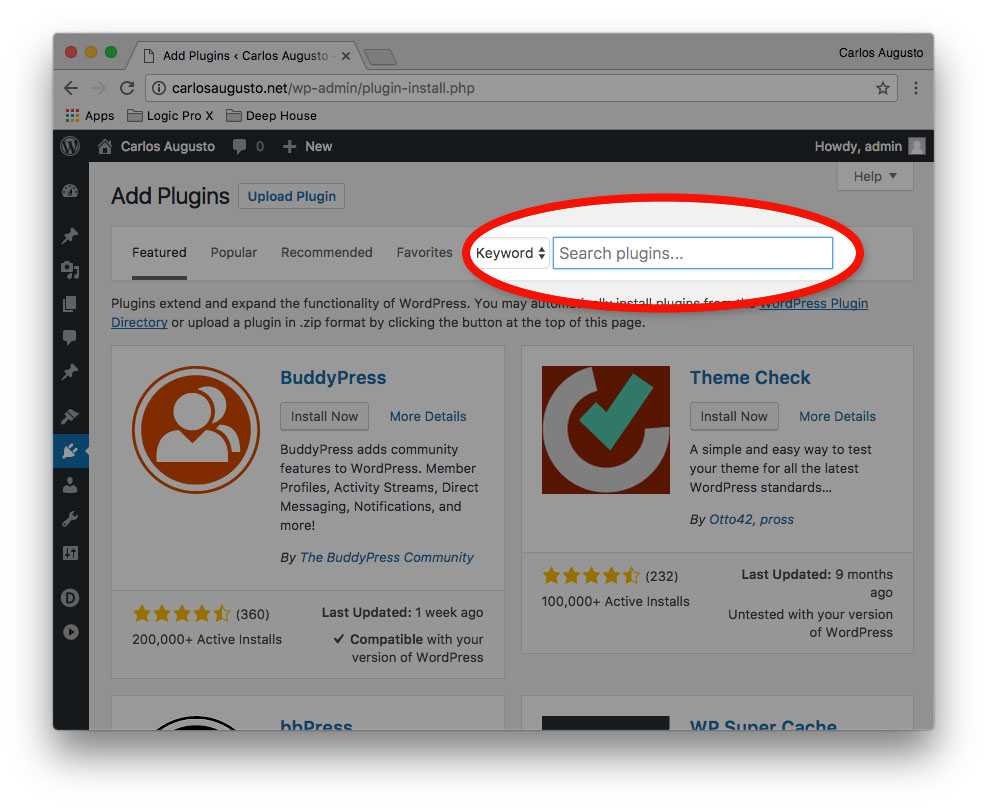
Next, type “WPForms” in the box highlighted below.
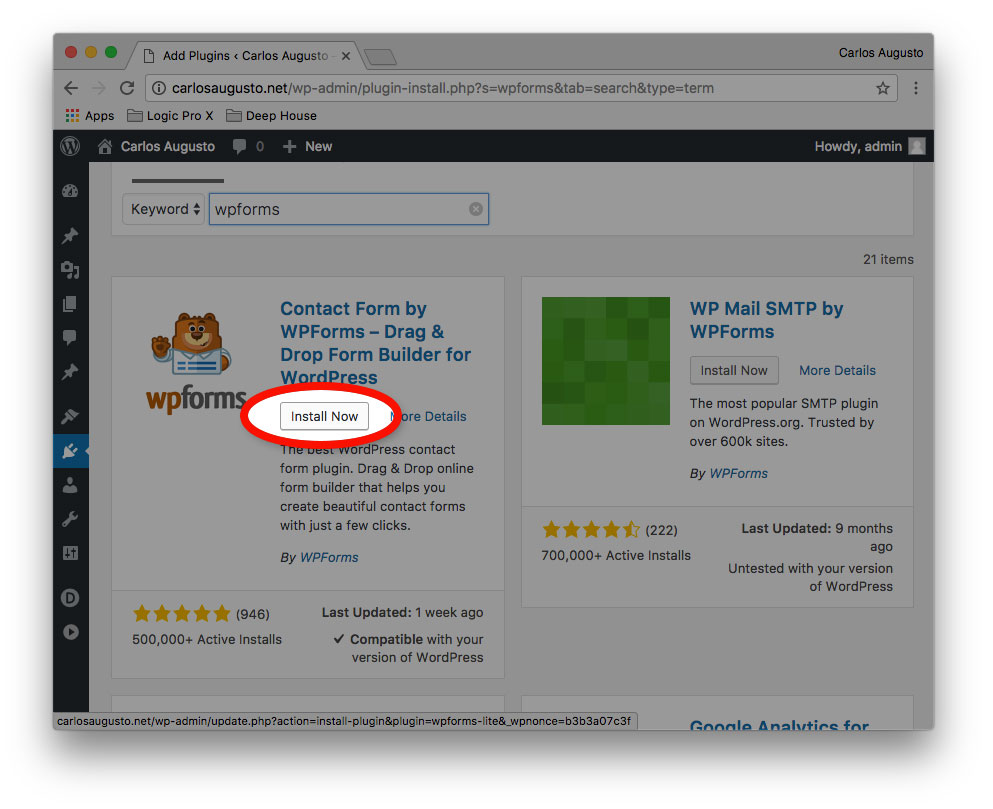
The first box that appears will be for “WPForms,” one of the best WordPress form plugins available today. Click on the “Install Now” button as highlighted, and it will change into a blue “Activate” button. Click on that as well :).
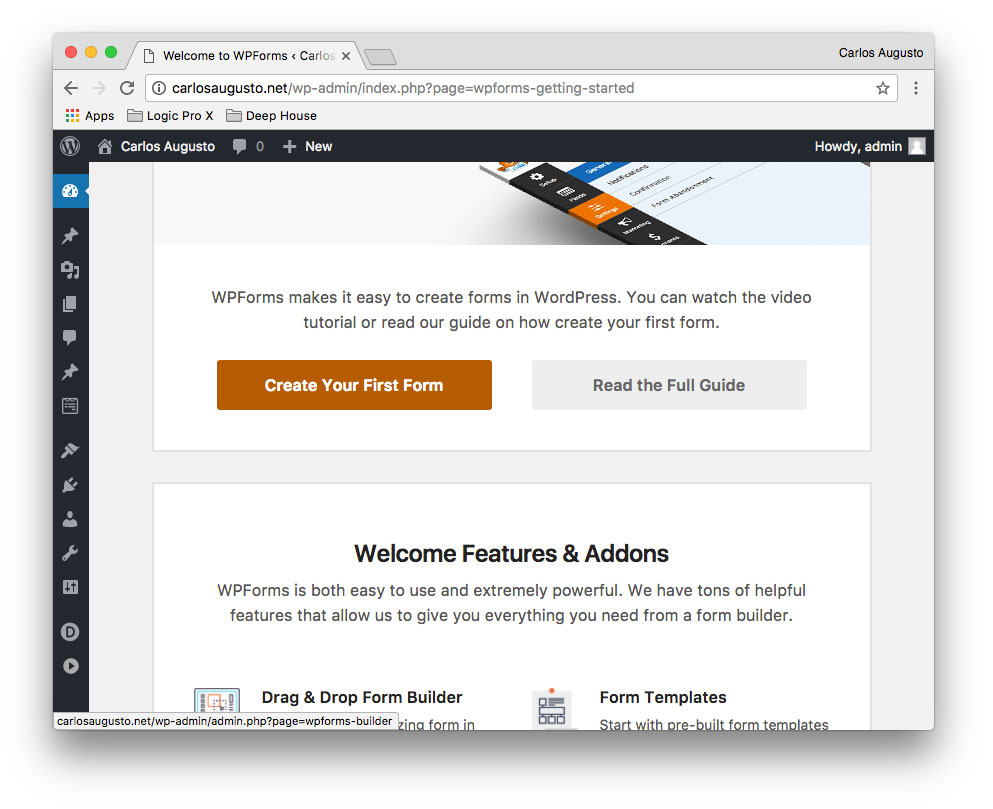
You’ll immediately be taken to the WPForms intro screen, as shown below. Click the big “Create Your First Form” button as shown.
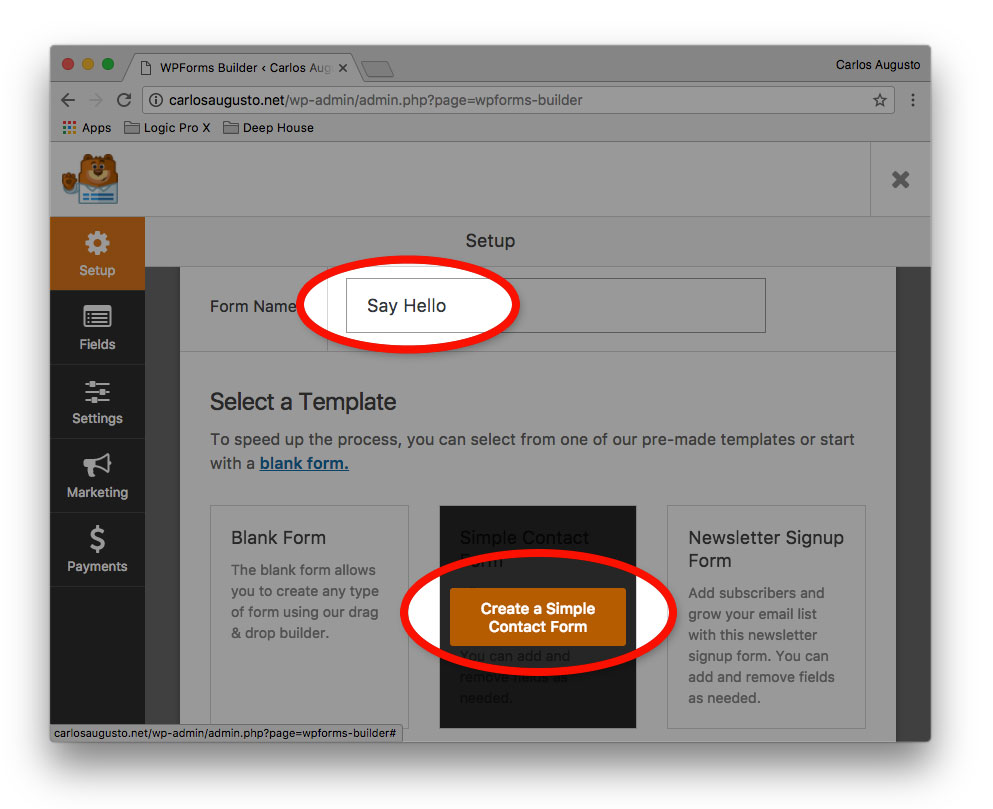
Next, give the form a title. I chose “Say Hello” for mine. Then click “Create a simple contact form” as highlighted.
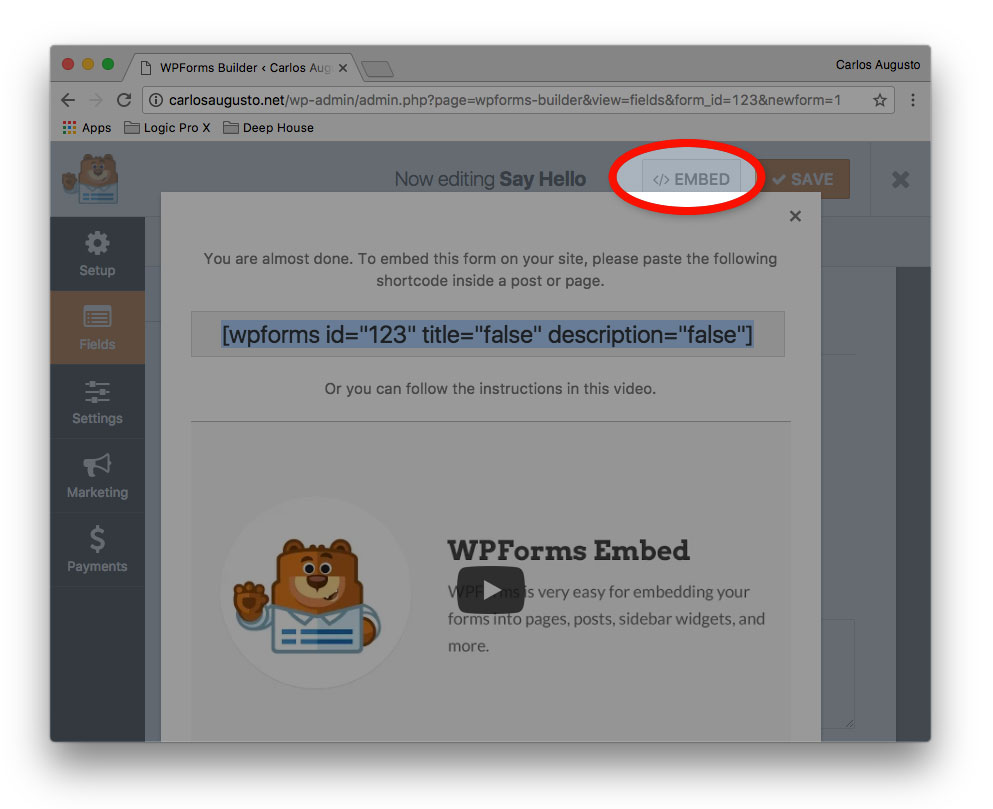
You’ll immediately be taken to a screen showing your form, including first name, last name, and email. Let’s leave everything as is for now. You can go and edit things later. For now, click on the “Embed” button as highlighted below, and the pop-up window displayed will appear. I’ve highlighted the embed code in blue but you don’t even have to copy this code (You’ll see why in a few more steps). Just click the “x” to close the window, and then the big “x” at the top right to get out of the WPForms interface and get back to the normal WordPress admin area.
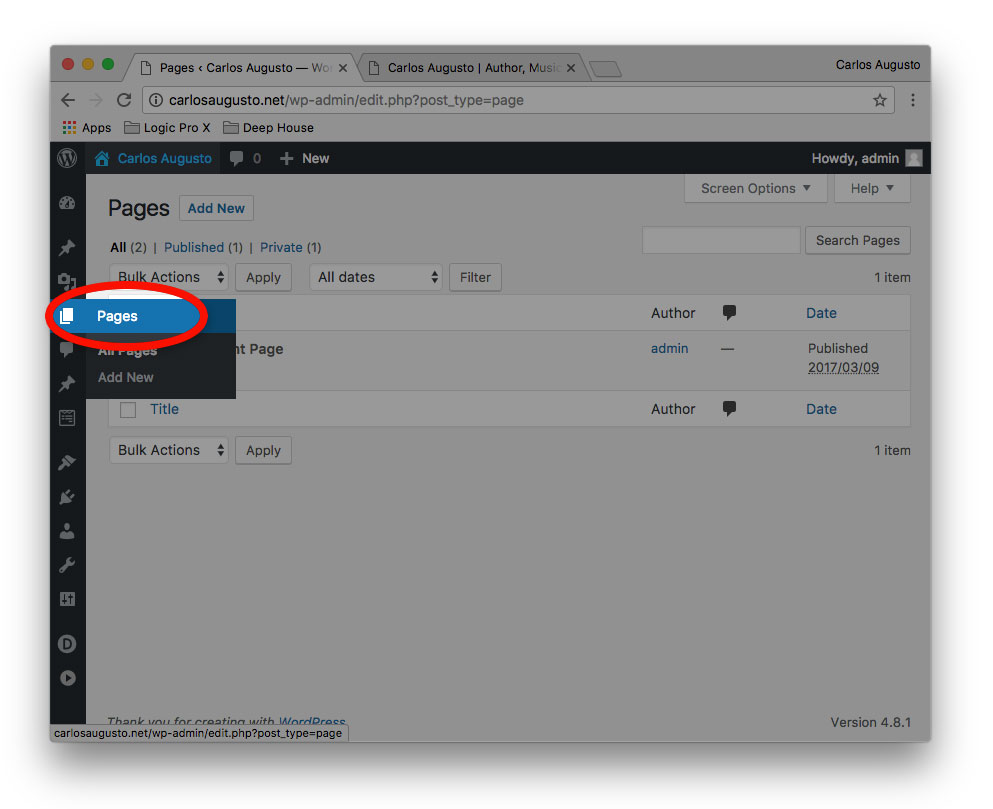
Now that you’re back in normal WordPress mode, click on “Pages” as shown below, in the left sidebar menu. This is where we’ll temporarily activate the form, for now.
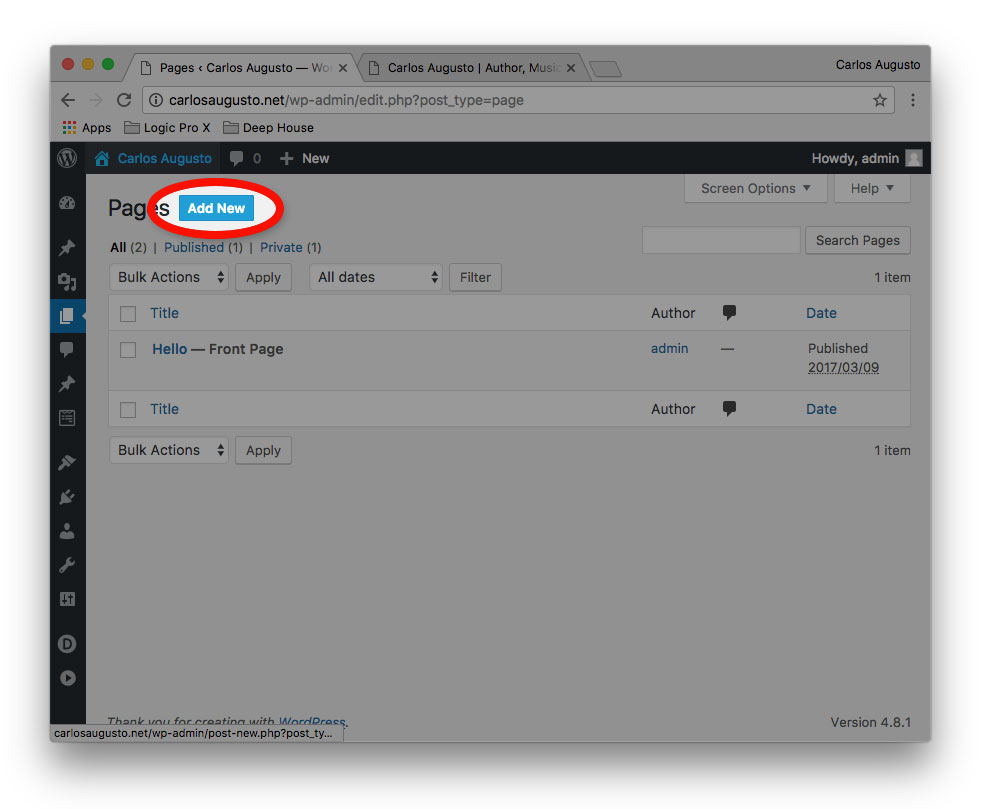
Next, click “Add new” at the top left (as shown below).
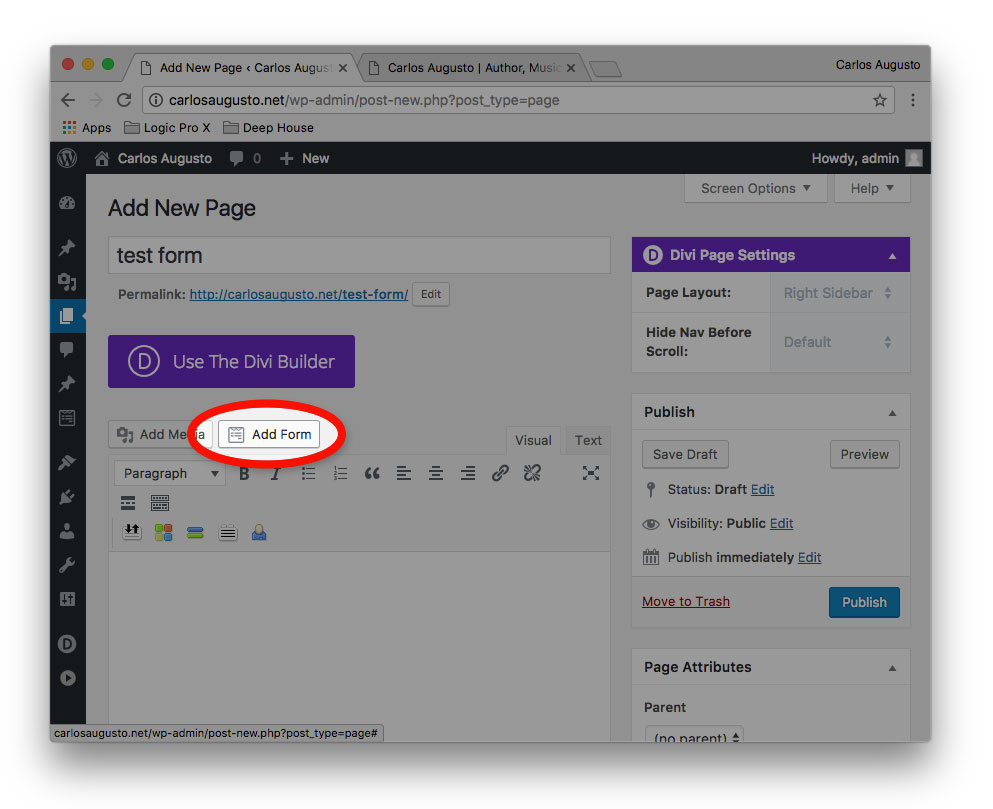
Now you’ll be in the page editing screen. You probably won’t see the big purple “Divi Editor” buttons I have but ignore that. You’ll see the highlighted button “Add Form.” This button exists because you installed the WPForms plugin (WordPress plugins can add little menus and buttons all over the place, in fact.). Click on it.
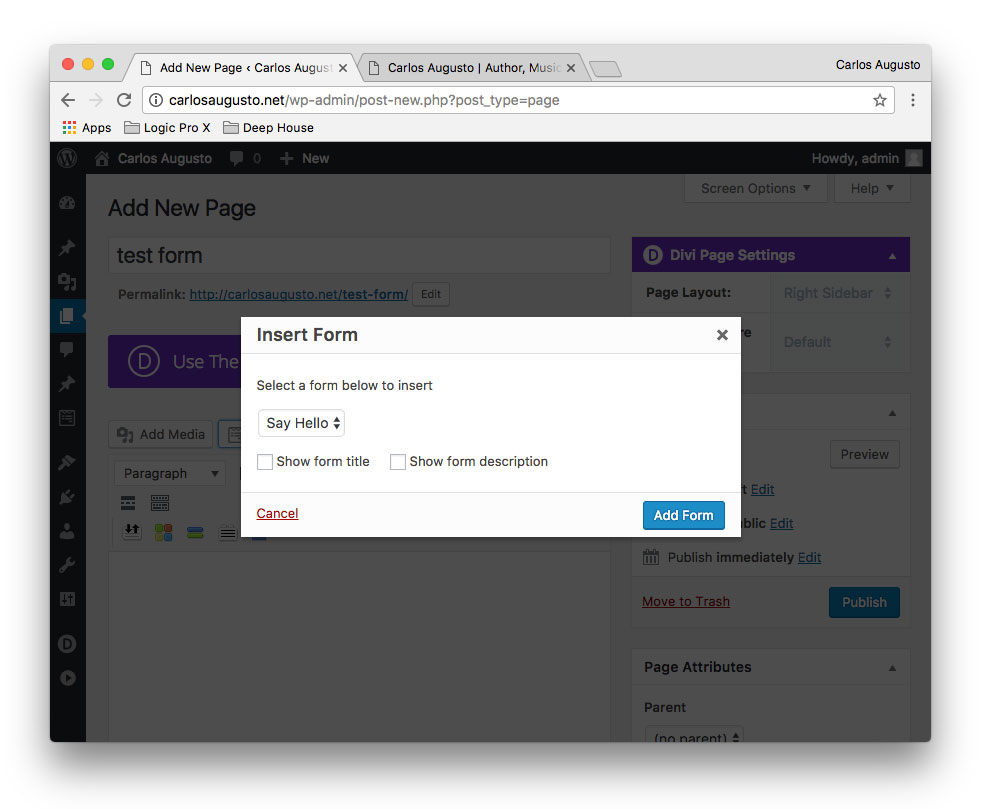
You’ll see a pop-up with our “Say Hello” form showing as the first choice in the drop-down. Just click the blue “Add Form” button at the lower right of this window to move on.
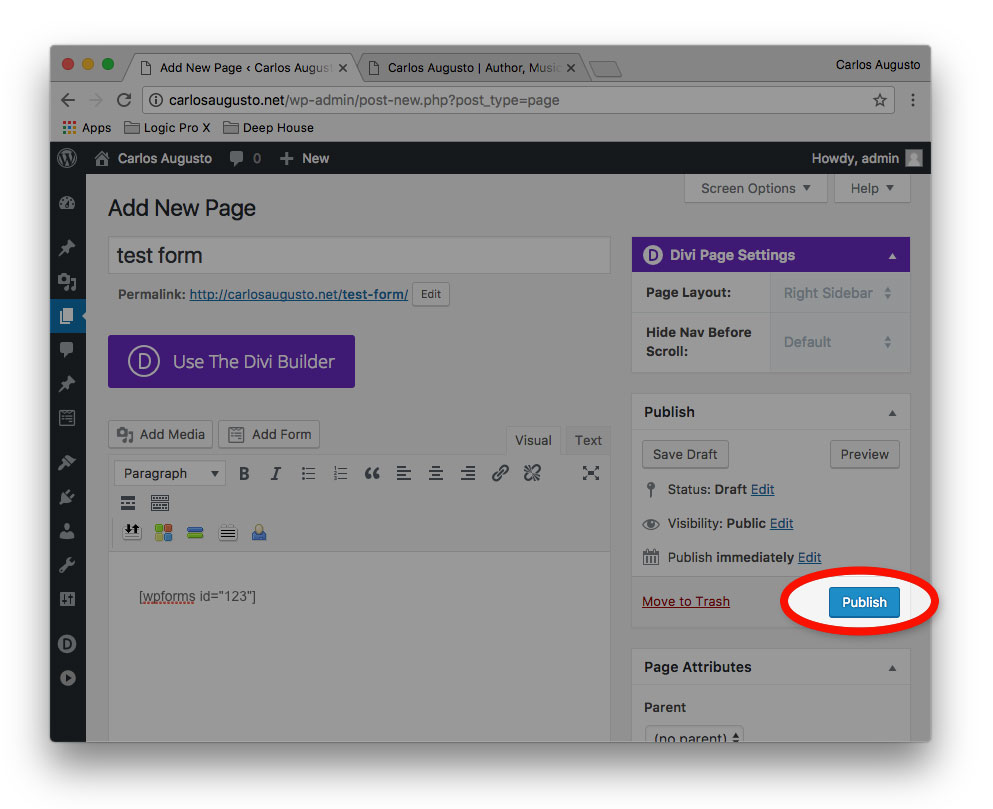
Now you’ll see the shortcode text that you didn’t have to copy earlier automatically inserted into the editing area :). Now just click the blue “Publish” button as highlighted below.
Once that’s done, you’ll see a box at the top of your screen that says “Page published. View page”. Click on that link (as shown) to view your brand new live form!

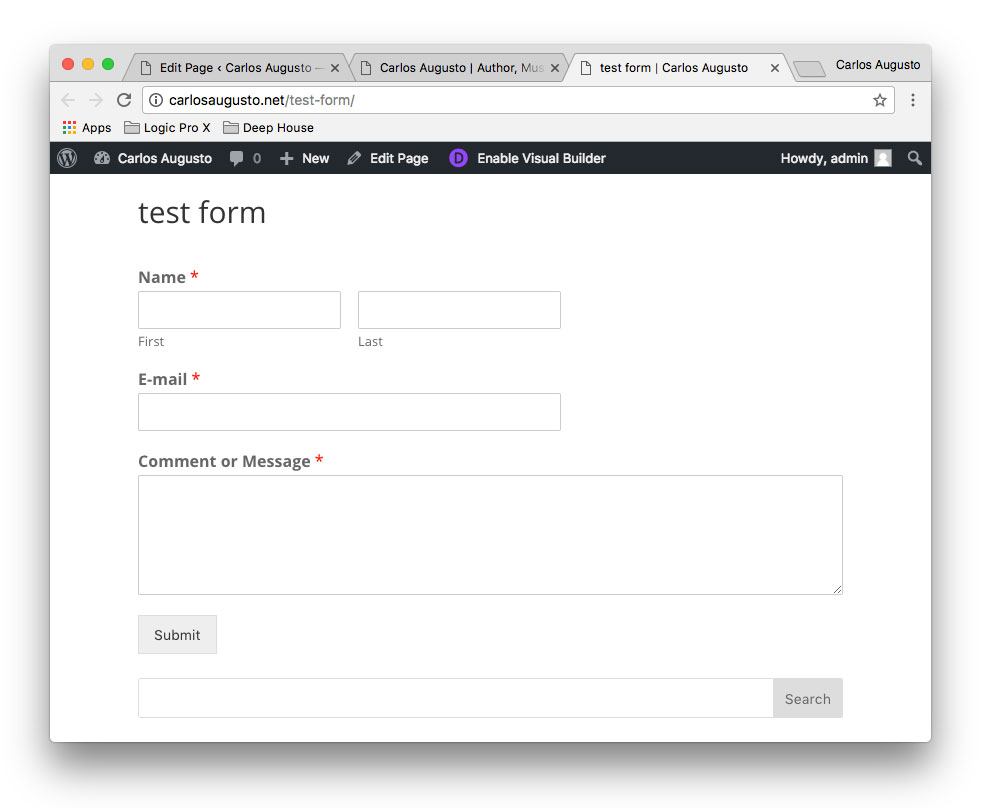
Yep, a basic form. Looks good! If you fill it out and click submit, it would be emailed to the email specified as the WordPress administrator’s email address. Let’s go back and double check that you have this the way you want it. Close out of your live form and go back to the WordPress admin area.
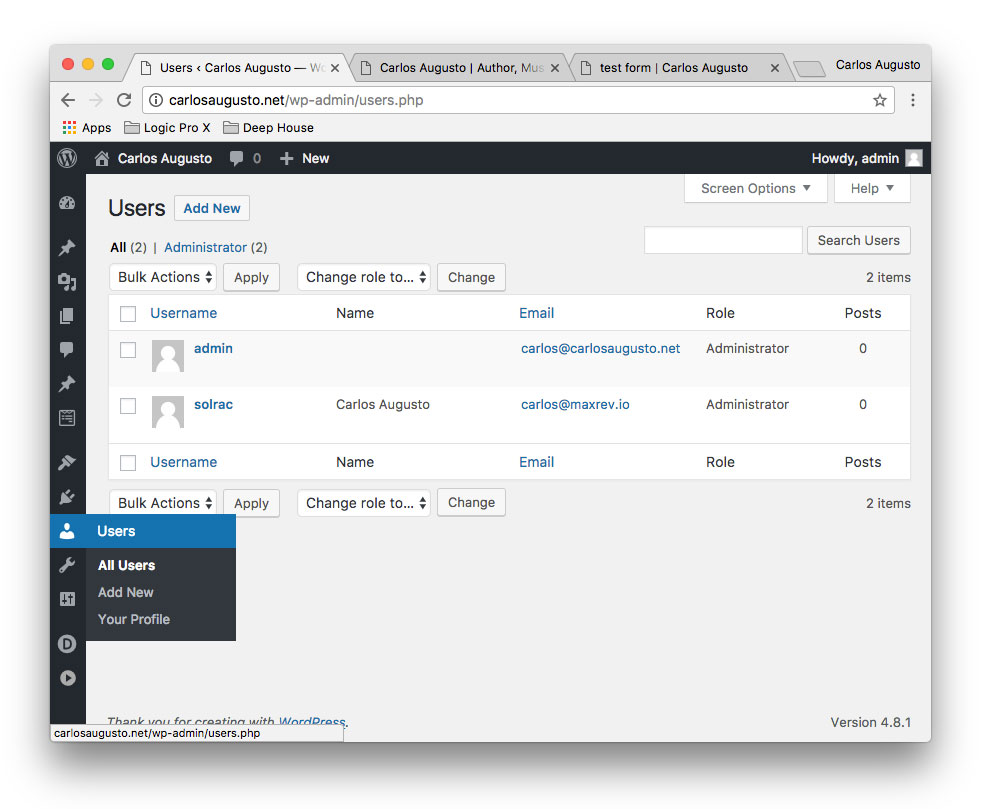
Again, on the left sidebar menu, click “Users” (as shown popped out in blue below). The first user is the admin account, and please ensure the email is correct. If not, or if you’re not the admin, you can go back to the WPForms settings screen by clicking on “WPForms” in the left side menu (just three above “Users” ;-).
That’s it! Be sure to fill out your live form and make sure it goes to your specified email address correctly. You can add the form to any page or blog post by clicking that “Add Form” button on any page or post editing screen.
What’s great about WPForms is that with the pro version, you can get plug-ins for MailChimp and lots of other marketing tools. I also find that its plugin interface is really sleek and nicely designed. Gravity Forms and Ninja Forms are also two other well-known, wonderful WordPress form plugins you can try out as well.
Creating a Form in PHP
This section will outline the basic steps of creating a form in straight PHP for your website. This is pure HTML and PHP code — no WordPress, no embedding a third party form, just pure coding! This is by far the most complicated method, and the steps in this section might well generate many more questions for you than there are steps! Still, almost any good content creator, marketer, or basic website owner should have a basic familiarity with these tools and this method of editing a website.
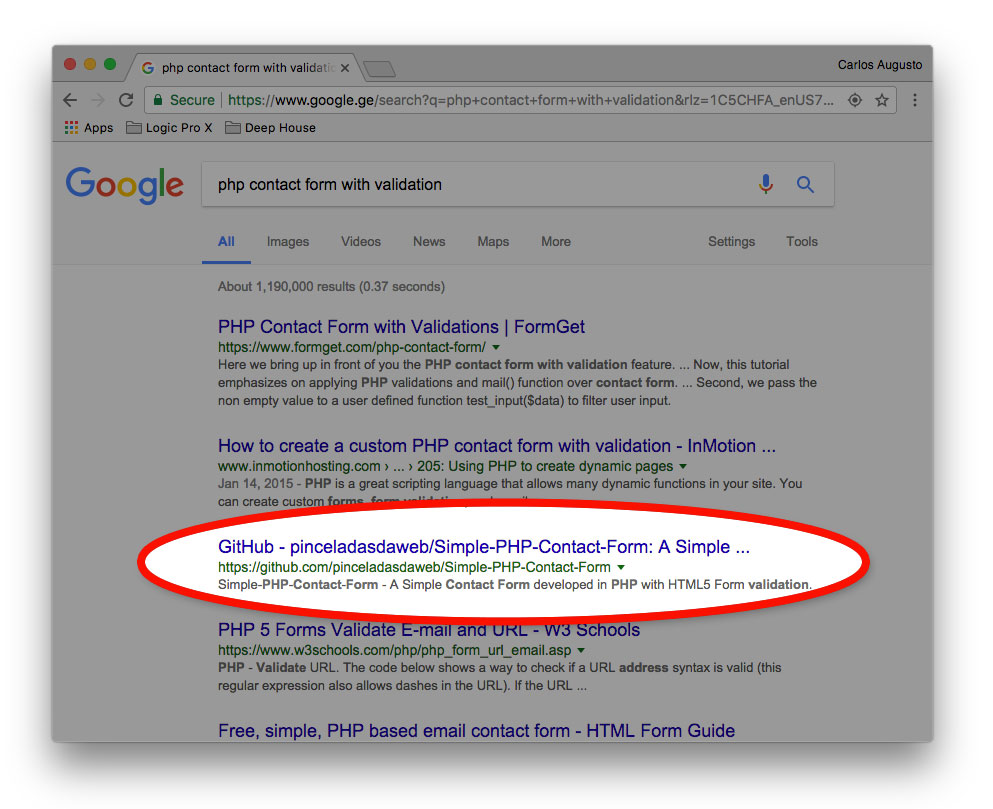
We’re going to start with a basic Google search for “php contact form.” Google automatically suggested I add “with validation” to my search, and as a web developer I agreed (see image below) — validation basically means the little messages that pop-up when you leave a form field blank, for example, which says “this field cannot be blank”.
In the red circle shown below, I’m showing the search result on GitHub, which is a huge community where typically great developers share their code. The top engineers in the world who earn six-figure salaries showcase their work on GitHub. Furthermore, any project on GitHub can be downloaded without any annoying email subscription pop-ups. Let’s check it out!
Once you’re on GitHub, look for the green “Clone or download” button on the right side of the page. Click on it to reveal a small pop-up. Click on “Download ZIP” (highlighted below). If you’re a seasoned developer, you might choose to clone the project into your own git repository (what GitHub is named after), but if you knew how to do that you probably wouldn’t be reading this guide ;-).

The ZIP file has downloaded into your downloads folder by now, but before we go looking for it, I must stress that you should scroll down every time you’re on GitHub and read (or at least skim) the documentation for the project! This is what those aforementioned seasoned engineers would call RTFM, which is short for “Read The …. um… Fahrvergnügen… Manual” 😛
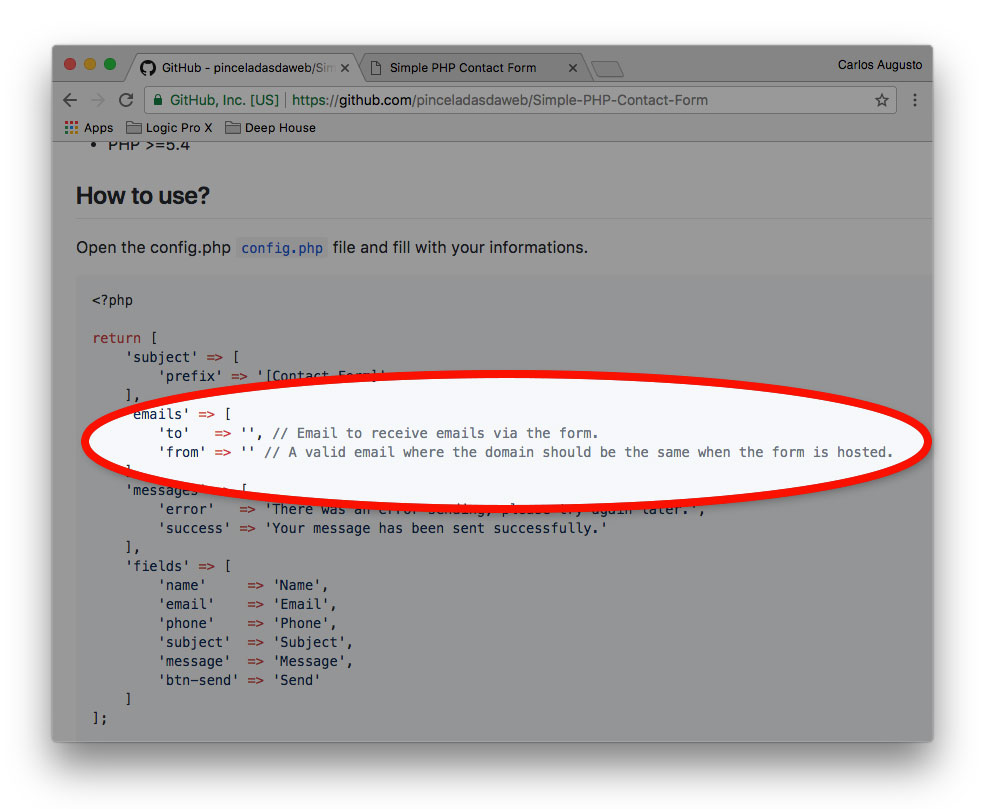
In the highlighted section below you see that you must edit the file called “config.php” and fill in what your from and to e-mail addresses will be so that the contact form can properly send out emails. If you just rushed straight to the ZIP file first, you would end up being lost and frustrated for hundreds of hours until you threw your computer over the cliff you happened to be sitting next to while working on this contact form.
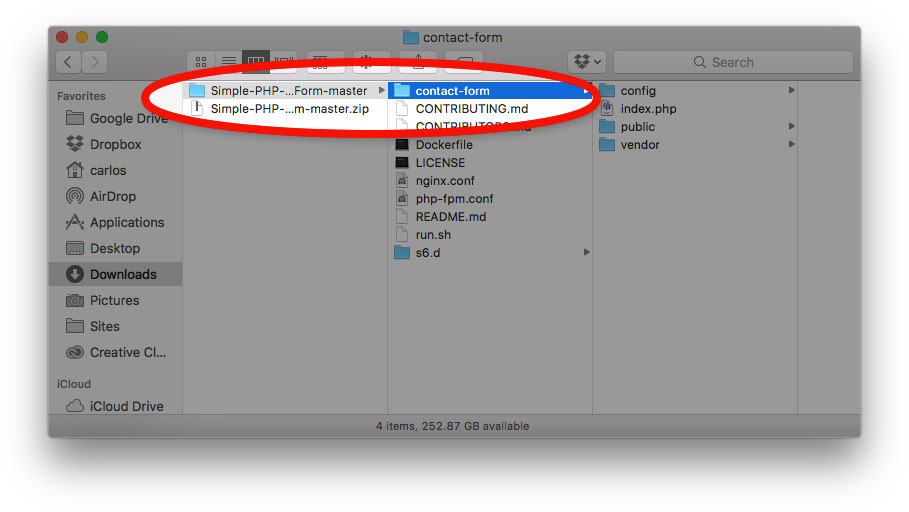
In the next screen below, I’m showing the ZIP file that was downloaded to my “Downloads” folder in OS X, which I use on my MacBook Pro. If I had a Windows machine, this could be in a different place, of course.
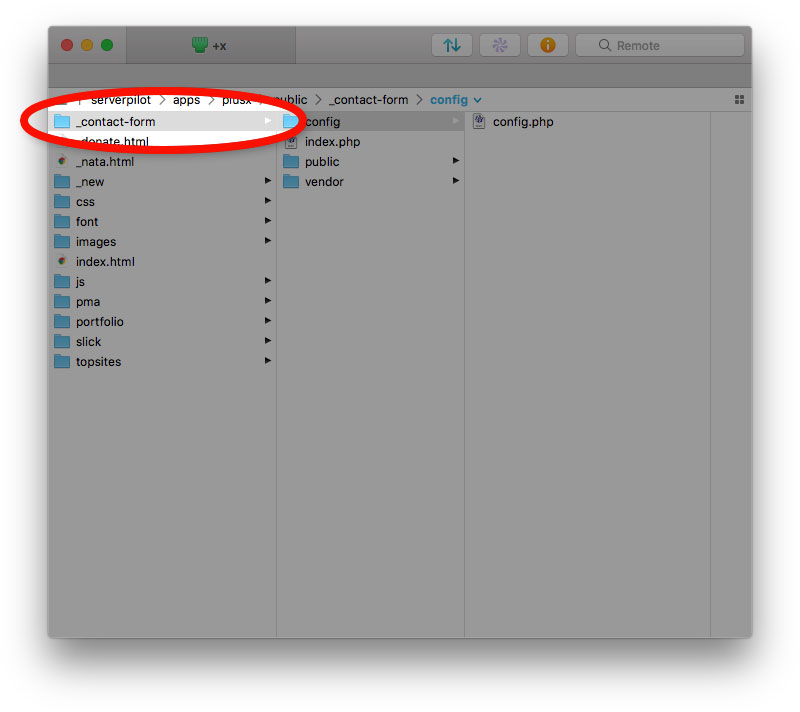
Notice inside the outer folder there are a bunch of files and a folder named “contact-form” at the top of the list. Generally, this outer listing of files are very techy developer stuff and you don’t need to worry about it. The file named “README.md”, for example, is actually the exact same information in the instructions on any Github project that I had you read in the previous step. So the basic pattern is that you’ll take the project folder (in this case named “contact-form”) and just drag that into your FTP program to upload it to your website.
Again, this step can vary wildly between Mac, Windows, Linux, and whatever FTP client you use. I’m using Mac OS X with the latest version of Transmit (version 5), possibly the best FTP client ever made! I’ve already set up a connection to my website in Transmit’s settings (you’ll need to know how to do this with your FTP client). But once you’re in, you’ll see something like the screen below, which is a listing of all my website files. Notice in the red circle below I just dragged the “contact-form” folder into my FTP window and it’s been uploaded to my website. (I also renamed it to “_contact-form” with an underscore at the beginning of the filename so that it goes first in the list alphabetically.)
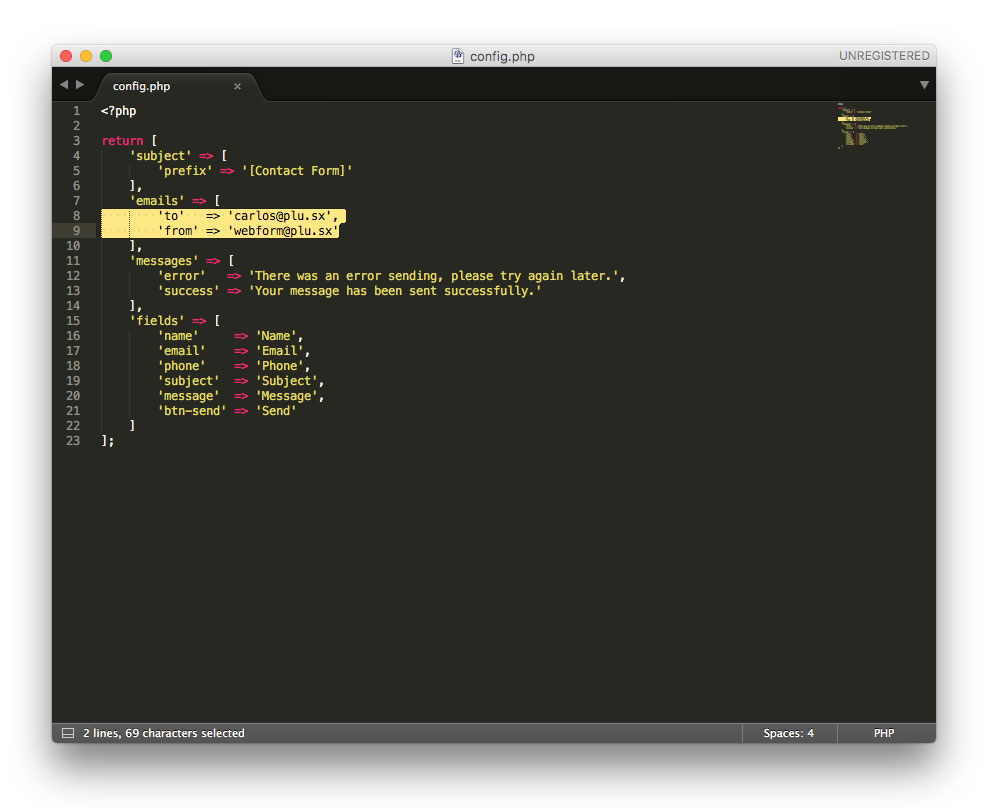
Notice also that I’m inside the “contact-form” folder, which contains the “config” folder, and within that there is our special “config.php” file. This is the one you know you have to edit if you had read those GitHub instructions above! One really cool thing about Transmit is that I am able to configure it to open any text files I double-click on directly into my text editor, Sublime Text 3 (which is one of the best code editors on the planet)! This lets me skip the whole process of downloading the file, opening the downloaded file, and then re-uploading it after editing it. Instead, it just opens right in Sublime Text (with color-coded text to boot), and when I hit Cmd+S (to save the file), it automatically re-uploads to my website!
Below you’ll see how my text editor looks. I highlighted the part we need to edit in yellow. Notice I filled in the relevant sections with my email addresses. I put my personal email address in the to section, and the from section is from a “webform” address which is fine; this is just a simple contact-form test. A real setup might have used “info@” or “no-reply@.”
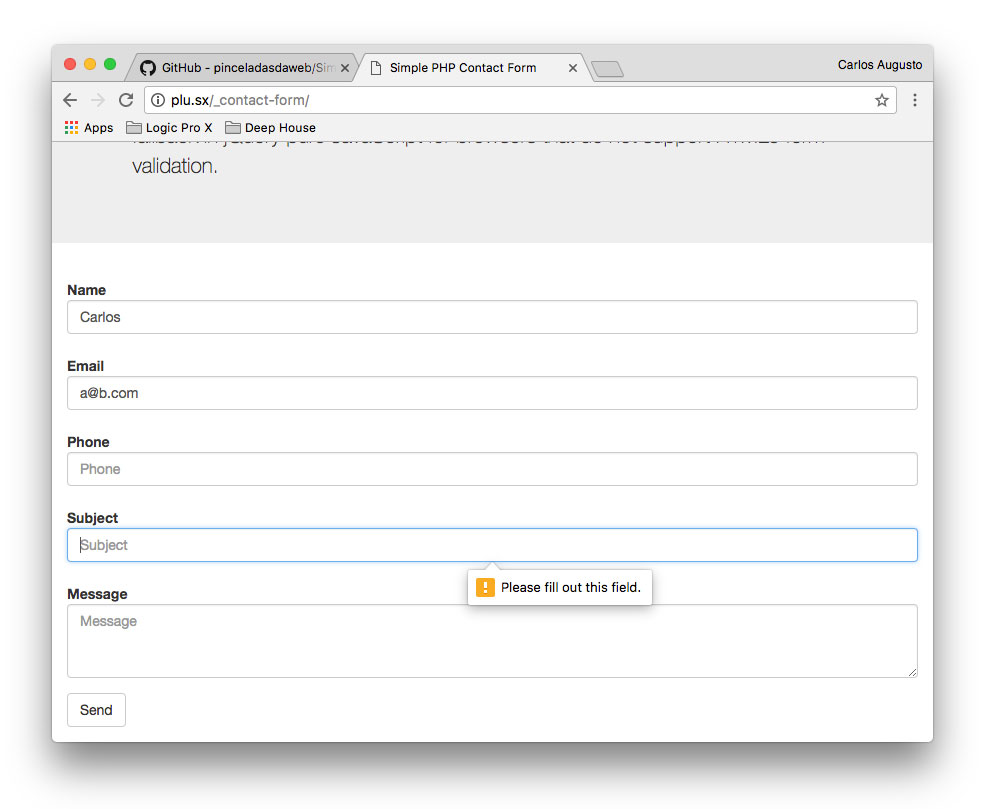
OK! After editing that file, our contact form is finished! We can go right to the live URL: https://plu.sx/_contact-form/index.php. Notice the form looks pretty nice, and the form validation works if you try to hit send without filling everything out.
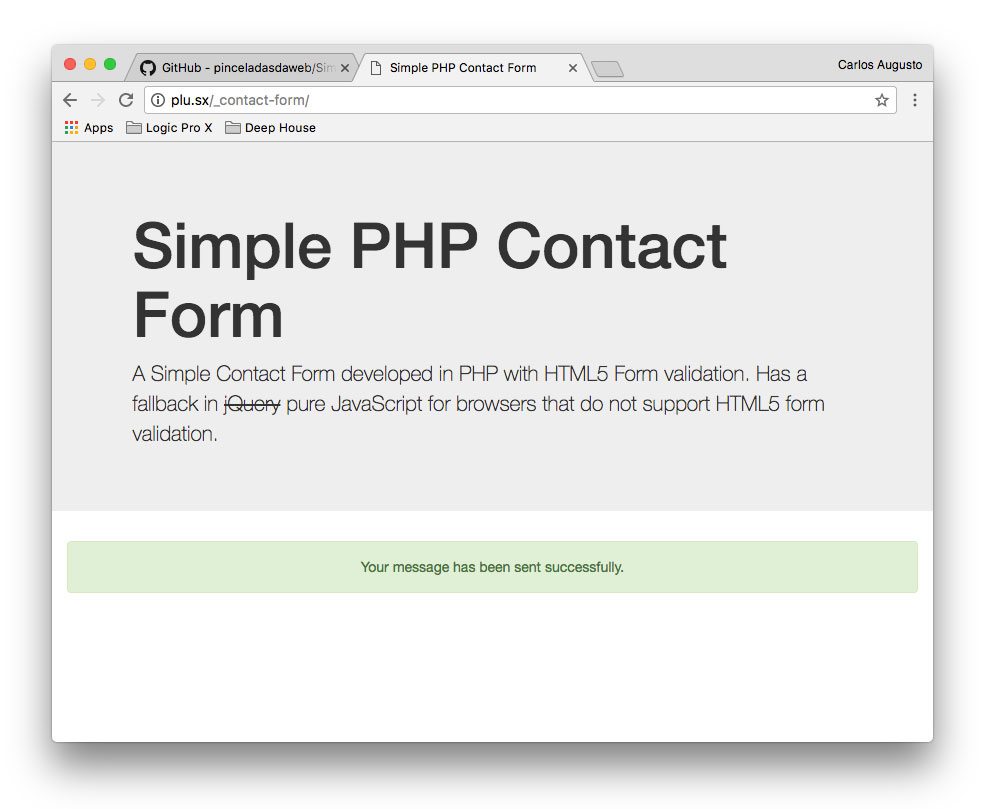
Once you fill out the form correctly, you’ll get to the final screen after hitting send. The form message displays “Email sent successfully.” Great!
But beware!! Just because the contact form thinks the message went out to you doesn’t mean you’ll get an email. Again, this step can vary wildly as there are thousands of server setups, web hosting companies, and PHP configurations that can cause any number of issues. If you actually don’t get an email, you’ll have to troubleshoot your server (or call your hosting company) and ask them what went wrong. Taking a look at the “SimpleMail.class.php” file hiding within the “contact-form” folder I can see it’s using the PHP “sendmail()” function to handle e-mail delivery. Luckily for me, this worked fine without any further headaches and the contact-form was working fine at this point.
That’s it! As you can see, the PHP version of this guide is very involved, wrought with potential mishaps, very hard to troubleshoot, and fraught with terror! Now you can viscerally see why companies such as MailChimp are so successful. They handle all the server setup and code on their end and just give you a simple embed code. The amount of complexity is reduced by up to 99%, and the ease-of-use increased conversely.
But if you’re set on using a PHP solution, then you should be adept at completing all these steps, and you do, in the end, have ultimate control over how to customize the form and how it works. There are virtually no limits to what you can program with HTML, PHP, and Javascript. For instance, you could make your contact form email you, save the visitor’s name to a separate database, and even connect to MailChimp or any of the other services we went over, all from one single click of the “Send” button.
Embedding a Form Into Your Website
In this section we’ll cover embedding a form on your website, both in WordPress and in straight HTML.
First, choose which embed code (that we generated in one of the sections above) you’ll want to use:
Here is our MailChimp embed code
Here is our SurveyMonkey embed code
Here is our Google Forms embed code

Interestingly enough, each of these services uses a different embed approach. MailChimp just gives you a plain block of HTML. SurveyMonkey gives you a block of javascript which creates the form HTML for you. And Google forms gives you an iFrame, which is like a little window directly to their website. Each of these methods requires that you either paste the code somewhere in between the <body></body> tags on one of your web pages for a plain HTML page or in the appropriate area of WordPress if you’re using that. Let’s review each:
Embedding Your Form in a Plain HTML Website
You’ll need to have an FTP client to access the files on your website and paste the code within. What you’ll end up with is a page similar to this demo page I’ve prepared on my website.
Here you’ll see the contact forms we created above, and if you choose Cmd+Opt+U in Google Chrome you’ll open up the “view source” page which will display the HTML code for this page. If you read through this code you’ll see how the various embed codes above were simply pasted below the page’s top <body> tag. I added a small bit of CSS to center each form in a nice box and pop them out from a gray background so it’s easier for you to see them.
Embedding Your Form in WordPress
First, you’ll have to be logged in to your WordPress dashboard. Again, this assumes you have WordPress set up already. So in that case, log into your WordPress admin area and we’ll start by clicking the “Plugins” menu circled in red below. Then click the “Add New” button on the top left of the Plugins page shown below.
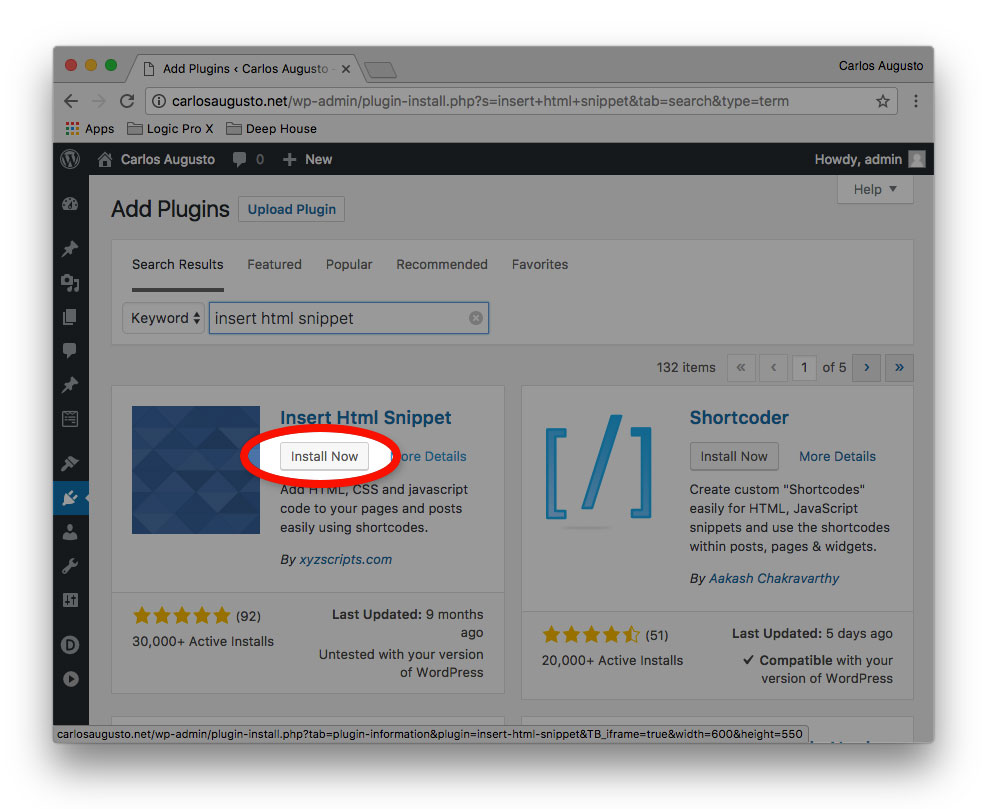
Note: We’re going to find and install the XYZ Snippets plugin which helps preserve HTML perfectly. If you try to paste HTML or Javascript directly into a WordPress post or page without any help from a plugin like this, you may get wonky effects because WordPress likes to add a bunch of formatting stuff automatically.
Now type “insert html snippet” into the plugin search field and you’ll see the screen below. Click “install now” (circled in red below), then immediately after click “Activate.”
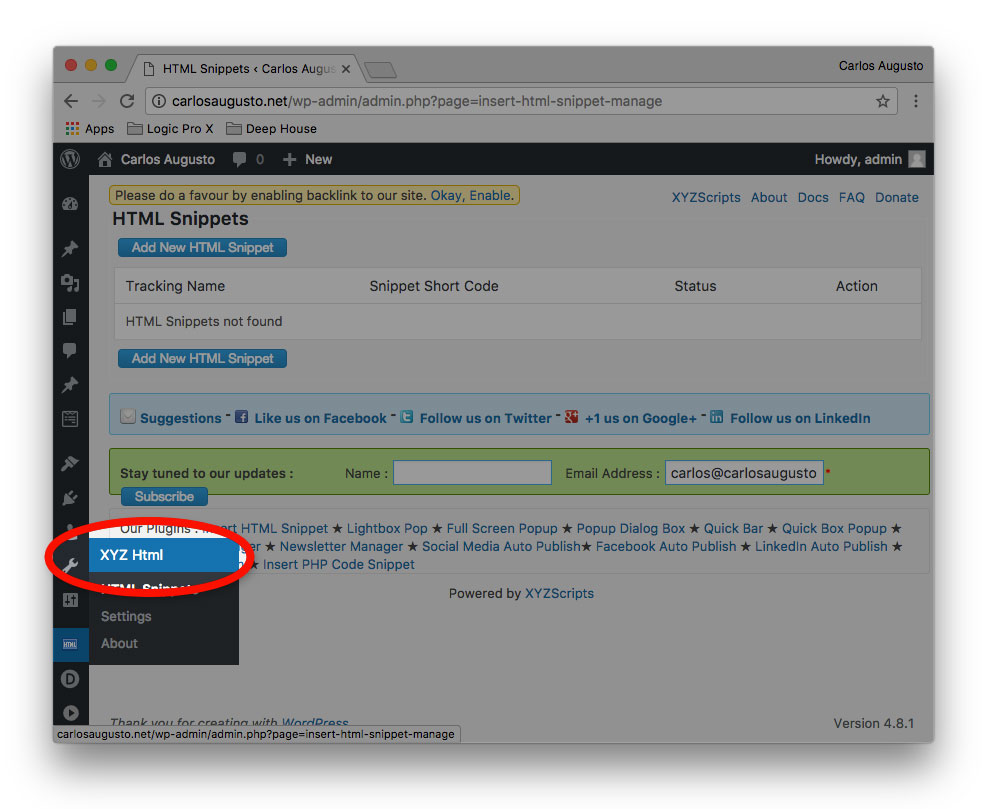
Once you’ve done this, you’ll have the “XYZ Snippets” menu in the left side-menu in WordPress. (See circled below.) Click on that to get to the plugin page, then click the blue “Add New HTML Snippet” button at the top of the page.
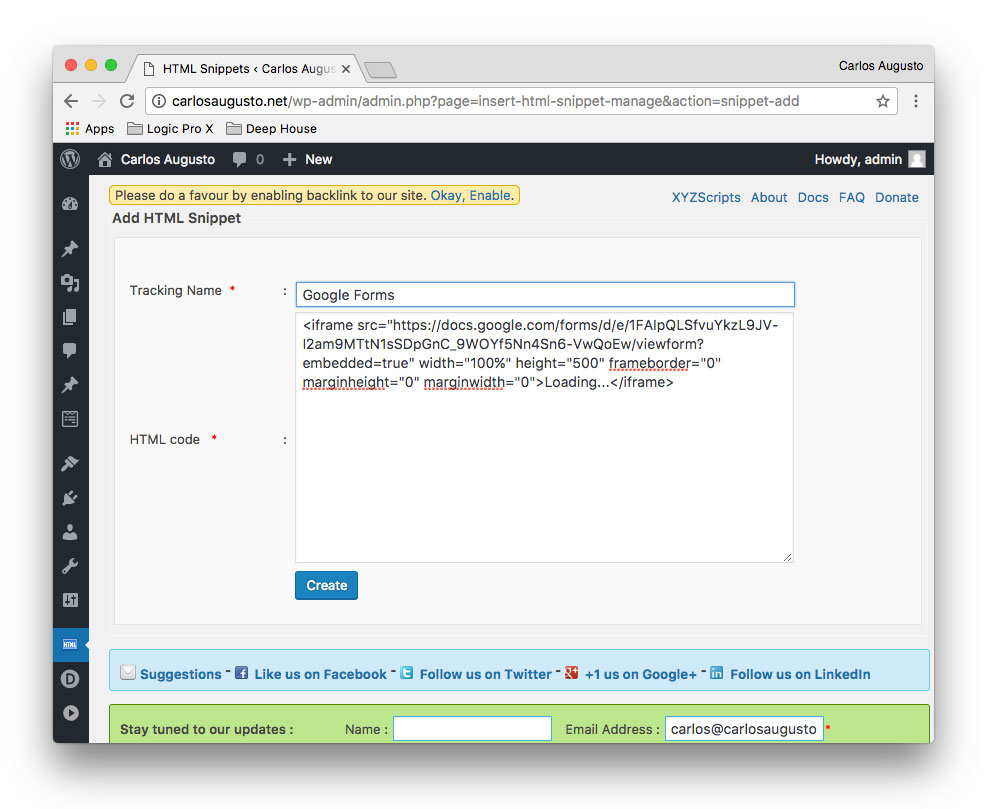
Now in this next screen below, let’s just call the snippet “Google Forms” and let’s just paste the Google Forms HTML code we showed above into the form. Finally, just click “Create.”
Now you’ll see the screen below, with the HTML snippet shortcode highlighted in blue below. You could select it here and copy it, but you won’t have to. Let’s just move on.

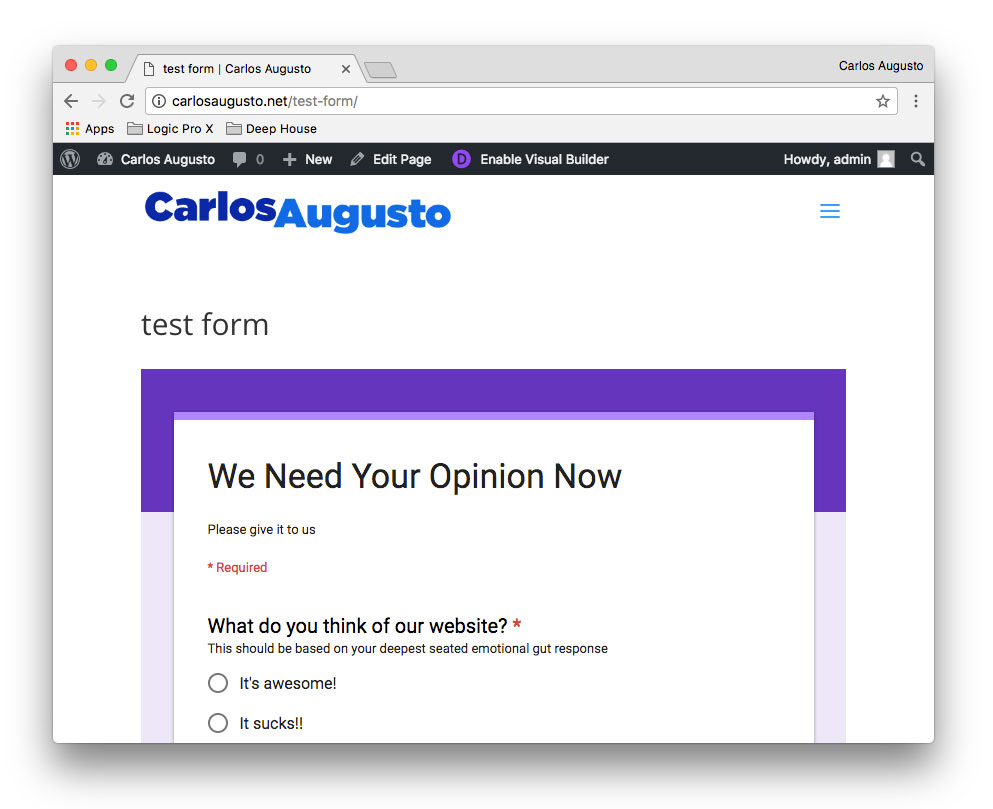
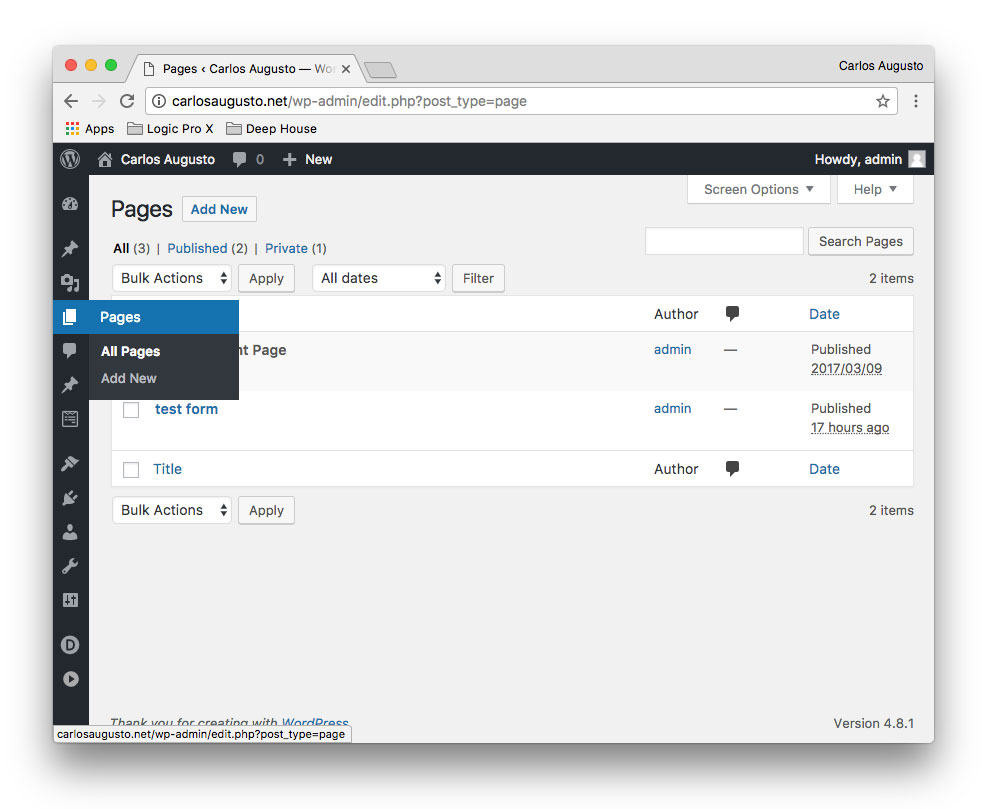
Click on the “Pages” left side menu option as shown below, then either click “Add New” at the top of the screen or edit an existing page. For now, I’ll edit the “test form” page that we created in the section above.
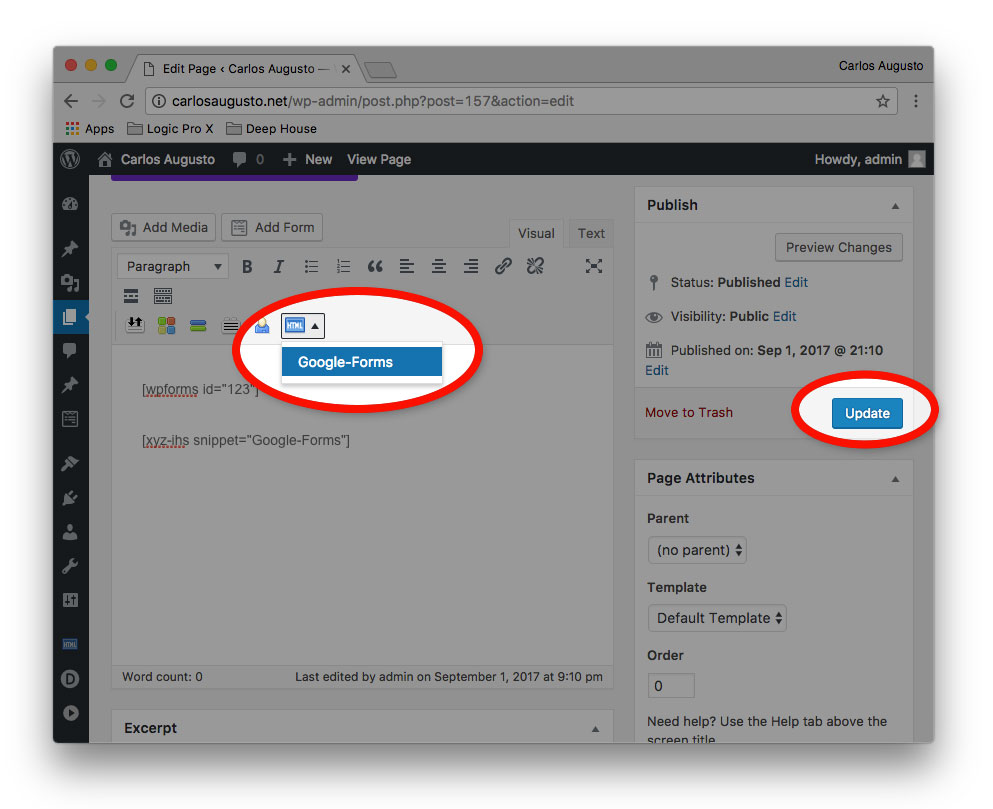
Now, check for the area I circled in red below. Again, WordPress plugins can create new buttons throughout the system. Remember, when we added the WPForms plugin above, we got the new “Add Form” button, and now we have this new “Insert HTML snippet” button. You’ll see the one snippet we created, “Google Form” showing in the menu. Click on that and the shortcode you didn’t need to copy earlier automatically gets added to the editing window below! I decided to move the Google Form shortcode to the top of the window for this demo (above the WPForms shortcode we created earlier on). Finally, click the blue “Update” button, also circled in red below.
Finally, click “View page” circled in red below!
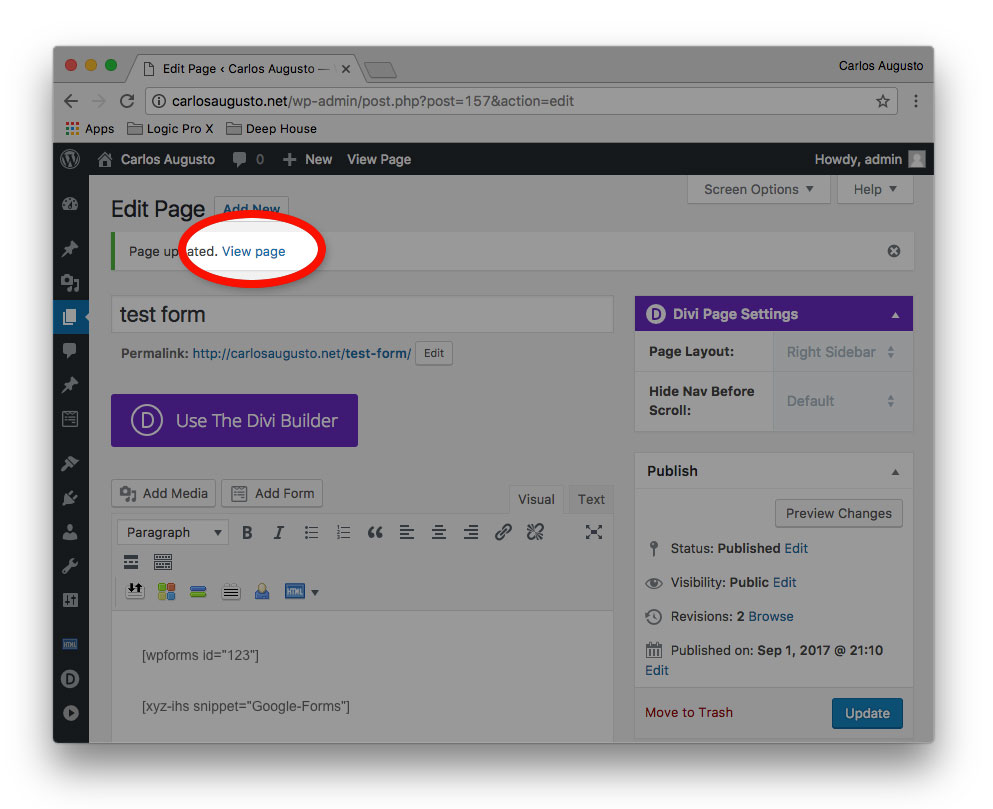
This will take you to your live WordPress page with, voila! Your Google Form embedded nicely within. Here’s the live URL: https://carlosaugusto.net/test-form.