You can’t have a successful website without visual content, including a good combination of images, icons, and graphics, with carefully thought and written text is the perfect combination to boost traffic.
However, if you see an HTTP error, you won’t be able to upload images to WordPress.
What does that mean, you ask?
The HTTP error is a code that indicates something went wrong during the uploading process. Now, fixing this error may sound complicated, but that really isn’t the case.
In this guide, we’ll show you how you can fix an HTTP error when uploading images to your WordPress website in the easiest possible way.
Let’s begin.
Why Fixing an HTTP Error When Uploading Images to WordPress Is Important

If you think website images are solely a “nice-to-have” element, think again.
They do so much more than serving eye candy. When used effectively, images can bring in more visitors to your website, encourage social sharing, and, ultimately, help you boost your sales and traffic.
Even experts have found that online content with images gets 94% more views than web pages without images. This makes sense as humans are highly visual creatures. Not only do images attract our attention, but they also draw us in by sparking emotions.
Enhanced user experience is another benefit. Adding images on your website presents important information in a more digestible manner. Hence, your visitors are more likely to stay on your website for longer and have a greater chance of converting into an inquiry or sale.
But that’s not it!
Website images also benefit your indexing on search engines. The captions you label your images with can be good for SEO—provided you add relevant keywords and the description is a genuine representation of the image.
Sounds great, right?
But to get all these advantages, you have to be able to add images to your website. Precisely why you must fix the HTTP error right away.
The Investment Needed to Fix an HTTP Error When Uploading Images to WordPress
Here, we’ll discuss the monetary and time investment you must be prepared for when trying to fix the HTTP error when adding website images.
Several reasons can lead to an HTTP error when you try uploading files via the WordPress media uploader. However, what makes matters worse, is the vagueness of the message.
You have no clue about what may have caused it. Even WordPress cannot figure out the cause (that’s why it displays the generic HTTP error message).
Your only option is to try out various solutions to find the cause and then fix the error.
This is where the whole process can get very time-consuming. It can take you a couple of minutes to a few hours, depending on how fast you identify and fix the problem.
As for the financial aspect of fixing the HTTP error when uploading images, there is not much for you to worry about. You can try the different steps yourself, and if you get stuck somewhere, contact your web hosting provider’s customer support for help.
The whole process of fixing an HTTP error when uploading in WordPress can be solved by following five simple steps. Here’s what you need to do:
- Step 1 Find Out If the HTTP Error is Temporary
- Step 2 Rename Your Files
- Step 3 Add Code to Modify WordPress Image Editors
- Step 4 Deactivate Your Website Plugins
- Step 5 Increase Your Server Memory
Let’s take a look at these steps in more detail.
5 Steps to Fix an HTTP Error When Uploading Images to WordPress
Let’s now focus on the whole point of the article: Fixing the HTTP error.
Note: You don’t have to try the remaining solutions if the error message goes away after you attempt a specific method. If you’re lucky enough to solve the problem on the first try, then that’s it! You’re done.
Step 1: Find Out If the HTTP Error is Temporary
The HTTP error can be temporary when caused by unusual traffic and low server resources—something that’s automatically fixed on most WordPress-specific hosting servers.
It’s why you should wait a few minutes and try re-uploading your image file.
If you find the upload failing again, try to upload a smaller image of the media file. If the upload completes without any errors, you’ll know the image size was the issue. In such cases, you can reduce the dimensions of the original image. Changing the file format is another option.
If you’re still facing problems, you can try refreshing your web page before re-uploading the image. In case your login session has expired, follow the steps below:
- Go to your admin dashboard, and log in again by typing in your username and password.
- Refresh the page by pressing either the Reload button or the F5 key on your keyboard.
- Re-upload the image to see if it works.
Try switching your web browser if you’re still facing issues. For instance, if you use Google Chrome, try Firefox. Google Chrome, in particular, is known for having issues with image upload, so it’s best to give other options a try.
Try to upload your image again after changing your browser.
If the HTTP error doesn’t go away, move on to the next step.
Step 2: Rename Your Files
Now you know the HTTP error is permanent. But before diving into the more elaborate solutions, try fixing the most common yet overlooked reasons for the error: incorrect file names.
When naming your file, stick to using letters, numbers, and dashes. In other words, avoid special characters (such as apostrophes, equal signs, and so on) and international language symbols.
Crazy Egg Tip: Create a file naming system. For instance, you can add underscores between words and a hyphen and a number at the end (Eg: my_image-1.png, my_image-2.png, etc.).
But how do you find out whether an incorrect file name is causing the problem?
Rename the file in your local folder using the guidelines we mentioned above. Upload the renamed image or media file. If you find the error message isn’t visible anymore, you’ll know an incorrect file name was causing the issue.
Still seeing an error? Move on to Step 3.
Step 3: Add Code to Modify WordPress Image Editors
WordPress has two image editor modules: GD Library and Imagick.
Out of the two, Imagick causes memory drain, which, in turn, can result in the HTTP error during image upload. This is because the editor uses multiple threads to improve image processing.
You may also have to handle restrictions on several shared hosts, which can again cause the HTTP error.
Naturally, you’ll want to make GD Library the default image editor.
There’s a simple way to ensure GD Library is always used as the first image upload option. All you have to do is add the following code at the end of the file into functions at your theme’s PHP:
function wpb_image_editor_default_to_gd( $editors ) {
$gd_editor = ‘WP_Image_Editor_GD’;
$editors = array_diff( $editors, array( $gd_editor ) );
array_unshift( $editors, $gd_editor );
return $editors;
}
add_filter( ‘wp_image_editors’, ‘wpb_image_editor_default_to_gd’ );
The other option is to force Imagick to use a single thread for image processing instead of multiple threads. If you want to proceed with Imagick instead of GD Library, you have to insert this line of port into your .htaccess file:
SetEnv MAGICK_THREAD_LIMIT 1
After you’ve modified the image editors, try re-uploading the file image. If you still see the HTTP error, move on to Step 4 after removing the code you just added to the functions.php file.
Step 4: Deactivate Your Website Plugins
Deactivating a few of your plugins and switching your WordPress theme to default can fix an HTTP error when uploading images to WordPress. But before you start with the actual deactivation and switching, you should clone your live site to a staging environment.
This way, any changes you make to your cloned website won’t reflect on your main WordPress website. Here’s how to go about it:
- Open your WordPress dashboard and select Plugins.
- Hover your cursor over the Bulk Actions tab at the top of your screen, and click on Deactivate. All your plugins will get disabled, but you won’t lose any data.
- Check whether the HTTP error is resolved. If yes, you have to carry out the next set of steps to find the glitching plugin.
At this stage, all your WordPress plugins are deactivated. Your aim now is to activate them—one by one—while you try uploading your image. When you see the HTTP error return after activating a specific plugin, you’ll know the culprit.
Once you’ve spotted the rogue plugin, you can either submit a support ticket in the WordPress repository, or you can contact the plugin developer directly to resolve the issue.
Step 5: Increase Your Server Memory
You require an adequate memory limit to upload files successfully. It’s why insufficient memory is one of the most prominent reasons for the HTTP error.
Before you can start increasing your server memory, keep an eye out for two things:
- Make sure you have appropriate hosting package limits. You‘ll see an internal server error (error 500) if you extend memory usage past these limits. To avoid these problems, you must sign up with a reliable web hosting provider that offers tailor-made WordPress plans.
- You must have an FTP client to edit files.
There are different ways in which you can increase your server memory. Below, we’ve compiled a list of a few of them:
Method A: Edit the wp-config.php File
One of the easiest ways to increase the memory limit is by editing the wp-config.php file. All that you need to do is add a single line of code:
define( ‘WP_MEMORY_LIMIT’, ‘256M’ );
Method B: Edit the .htaccess File
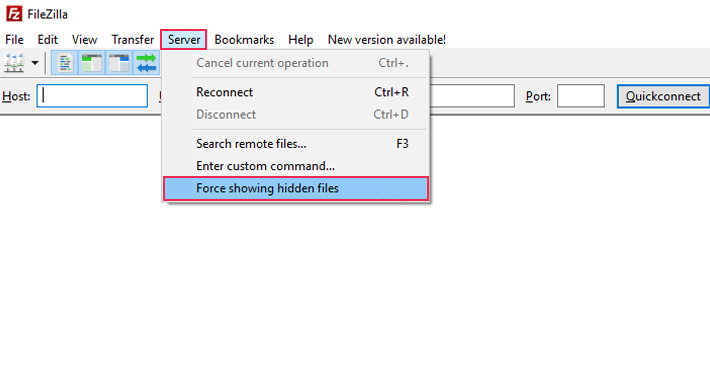
The .htaccess file is a server configuration file found in the root WordPress directory. You can access this folder by enabling the relevant options to show hidden files within your FTP client.
FileZilla, for one, is one of the best FTP clients. If you too decide to use it, here’s what you need to do:
- Go to the Server tab.
- Select Force showing hidden files.
- Search for memory_limit, and change the value associated with it.
- If you don’t see any code present, add the following line: php_value memory_limit 256M
Method C: Edit the php.ini File
The php.ini file is in the WordPress root directory. You must open the file, search for memory_limit, and then change the value associated with it to boost your memory limit.
In case you don’t find the php.ini file, you’ll have to create one. Once that’s done, enter the following code:
memory_limit = 256M
For shared hosting users, the steps are slightly different.
Here, you have to edit the .htaccess file before changing the memory_limit value. This is because shared hosting often has multiple php.ini files, which is why you must specify the exact location of the file created or edited by you.
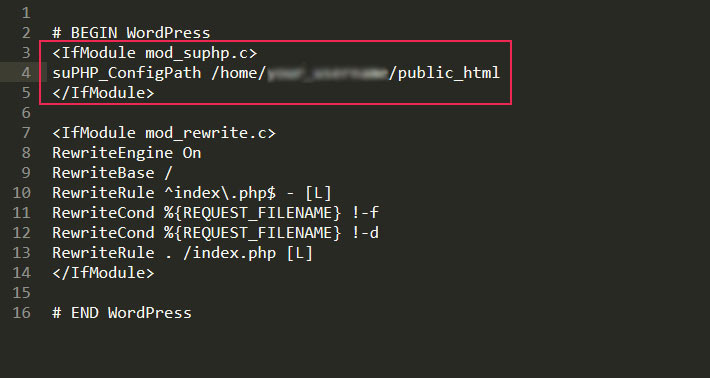
To edit the file, simply add the following go to the .htaccess file towards the top:
<IfModule mod_suphp.c>
suPHP_ConfigPath /home/your_username/public_html
</IfModule>
Remember, you must replace your_username with your actual cPanel username.
Method D: Change the Memory Limit Value Within the cPanel
Login to cPanel, and scroll down to the Software field.
Click on MultiPHP INI Editor. From there, you can choose your domain from a displayed option. Search for memory_limit. Type in 256M instead of 32M as the value.
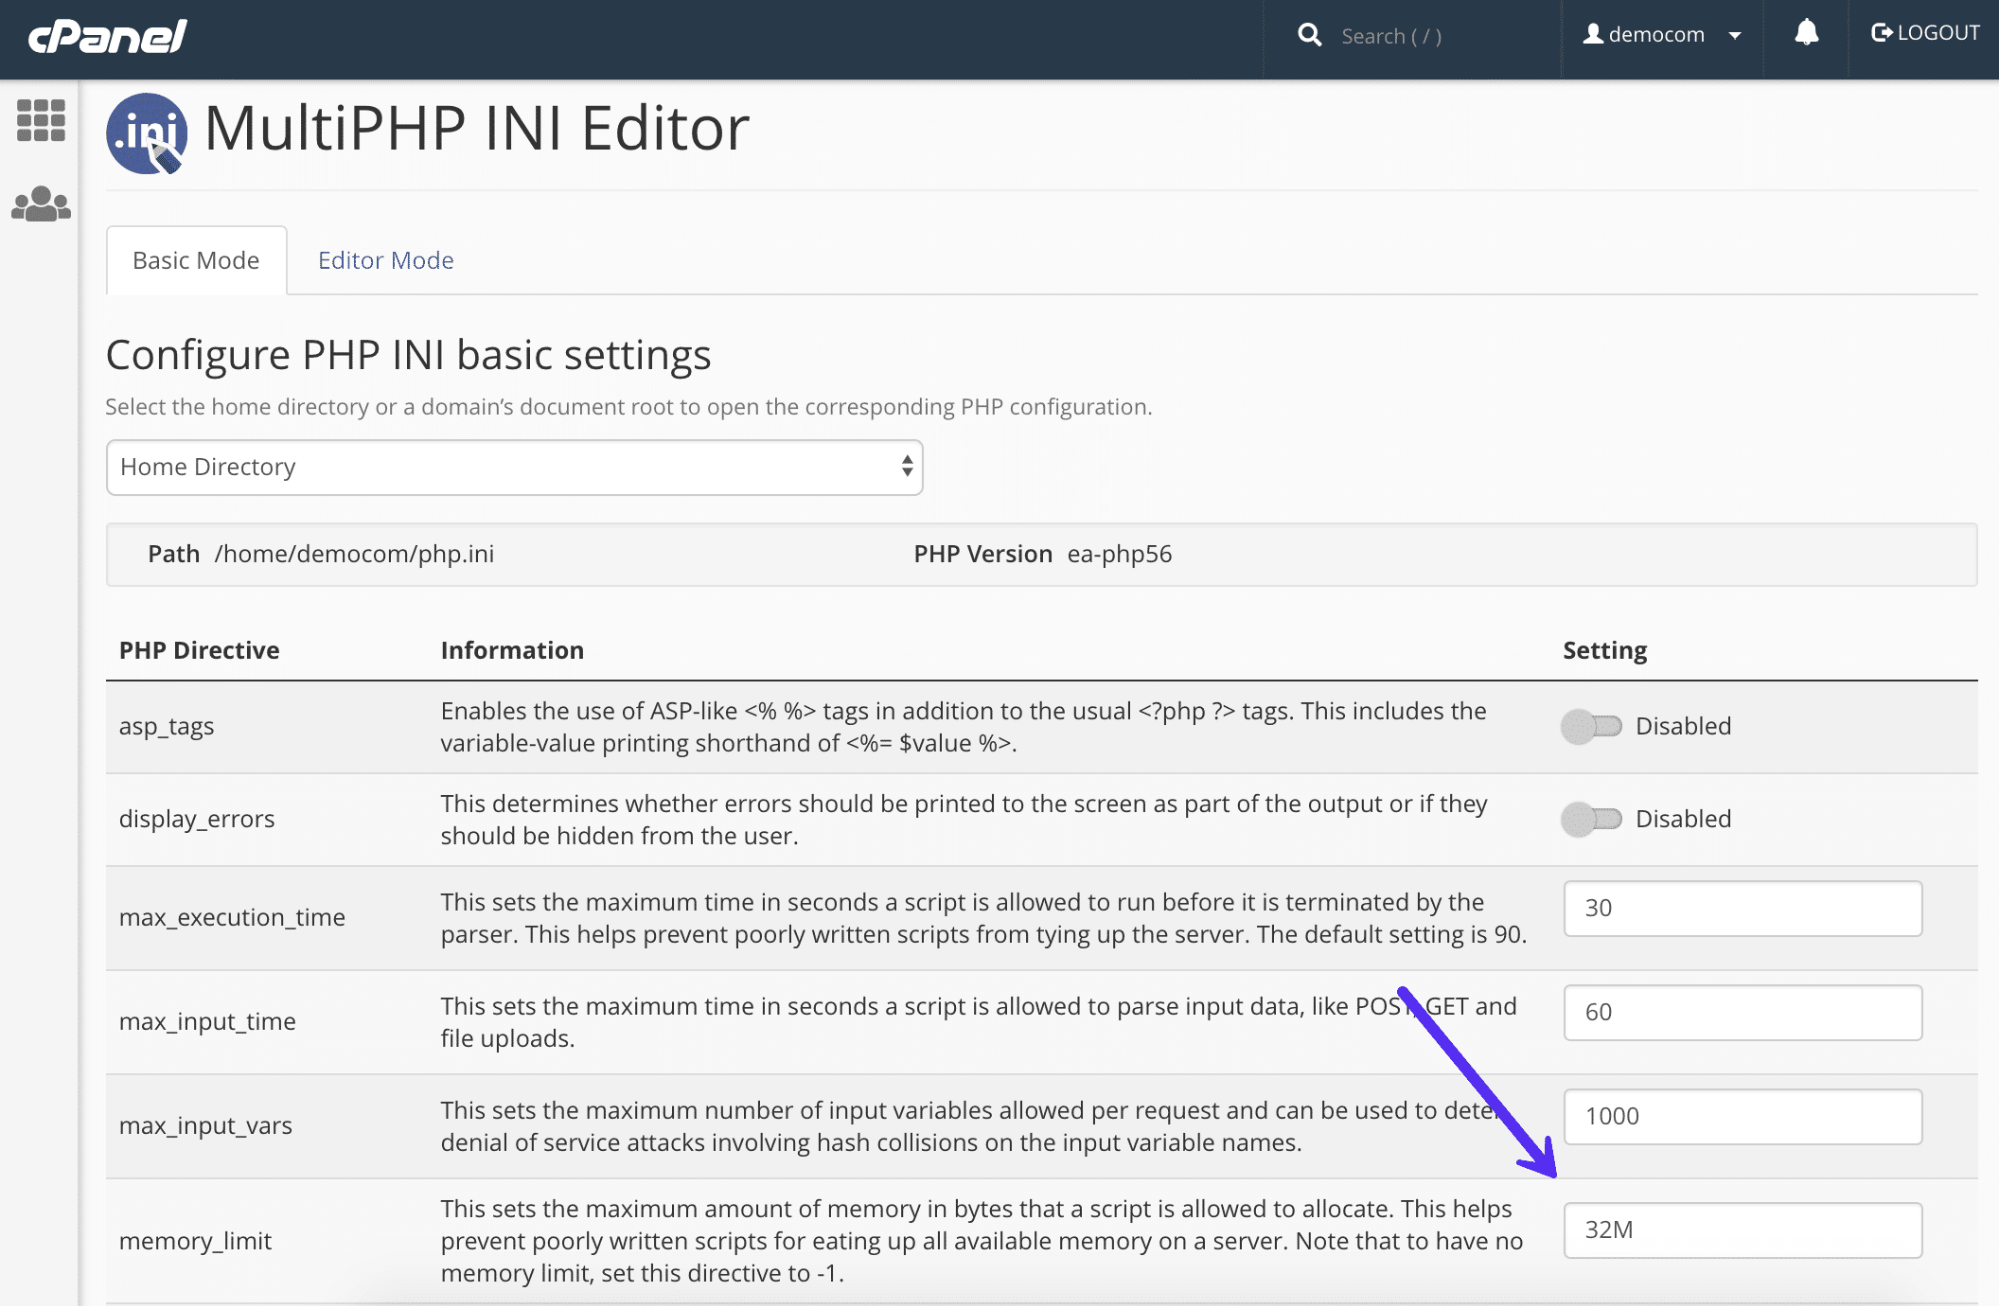
This should instantly increase the memory limit.
Next Steps
Once you’ve succeeded in fixing the error, here are a few other Crazy Egg guides to help you improve your website performance: