Site indexation may seem like a fairly passive task.
Just write some content, optimize it for search engines, upload it to your site, and just wait for the magic to happen — right?
Not necessarily.
How can you get your content on Google faster? How do you get Google to index the pages that you updated?
Google’s indexation process is very effective, but it isn’t perfect.
And considering that it’s impossible to reach your marketing goals if your pages aren’t indexed, indexation isn’t something you should leave up to chance.
Fortunately, there are many steps you can take to help Google quickly and accurately index your pages.
In this post, I’ll go over nine ways you can take a more proactive approach to your site’s indexation — and, as a result, improve your online visibility.
You’ll learn how do to get Google to index your website and how to check your Google index ranking.
But first, let’s take a step back and look at what indexation actually is, and why it plays such a major role in your digital marketing results.
What is Google indexation?
Before we can jump into ways to speed up the indexation process, it’s important to understand what, exactly, indexation is.
What is a web index?
In its most basic form, and index is a list of information. Long before the Internet, indexes existed in many forms, like the alphabetical indexes at the end of books.
A web index, then, is a database of information on the Internet.
Search engines use these databases to store billions of pages of information. So when you use a search engine, you aren’t actually searching everything that exists on the Internet.
You’re searching that search engine’s index of stored pages and information.
Bots or ‘spiders’ crawl new pages online and store them in an index based on their topics, relevance, authority, and more.
How does Google index work?
Every search engine has its own index. But because Google is the world’s largest search engine — and where most marketers focus their SEO strategies — we’re going to be focusing on theirs.
In 2016, Google claimed to have knowledge of over 130 trillion individual pages.

Today, it doesn’t specify exactly how many pages are in its index — but says that its search algorithm sorts through “hundreds of billions” of pages in its index to deliver useful and relevant results.
How does Google index the Internet?
Creating a library with billions of pages requires some powerful tools.
The most important of these tools are called spiders. These automated bots are automated browsers that “crawl” from site to site, following links to find content.
All of the information that these spiders crawl is stored in Google’s index.

Then, when a user performs a search, Google’s search algorithm sorts through its giant database to find the most relevant pages.
Pulling from this established database (instead of attempting to find information in real time) allows the search engine to deliver results quickly and efficiently.
Google’s spiders are constantly crawling for new information and updating its database.
Even though the results are pulled from a stored source, the search engine’s goal is to always provide up-to-date results.
So as you add new content, it’s in your best interest to make sure that it gets indexed as quickly as possible.
Why does it matter if your site is indexed quickly on Google?
Given that Google’s spiders are constantly crawling for information, you might be wondering why you need to put in any extra work to help them.
After all — if they’re already crawling, won’t they find your site anyway?
The fact is: They might.
But if your site is relatively new, or doesn’t get crawled often, it could days, or even weeks for your new content to get indexed.
This causes delays in search engine visibility — which is one of most important factors in your digital marketing success.
You can attract traffic from a variety of sources, but when you consider that 51% of all trackable website traffic comes from organic search, it’s impossible to deny that your search presence can make or break your success.

Indexation is essential for establishing rankings, attracting traffic, and reaching your goals for your site.
Google is probably going to index your website, regardless, unless you’ve specifically taken action to refuse indexation (which we’ll get to later).
But you want your website indexed quickly.
The sooner your pages are indexed, the sooner they can start competing for — and establishing — top spots in search results.
Consider that only 5.7% of newly-published pages make it into the top ten results within a year.

It’s clear that establishing high rankings doesn’t happen overnight. This data shows that Google tends to favor established content.
In fact, the average page one ranking is over two years old, and the average page in position one is almost three years old.
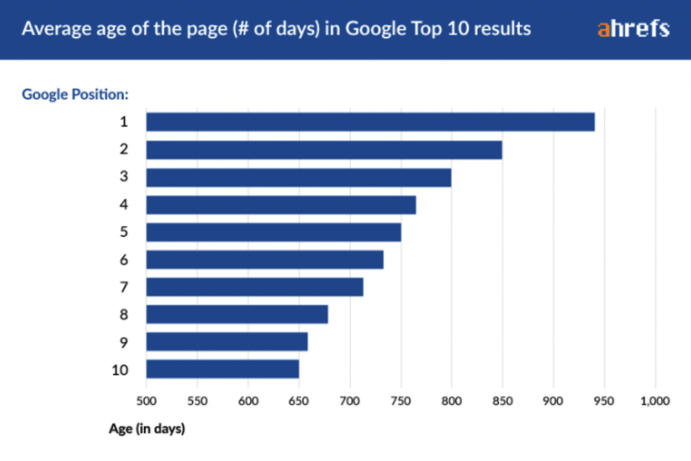
That’s not to say that new pages can’t rank well, of course. But achieving a top spot quickly is rare.
In fact, of all of the pages ranking in position one, less than two percent were less than a year old.

The sooner your pages are indexed, the faster they can start competing for those top spots.
This is a particularly important concern for new websites. If Google has no existing record of a site, its spiders can’t simply follow internal links to find new pages.
So while other sites continue to have new pages added to its database, your site could get ignored.
The same holds true if you switch domain names. Even if you migrate all of your content, Google will view your new domain as an entirely new site.
For example, when Podia (formerly Coach) recently rebranded and adopted a new name, they also changed their domain name to reflect that. Their services remained largely the same, as did their site content.
But Google can’t immediately recognize when a site simply switches to a new location.
So even though a customer could likely identify that this was the site they were looking for, they needed to take steps to ensure that Google could get those users there.
Google does help with this process by letting webmasters who are switching domains fill out a “Change of Address” form.

But beyond that, there are plenty of other steps you can take to make sure that your content is getting indexed as quickly and efficiently as possible
How do I get Google to index my site using these SEO tools: Google Search Console & Yoast
Getting your site properly indexed might sound like a complicated task.
And the truth is, it sometimes can be — but there are lots of tools available to simplify the process, many of which are extremely user-friendly.
There are tons of options you can use that offer advanced features and functionality, but the two most important and widely-used are Google Search Console and Yoast SEO.
Google Search Console is a free tool that helps you monitor your site’s presence in Google’s index and search results. You can use it to make sure that Google can access your content, submit new content, and monitor and resolve any issues.
Yoast SEO is a free WordPress plugin designed to easily optimize sites for search. If you run a WordPress site, it’s one of the best tools you can use to improve your presence in search — and at this point, it’s basically considered an essential tool.
If you’re already familiar with these tools, feel free to skip down to the next section for nine tips you can use to improve your indexation.
Google Search Console
Google Search Console (formerly known as Google Webmaster Tools) is one of the most valuable SEO tools at your disposal — and it’s completely free.
You can use it to keep an eye on many different aspects of your search visibility. But for the sake of indexation, you can use it to monitor crawling, index errors, and security issues.
If you don’t yet have an account, go to Search Console and log in with your Google account.
If you already have a Google Analytics account, sign up with the same email address. This will simplify the process and make it easier to keep all of your information in one place.
Once you’ve created an account, click the “Add a Property” button in the top right corner.

Type your domain name, then click “Add.”
After you do this, you’ll be taken to a page with instructions for verifying your ownership of the property.

If you opt to verify with an HTML file upload, you’ll see an HTML file available for you to download.
Download the verification file, then use your FTP to upload it to your root directory.
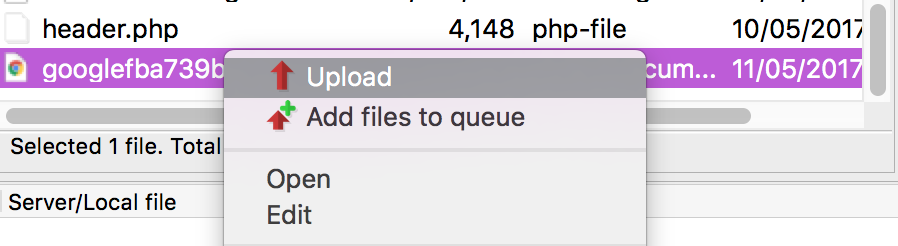
Once you’ve uploaded the file, you can verify that it by opening the target URL in your browser. If you see the file name in your browser window, your upload is completed. Go back to Search Console and click “Verify.”
Once this step is completed, you can access your Search Console data. It’s important to note, though, that you’ll need to leave the verification file on your site. Even after the initial verification, this file shows Google that you are the correct owner.
If you have trouble verifying your site with the HTML file — or if you just prefer to verify if a different way — there are a few other options you can use.

If you already have a Google Analytics account, this is an easy option to use. Make sure that you’re logged in with the same Google account you use for Analytics, select “Google Analytics” and click “Verify.”
After authenticating your account, you can familiarize yourself with a few basic features.
Set your preferred domain
One of the easiest fixes you make make for indexation purposes is setting your preferred domain.
Users can arrive on your site by typing your domain name with or without WWW in front of it. This may not seem like an issue — but Google views WWW and non-WWW versions of your domain as different sites.
If you don’t tell Google that these are both your site (and which one you prefer) it could be indexing the same content under different URLs. This can create some annoying, but easily avoidable, issues.
Setting a preferred domain tells Google which version you prefer, and ensures that all of your pages are indexed in the correct place.
Fortunately, it’s also an easy process.
First, add all versions of your domain following the same process as above. Make sure to add both the WWW and non-WWW versions, as well as the HTTP and HTTPS versions of both, if you have HTTPS enabled.
This means that many site owners end up with four properties for a single site:
- https://www.yourdomain.com
- https://www.yourdomain.com
- https://yourdomain.com
- https://yourdomain.com
After you’ve added all versions of your domain, click the gear icon and select “Site Settings.”
At the top of the page, you’ll have the option to determine which version of your site you want Google to recognize.
This way, if another site links to the WWW version of your site, but you prefer the non-WWW version, Google will know to attribute the link to the version you prefer.

The version you go with is essentially subjective.
Site owners have debated for years which is better, but there’s no indicator that selecting either version over the other is better for SEO purposes. The important thing is just to pick one — it doesn’t really matter which.
Once you’ve set your preferred domain, you can start utilizing the many features available in Search Console. But for the purposes of this post, the ones listed under “Google Index” and “Crawl” in the left menu are the most important.

Index Status
The Index Status report shows how many of your URLs Google has indexed over the past year.
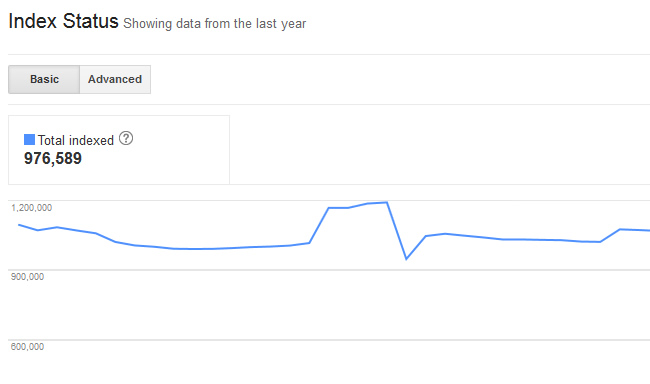
This report makes it easy to determine whether Google is finding and indexing your pages.
You can also check out the “Advanced” tab to see how many pages on your site have been blocked by your robots.txt file (which we’ll get to later).
If you’re intentionally preventing Google from indexing certain pages, this tab will let you know that you’ve set up the blocks correctly.
And if you don’t want to block Google from indexing certain pages, this tab will let you know if there’s an issue.
Remove URLs
If you ever want to temporarily remove a URL that you own from search results, you can do this using the Remove URLs feature.

This won’t permanently remove the page from search results, but can be helpful for pages that are under construction, or you don’t want to attract traffic to for any other reason.
Crawl Errors
The Crawl Errors reports gives you an at-a-glance overview of any site or URL issues over the past 90 days.
This makes it easy to quickly identify and fix and issues that might be preventing your pages from being indexed and ranked.

Crawl Stats
The Crawl Stats report shows Google’s activity on your site over the previous 90 day period, including pages crawled per day, kilobytes downloaded per day, and time spent downloading a page.

The pages per day graph at the top is arguably the most important of the three, since it shows how frequently Google is crawling and indexing your content.
The more Google crawls your site, the better.
Though you can’t directly impact your site’s crawl rate, you can safely assume that if Google is crawling your site at a consistent speed, your site is in decent shape.
If you see a sudden drop, though, this could indicate a problem like broken links or unsupported content. Keeping an eye on this frequency can help you identify potential issues before they turn into real problems.
Yoast
If your site runs on WordPress, Yoast SEO is an essential plugin. It’s designed to make SEO easy for WordPress users and doesn’t require any technical or coding knowledge to use.
Yoast offers a paid, premium version with advanced features, but its free version has plenty of functionality for most users. All of the tips we mention in this post can be done in the free version.
If you haven’t yet installed it, log into your WordPress dashboard and select “Plugins.”

Select “Add New,” then search for Yoast in the search bar.
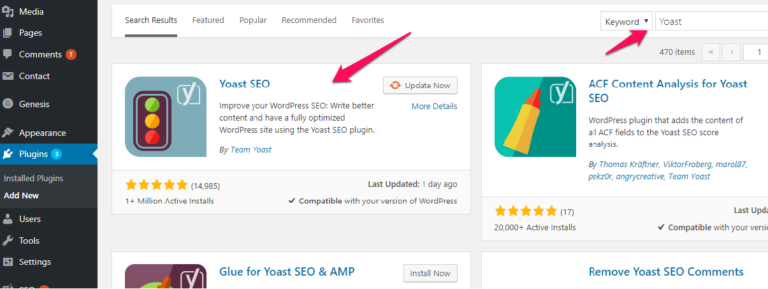
Click the “Install Now” button to download and install the plugin, then follow the required prompts to activate it.
Yoast simplifies many of the steps involved in optimizing your site.
For example, it will automatically analyze your on-page SEO for each new post you add and help you identify issues with your title tag, meta description, and readability.

There are tons of features worth exploring, but for the sake of indexation, the most important is the XML Sitemaps module.
Click the Yoast icon in your menu bar, then select “XML Sitemaps.”
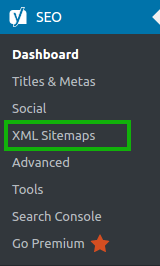
Then, switch your XML sitemap functionality to “Enabled.”

The default options are fine for most users, but if you have specific preferences for how yours is set up, you can set those here.
Then, click “Save Changes.”
Congrats! You have a sitemap. Keep reading to learn what to do with it.
How to Index Your Site In Google
1. Create a Sitemap
As the name implies, a sitemap is a map of your site. It’s a document in XML format that tells crawlers where they can and can’t go.
The crawler looks at this page to learn all about your website — how big it is, what the most important pages are, and where new content is located. An XML sitemap is the critical first ingredient to successful indexation.
The spiders are smart, but they really do need a map.
Why?
Without a sitemap, crawling can take a long time — as long as 24 hours to index a new blog post or website.
That’s too long.
With a sitemap, you can shave that time down to just a few minutes.
That’s right: Your website, blog, or new page can be indexed by Google in less than an hour.
Your sitemap also tells Google how often to look for changes and new pages on your site. If you don’t update or add new content often, it’s probably okay if your site isn’t crawled every few hours.
But if you add multiple blog posts each week, add new product pages on a regular basis, or publish time-sensitive news articles, you’ll want to let Google know to crawl and index your site more frequently.
Fortunately, creating a sitemap is often easier than sounds. If you use the Yoast plugin listed above, you can skip to the next step.
And if not, there are several other tools that can crawl your site and deliver a similar results.
Screaming Frog
One of the best options for creating an XML sitemap is Screaming Frog.
To use Screaming Frog, first download their SEO Spider tool.
If your site has less than 500 pages, this is completely free.
If your site is larger, you’ll need to buy a license — which could be worth it when you consider the time it would take to manually find and list 500+ URLs.

Once you’ve installed the program, type your URL into the “enter URL to spider” box and hit “Start.”

Then, click Sitemaps > Create XML Sitemap.
Before you create your sitemap, there are a few settings you can configure.
First, you’ll need to determine which pages you want to include, and which you want to exclude.
By default, only pages with a “200” OK response from the crawl will be included — so you don’t need to worry about redirects or broken links.
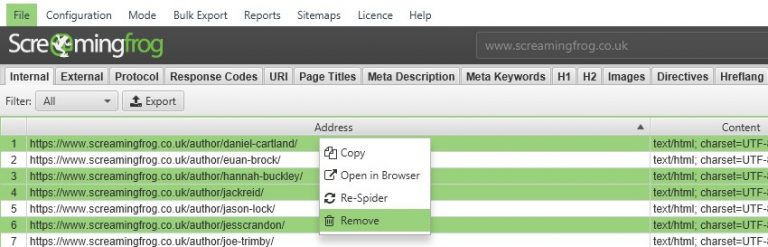
Still, you may want to scroll through your list of pages and look for duplicate content. For example, having both WWW and non-WWW versions of URLs in your sitemap is unnecessary.
You can fix this issue by right-clicking the version you want to remove, then selecting “Remove.”
If your pages vary in importance, you can opt to set priority values for different URLs. Your URLs can range from 0.0 – 1.0, with the default at 0.5.
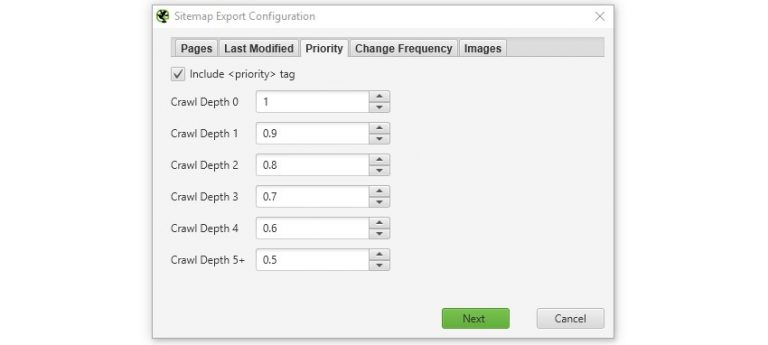
This tells Google which pages are the most important, so that they can crawl and index those pages more often.
It’s important to note, though, that setting priority values does not affect your rankings — so you won’t benefit from trying to game the system here.
Next, you can tell Google how frequently each page on your site is likely to change. This signals to crawlers that they should focus on crawling pages that are updated often.
Setting change frequency for hundreds of pages can be tedious, but you can use Screaming Frog’s “Calculate from Last Modified Header” to automate the process.
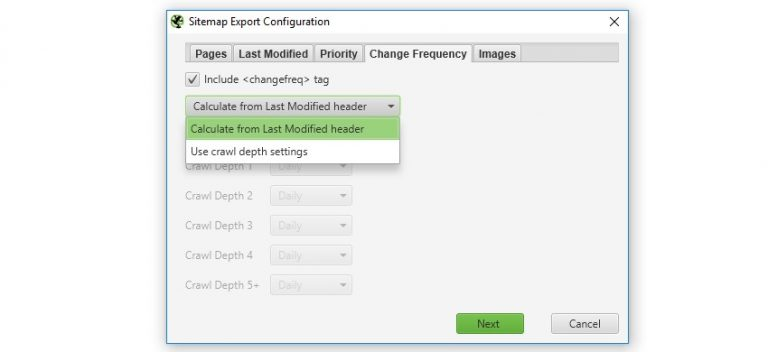
This means that if a page’s header was changed in the previous 24 hours, its change frequency will be set to daily, while if it hasn’t been updated recently, it will be set as monthly.
Finally, you can determine whether you want to include images in your sitemap. If the “Include Images” option is selected, then all of the images on your site will be included by default.

You can opt to exclude images like your logo and social media icons, but include product photos and other important graphics.
Once you’ve finished your configurations, hit “Next” to generate your sitemap. Save it to your computer, then double check the size.
A sitemap can’t include more than 50,000 URLs or be larger than 50MB — so if yours breaks either of those rules, it may be split into two separate files.
But if you end up with an appropriately-sized file, upload it to your site’s root folder via your FTP client.
Then, skip to the next step!
Google XML Sitemaps
Google XML Sitemaps is another free plugin for WordPress sites. If you’re not using Yoast, it’s an easy way to generate a sitemap with custom parameters, much like the ones you can set with Screaming Frog.

Once you’ve set your preferences, you can find your sitemap at the URL listed at the top of the page. In most cases, this will simply be https://yourdomain.com/sitemap.xml.
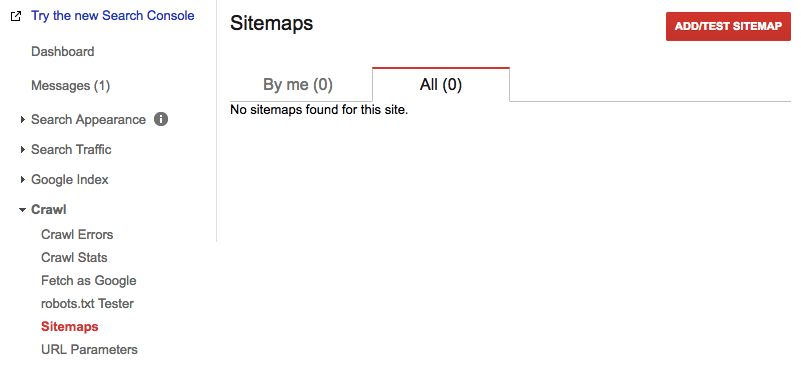
2. Submit your sitemap to Google Search Console
Now that you’ve created a sitemap, you’ll need to submit it to Search Console.
This lets Google know about all of the pages you want indexed, and can help their crawlers find the most important ones.
On your Search Console home page, select your preferred version of your domain. Then, in the left sidebar, click “Site Configuration,” then “Sitemaps”.
Click the Add/Test Sitemap button in the top right and enter the URL of your sitemap.
In most cases, your sitemap’s URL will simply be https://yoururl.com/sitemap.xml.
If you use a WordPress plugin, the URL will be in the plugin settings. With Yoast, the file is usually named sitemap_index.xml.
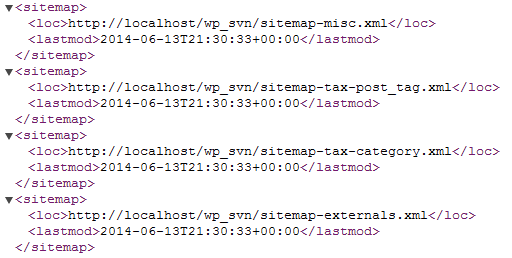
You can verify your sitemap’s location by entering it into your browser. If you have the right URL, it should look something like this:
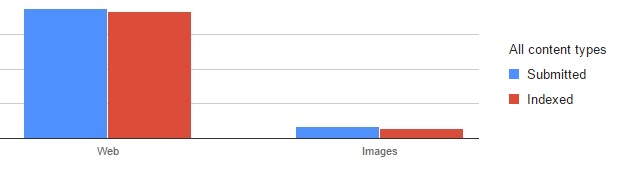
After you hit submit, you’ll see that your sitemap is Pending.

Once it’s approved, you can see the number of your pages you submitted vs. the number that have been indexed.
This can give you a good idea of how much of your site’s information Google stores.
It’s important to realize, though, that creating and submitting a sitemap is not a once-and-done process.
As you keep adding pages and updating your site, your site will evolve — and your sitemap needs to evolve with it.
This will help you make sure that Google always has an updated version of what your site should look like, and can crawl and index your site as efficiently as possible.
3. Create a robots.txt
Though the name “robots.txt” may sound a bit technical and intimidating, the file itself is actually fairly simple.
A robots.txt is a text file on your website that instructs search engines on what to index and what not to index.
It is essentially a list of commands to the crawler that lets it know where it can and can’t go on your site.
This is the very first stop that a spider makes on its journey to index your website. If your robots.txt says, “don’t index me,” then the spider will move along.
As you may have guessed, it’s pretty important that your robots.txt gives Google permission to crawl the site. This is the default setting.
Still, if there are sections of your website that you don’t want to appear in the search results, you can set this up in your robots.txt.
As Google explains:
We offer webmaster tools to give site owners granular choices about how Google crawls their site: they can provide detailed instructions about how to process pages on their sites, can request a recrawl or can opt out of crawling altogether using a file called “robots.txt”.
The more pages you have on your website, and the more you open these up to the index, the better your indexation will be.
Still, having control over your indexation is important — and that’s where your robots.txt file becomes important.
How to create a robots.txt file
Robots.txt files are simple, text-based files. This makes it easy to create them in your computer’s default plain text editor, like Notepad (for Windows users) and TextEdit (for Mac users).
This does not include programs like Microsoft Word, which can add extra formatting that distorts your file.
Before you get started, check your FTP to see if you already have a robots.txt file. If you do, it should be stored in your root folder as something like https://yourdomain.com/robots.txt.
If so, download it and use it as a starting point.
If not, that’s okay! Creating a robots.txt file, even from scratch, is fairly simple.
First, you’ll need to familiarize yourself with a few basic pieces of robots.txt syntax.
Google has a helpful robots.txt resource for this:
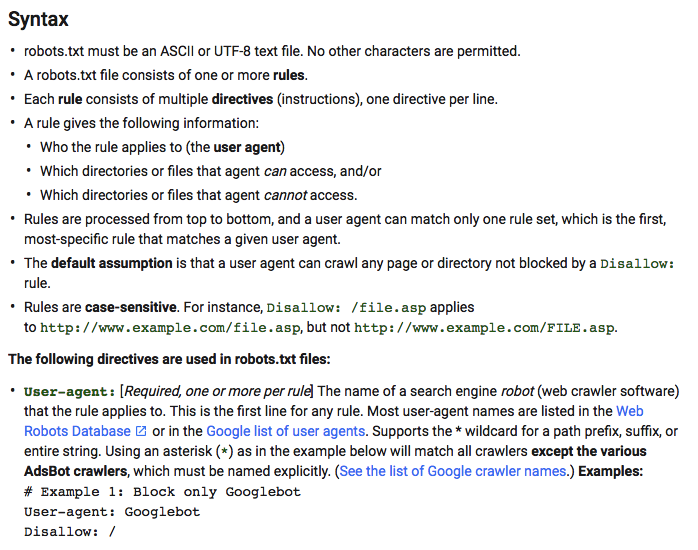
To create your file, there are a few pieces you’ll need to know:
- User-agent: the bot the following rule applies to
- Disallow: URL path you want to block
- Allow: URL path within a blocked parent directory that you want to unblock
It’s also important to note that an asterisk makes the User-agent command apply to all web crawlers. So if you create rules using “User agent: *”, they will apply to crawlers from Google, Bing, and every other bot that crawls your site.
If you want your entire site open to being crawled, then, your robots.txt file will look like this:

The rule applies to all crawlers, and nothing is blocked.
If you want to create a more complex robots.txt file, though, you can use a generator like SEObook.
Just select the bots you want each rule to apply to, then enter the files or directories you want to disallow or allow.

Then, you can copy and paste the generated content at the bottom of the page into your robots.txt file.
SEObook also gives you the option to add a sitemap. This used to be considered best practice, but for isn’t necessary if you’ve submitted your sitemap to Google Search Console.
Still, it won’t hurt — so feel free to include it if you’d like.
Why block certain pages?
Blocking certain sections of your site from being indexed is one of the biggest roles of a robots.txt file.
But why would anyone want to do that?
The short answer is that not every page on your site provides value to readers. So even if those pages were indexed, they’d likely never rank in search results anyway.
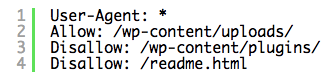
For example, if your site runs on WordPress, it has lots of subfolders containing plugins and other information.
These files are important for helping your site function, but not helpful for visitors. So if you wanted to prevent them from being crawled and indexed, your robots.txt file might look something like this:
You can also disallow your “thank you” or confirmation pages, checkout pages, and any other pages that wouldn’t make sense for a user to land on directly from a search engine.
This keeps search engines from indexing information that is unlikely to ever be served as a result.
Robots.txt and crawl limits
Disallowing certain pages and subfolders can also help bots crawl your site more efficiently.
Google limits how often it crawls sites in order to avoid overloading servers. You can also set your own crawl frequency preference in Search Console.
This means that it is limited in how much time it can spend on your site, and how many pages it can crawl in that time.
Disallowing certain pages helps crawlers focus on the content that you actually want indexed — and can improve how often your valuable pages are crawled for new information.
4. Create internal links
One of the most effective ways to encourage crawling and boost your website’s indexation is through internal linking.
The paths that the spiders take through the Internet are formed by links. When one page links to another page, the spider follows that path.
Within your own website, make sure that you’ve created links to and from all your most important pages.
Usually, this happens naturally as long as you have a well-organized website. For example, this standard architecture of a restaurant website links to internal pages with main navigation.

Site structure is often overlooked, but can have a major impact on many different parts of your SEO strategy.
User experience
From a user perspective, a logical site architecture and navigation makes your site much easier to browse.
Plan a hierarchy ahead of time, then organize your navigation in a logical way. A user shouldn’t have to guess where the information they’re looking for is — it should be intuitive based on your categories and links.
It’s also a good idea to keep your site structure as simple as possible. Complex mega-menus might look fancy, and are sometimes necessary for extremely large sites, but if you don’t need one, don’t use one.
Instead, stick to a simple, straightforward setup that makes it immediately obvious where a user needs to click to find the information they want.
Crawlers
Beyond your human users, logical site structure makes it easier for crawlers to access and index your content.
Well-planned site architecture establishes hierarchy among your pages. It helps crawlers understand which pages are the most important, and how different pages are related to each other.
Internal links send crawlers to other pages on your site and help them discover new content
Every page on your website should have links pointing to it
Content hub pages
If you have a lot of content, you can create “hub pages” to help both users and search engines browse your site more efficiently.
These pages can be organized in many different ways, but essentially serve as indexes of your information on specific topics.
You can create hub pages grouping together:
- Blog posts on similar topics
- Similar products (if you run an ecommerce site)
- Related news stories (if you manage an editorial site)
These pages help Google determine the relevance of individual pages, and how they’re related to other pages on your site.
Plus, from a user perspective, it makes it easy to find additional content related to the pages we’re interested in.
TechCrunch, for example, has category pages for certain topics that it writes about often, like the Internet of Things.

If a user reads a story about the Internet of Things and wants to learn more, this page makes it easy for them to find more articles on the subject.
And when a crawler sees all of these pages grouped together, it will be able to determine that they have similar content.
These types of hub pages can be extremely useful. And if you want to add one to your site, it can as simple or as complex as you like.
If you have HTML experience, you can hardcode a page (or pages) with groups of related links. Get as fancy as you want with the formatting, or not — it’s up to you.
The real value is in the groupings you create, and the value they provide to users and crawlers.
Regardless of the format you choose, make sure to continue adding to your hub pages over time as you add more content.
Linking to new pages as you add them will help those pages get indexed (and ranking) faster.
Link to relevant content on each page
As you add content to your site, there’s bound to be some overlap in the topics you cover.
These areas of overlap present perfect opportunities for adding internal links.
For example, if you run a personal finance site, you might write a post with tips for improving credit score.
If you’ve already written a more general post about what credit score is, you can link to that post as a resource for readers.
Although some of your visitors may be loyal readers, many of them will not have read all of the content on your site.
Directing them to relevant information can help them learn more about the topic and encourage them to spend more time on your site.
If your site is relatively small, identifying relevant pages to link to is a straightforward process.
And if you write all of the content yourself, your brain may even serve as a live index of every page on the site.
But if you have a large site with hundreds (or thousands!) of articles and posts, it can be nearly impossible to determine the most relevant ones to link to in each new piece of content you create.
This is where tools like Yet Another Related Posts Plugin, or YARPP, become extremely helpful. Once you’ve installed the plugin, you can use it to automatically add links to relevant content to your posts and pages.
You can set preferences for the links included based on categories and time range.
So, for example, if you’re setting this up for that personal finance blog, you might opt to pull in posts you’ve written about credit over the past year at the bottom of your new credit-related posts.

You can also determine whether you want to include basic, text-only links, or links with thumbnail images.
Tables of Contents
Many users don’t read all of the content on a page. They arrive on the page looking for a specific piece of information, then scroll and skim until they find it.
If they can’t find what they want on your page, they’re likely to return to the search results and click another result.
The easier you make it for them to navigate your content, then, the more likely they’ll be to stay. One way to do this is by creating a table of contents.
If you have a WordPress site, you can use a plugin like Easy Table of Contents to create, as the name implies, a table of contents. (Easily).
Simply install the plugin, determine the types of pages where you want your tables of contents to show up, and configure where you want it to appear on the page.

You can also set the plugin to automatically create a table of contents when you use a certain number of headings, and allow users to toggle its visibility.
Adding these to your pages makes it easy for users to skip to key sections or information — and if also gives you the opportunity to link to additional resources.
Your posts can’t all serve as fully comprehensive resources for your readers. But there’s a strong chance that content you’ve written in the past is relevant to your newer content.
Include links to these posts below your table of contents to show your readers where to find additional information, and boost your internal linking structure in the process.
Yoast internal linking
If you have Yoast Premium, you can use the Yoast internal linking features to simplify the process of adding relevant links to each of your posts.
This feature operates by analyzing prominent words in each post, then provides link suggestions based on articles with similar prominent words and content.
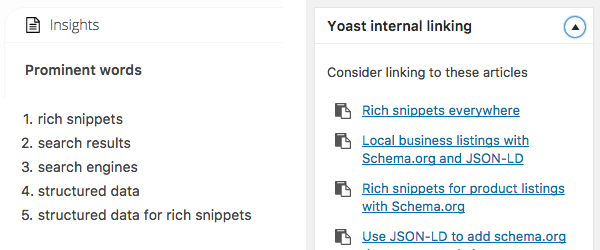
Unlike YARPP, this feature isn’t fully automated. Instead of automatically adding links to the end of your posts, it gives you a list of narrowed-down possible options.
This way, you can choose the options you like best, then incorporate them into your post however you see fit.
It saves time by eliminating the need to go back through all of your old posts each time you publish something new and want to include relevant internal links.
It requires a little more effort than an automated plugin, but the result is that you can make your links fit more naturally into your content.
5. Earn inbound links
Though internal links help spiders understand your site’s structure and find new pages, the most important links are inbound, or links from other sites.
When other websites link to yours, it gives your site a boost in multiple ways.
If you have experience with SEO, you already know how important links are for establishing trust and authority.
The more links you have from credible sites, the more credible you appear in Google’s eyes — and the more likely they’ll be to rank your site well.
And though that alone is reason to focus on earning inbound links, they can also help you website get indexed faster.
Links from other sites send crawlers to your pages. So if another site links to one of your new pages, that page will likely be crawled and indexed much sooner.
And while some of these links may happen naturally, it’s best to take a more proactive approach.
If you can minimize the time between new site content going up and links coming back in, you’ll improve the speed at which that new content is indexed.
Of course, if you have any link building experience, you know that earning links is often easier said than done.
But if you create a promotion strategy ahead of time, you’ll know exactly what to do once your new post goes up — and you’ll have much better chances of getting that page indexed quickly.
Content syndication
If you can find places to syndicate your content, this is one of the easiest ways to ensure an audience for every new piece of content you publish.
Syndication is the process of having your content re-published on other websites, with credit given to your site.
Unlike guest posting, which requires you to create original content for someone else’s site, you get the reward of a link with much less effort.
Of course, syndication can get complicated. When done incorrectly, it can cause duplicate content issues.
In some cases, site owners even find syndicated versions of their content outranking their own site.
But when done well, it can help you improve your reach and earn more links from larger publications.

Re-publish on Medium
Medium is an extremely popular site for publishing and reading content.
It’s also a prime spot for syndication.
Although many users publish exclusively on the platform, you can also use it to republish posts and articles on your site. Medium automatically uses the rel=canonical tag, too, so you never have to worry about duplicate content issues
It’s easy, too: Just enter the URL where your article was previously published in Medium’s Import Tool, then click, “Import.”
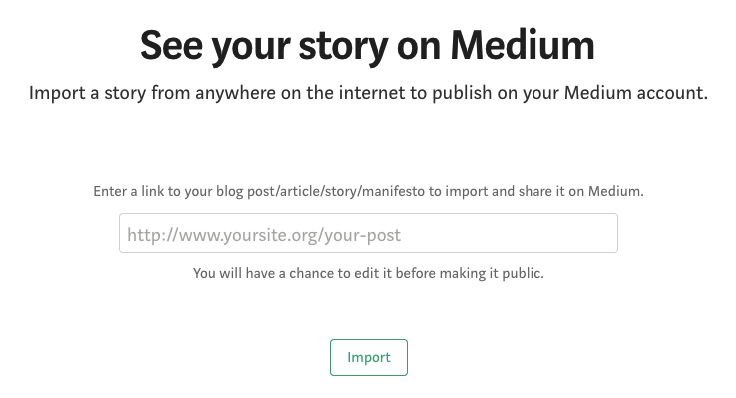
This will pull all of the copy from your original post, as well as text formatting, headings, lists, and links. This makes it extremely easy to quickly import and publish a post.
Images are not automatically imported, though, so you’ll need to add them manually. If you didn’t have images in your original post, consider adding some before publishing!
Medium’s homepage and category pages show popular posts, all with an image before the title. That’s not to say that you can’t get results without an image — but it will likely be much more challenging.
Plus, on the chance that you do make it to a category page, you don’t want your plain text headline competing for attention with all of those images.

Take the extra ten minutes to add a few images into your post.
After all, the content is already written and imported — so your time spent publishing will still likely end up being less than 15 minutes
Once you import your post and add images, you also have the option to create a custom permalink.
Click the three dots to the right of the “Publish” button, then select “Custom.”

Then, you can add up to five relevant tags to your post.
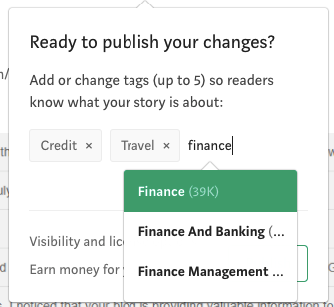
The number next to each tag represents how many users follow it. So if you choose tags with large followings, you can drastically increase your reach and get more value out of each piece of content you publish.
Submit to infographic directories
Directories used to be a huge part of SEO. Submitting your site to as many random directories as possible was an effective way to improve rankings and attract traffic.
Fortunately, that’s no longer the case. The term “directory” is often associated with spammy, ineffective practices — and rightly so.
Infographic directories are an exception.
Visual.ly, for example, lets users submit graphics to their visual inspiration gallery

If you create infographics for your site, you can submit them to the site and use the original link as the source. This requires very little work for the potential exposure it can earn you.
Plus, considering how time-intensive infographic creation can be, this extra step is a great way to maximize the value you get out of each one.
Publish on LinkedIn Pulse
Much like Medium, LinkedIn Pulse is a platform that encourages original content, but can also be used to drive traffic to your site.
If you haven’t yet published on the platform, it’s important to note that Pulse articles are separate from regular status updates.
Just below where you’d normally type a short update, click “Write an Article.”
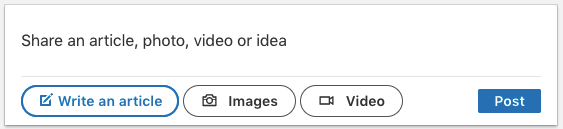
Then, you’ll see a full text editor with formatting options, media capability, and everything else you’d expect from a publishing platform.

Many users treat this feature like a blog and use it to publish completely original content.
This certainly isn’t a bad use of the platform, especially when you consider that it gets their writing directly in front of professional contacts.
But if you’re looking to drive traffic to content you’ve already published on your site, you can use Pulse to share an excerpt, then link to the full version.
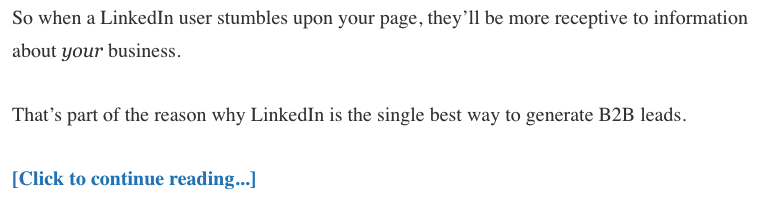
Copy and paste your first few sections (or more, depending on the length of the post). Make sure to include information that’s interesting enough to make readers want to get to the end of your article.
Then, include a link to the full version with a call to action like “Click to continue reading” or Read more!”
This strategy lets you take advantage of LinkedIn’s built-in audience and reach, while ultimately driving traffic to your own site.
As long as your first few paragraphs are solid, this is a great way to earn readers quickly after publishing new content.
6. Encourage social sharing
The extent of social media’s role in SEO is unclear.
What is clear, though, is that social platforms are an easy way to immediately let people know that your new content exists.
Copy and paste a link, add a few words of text, and voila — your content is shared with the world (or at least your followers).
Sharing your pages on social media also sends crawlers to them, which can help speed up the indexation process.
Social media platforms should absolutely have a place in your publishing strategy. And if they don’t yet, getting started is easy.
Create accounts on major platforms
If you’re just getting started with social media, the options might seem a little overwhelming. But at the very least, you should have a presence on Facebook and Twitter.
The other platforms you use depend on your industry and target audience.
If you’re a B2B company, for example, you’ll definitely want to be on LinkedIn. If you’re an apparel retailer targeting the 18-24 demographic, on the other hand, you’ll probably see better results with Instagram.
Once you’ve determined where you want to focus your social media efforts, take the time to build out your account or business page.
On Facebook, for example, you’ll want to include all of your contact information, as well as details about your services, mission, and story.
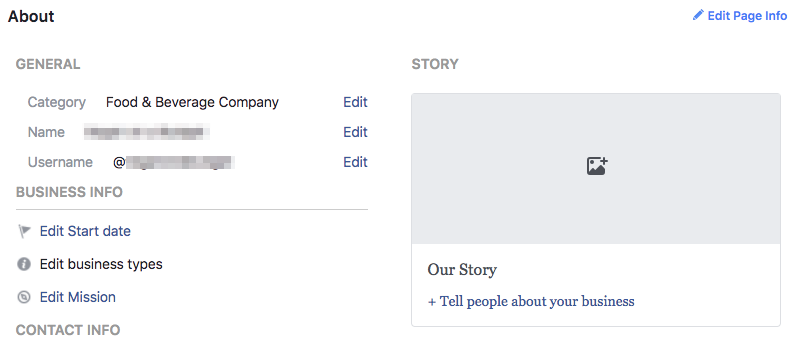
You should also have a profile picture and cover photo that are an accurate representation of your brand.
Create a promotion strategy
Once your accounts are up and running, you should create a social sharing routine to ensure that you’re regularly publishing new content to your accounts.
One of the best ways to do this is to use a tool like Buffer.
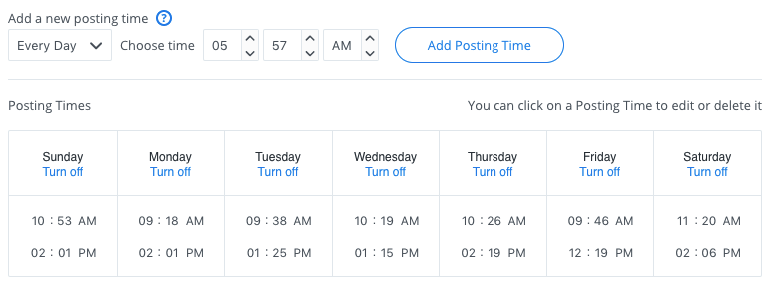
You can create a schedule of all of the times you want to publish new content for each of your social media accounts.
Then, you can add content to your queue and have it automatically shared at your predetermined post times.
This way, you never have to worry about remembering to post certain updates or share specific links at different times of the day or week.
Plus, every time you publish a new page, you can add it to your queue immediately.
So no matter what time it goes live, it will be added to your pre-existing schedule and shared with your followers at an expected time.
When you establish this level of consistency, your followers will know what to expect — and they’ll start to look forward to reading your new articles and blog posts on a regular basis.
From an indexation standpoint, this also means that every new page you add will be shared within a few days of being published.
This is a great way to get crawlers to your site and improve the chances of fast indexation.
Connect with influencers
Everyone likes to feel important.
And though your main goal with content should be to provide value to your readers, you can do that in a way that highlights other people and their opinions.
One of the best ways to do this is with roundup posts, or posts that combine quotes, tips, predictions, and other information from a variety of relevant people.
For example, this massive list of video content marketing predictions includes insight from a whopping 87 experienced marketers.

This provides a ton of value to readers who want to learn from the best, since it all comes from reputable marketers, many of whom are well-known in the industry.
And beyond that, it gives those marketers the chance to show their expertise — so you can be sure that almost all of them shared it on their social channels once it went live.
That likely resulted in a ton of additional traffic for the site. That kind of traffic can be huge for indexation.
Connect with influencers, ask for their advice or insight on a particular topic, then compile it into a resource from your readers.
After you publish it, make sure to reach out to those influencers to let them know. In many cases, they’ll be proud to show their expertise being highlighted, and share the post with all of their followers.
Consider using paid options
Sharing links is an effective way to let your existing followers know that you’ve published new content.
And beyond that, you can also use your social accounts to grow your audience with paid post promotion.
All of the major social platforms have options for “boosting” content to improve your reach.
So instead of creating a traditional advertisement, you pay to get the content you’re sharing with your followers in front of more people.
Most platforms also make this a fairly straightforward process.
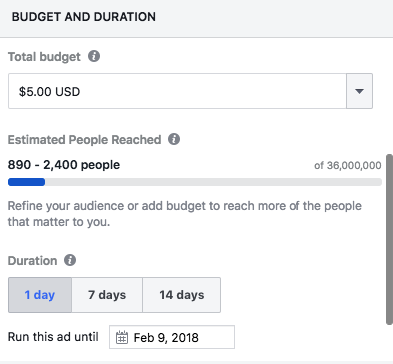
On Facebook, for example, you can determine up front how much you’re willing to spend to boost your post and how long you want the promotion to run.
Then, you determine your audience based on a variety of targeting options. If you want to keep things simple, you can stick with the standard age, gender, and location targeting.
But if you have a clearer idea of who you want to reach, you can also select your audience based on factors like interests, job titles, and online browsing behavior.
Essentially, the goal here is to choose an audience that is likely to be interested in reading the article, blog post, or other piece of content you’re sharing.
You’re not necessarily trying to sell to these people, but they should be part of your target audience.
(And if the people who are likely to be interested in your content aren’t your target audience… it might be time to adjust your strategy.)
Once you’ve selected your audience, you can start boosting your post. If you’ve never boosted a post before, you may be surprised by the impact it can have at a relatively low cost.
If you decide to make this a regular part of your strategy, you can also use tools like AdEspresso to automate the process and make it even easier.
You can set your Facebook account up to automatically run promotions for posts that meet certain criteria.
So, for example, if you share an article and it gets 50 likes organically, you can safely assume that it is an effective piece of content for your business.
This is the kind of content worth investing some of your advertising budget in.
With AdEspresso, you can set these parameters ahead of time — so that every time a link organically gets a certain number of likes, you automatically spend a certain amount of money promoting it to even more users.

This can help you maximize the value you get out of each piece of content, and focus your advertising budget on the pieces that give you the most bang for your buck.
7. Create a blog
Google’s algorithm prioritizes giving their users “fresh, recent search results.”
Site owners are constantly publishing new pages and sharing new information, and the search engine focuses on making sure that searchers are getting the most up-to-date version of the information they want.
Adding new content to your site on a regular basis shows Google that your site provides fresh information. The best way to do this is by running a blog.
A blog creates tons of content for spiders to crawl and Google to index. The more high-quality content you put on the web, the more indexation you get — and the more SEO power you earn.
Websites with a blog have an average of 434% more indexed pages.
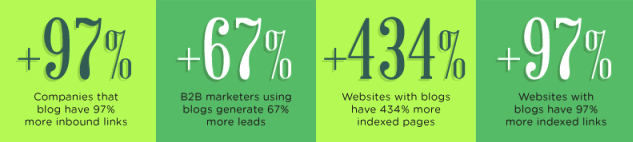
These companies also have 97% more inbound links and generate 67% more leads.
So if you’re not yet running a blog, creating one could help your marketing strategy in several different ways.
And if you’re not sure where to get started, you can use the blog content that’s already out there to analyze what works.
This way, you’re not just choosing topics you think you’re audience might be interested in — you’re taking a data-back approach to creating interesting, effective blog posts.
Competitor research
No matter your industry or niche, there are probably already hundreds (if not thousands) of people writing blogs about it.
You can use these blogs to do competitor research.
There are plenty of tools available to help you figure out which content is performing best for other sites.
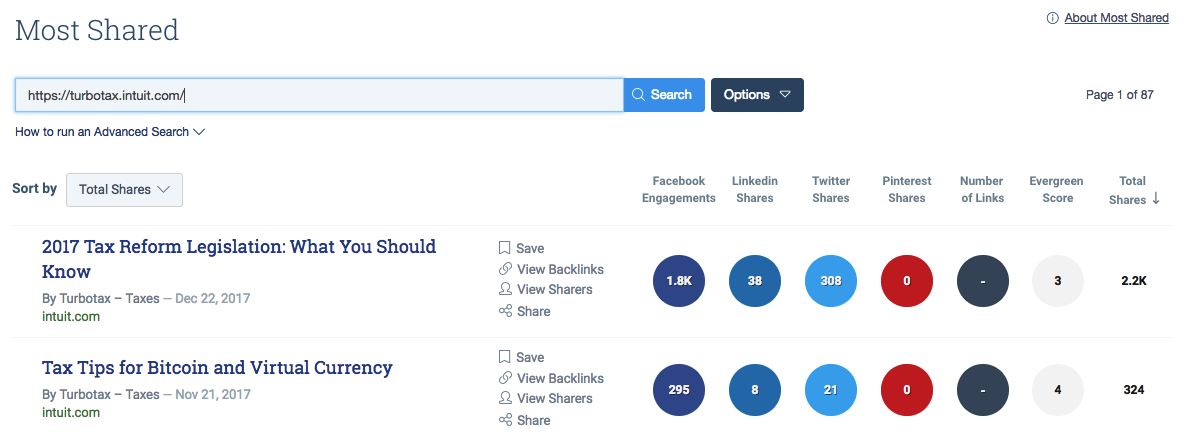
One of the best is Buzzsumo, shows the top-performing content for any domain or topic based on social shares.
If you know which competitor you want to research, type their domain name into the search bar. Then, you’ll see a list of their most-shared pages, with share counts for Facebook, LinkedIn, Twitter, and Pinterest.
You can also search for a specific topic, and you’ll see the most-shared content about that topic from a variety of sites.

If you’re not yet sure who your blog competitors are, this is a great way to see who’s publishing content in your industry.
Then, you can take a more in-depth look at each of the blogs that are earning lots of views and shares.
If you already know who your competitors are (or if you just want to keep an eye on when your business is mentioned online), you can set up Google Alerts to monitor for specific words and phrases.
Enter the phrase you want to track, then set your alert preferences for time, sources, language, and frequency.

These alerts will be sent directly to your email, so you can easily stay on top of when new content is published about the topic you’re monitoring.
If you want to dig more into competitive research, there are tons of other helpful tools you can use.
Many of them require a subscription, but if you’re serious about outranking your competitors and getting better results with your site content, they’re worth the investment.
8. Create an RSS feed
Creating an RSS feed isn’t absolutely necessary, but it doesn’t hurt.
RSS stands for “really simple syndication,” and it is an easy way to share the publication of new content. It’s essentially an automated feed of your website that updates every time you publish a new post.
It also used to a popular way to subscribe to blogs.
Each post would be added to a site’s RSS feed, and users could subscribe to that feed and get an email each time a new post was published.
Today, most site owners prefer to have their own email lists — so RSS subscription is no longer a popular option for that purpose.
Still, an RSS feed can be an effective way of telling Google about your new content as soon as it’s published, and there are a few other basic tasks you can use it to automate.
RSS readers
An RSS reader lets users access all of the RSS feeds they subscribe to in one place. It’s basically a customized news feed, where users only see stories and posts from the publications like.
When Google discontinued its RSS reader, Google Reader, many people thought that signaled the end of RSS readers in general.
Still, many people still use RSS readers like Feedly as a content curation tool.

This is ideal for users who want to regularly share helpful content on their social media accounts with their followers. Instead of sorting through the noise on social media platforms, they can use their Feedly accounts to find high-quality articles and posts from the publications they trust.
So if readers like your blog and want to know about your new posts, but don’t necessarily want to subscribe to your email newsletter, it’s helpful to have an RSS feed.
Create an RSS feed
The easiest way to create an RSS feed is with Feedburner.
First, enter your blog’s URL into the search box. Keep in mind that in most cases, your blog will be in a subfolder like /blog.
Entering this URL (and not just your domain) ensures that only your blog posts are pulled into your feed — and not other content like service pages or pricing information.
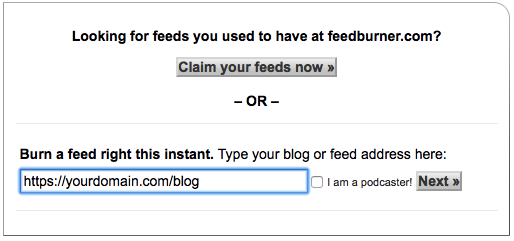
Next, give your feed a title and a URL.

Then, click next — and you’re done!
You now have a feed address that users can subscribe to in their RSS readers. You can let them know by adding a link to it on your site with the standard RSS icon.
If you already have social media icons on your site, this is a logical place to add your RSS feed.
For example, in Search Engine Journal’s header, they link to their RSS feed right between their email subscription button and the links to their Twitter and Facebook accounts.

This makes it easy for visitors who use RSS readers to subscribe to their feed.
RSS for automation
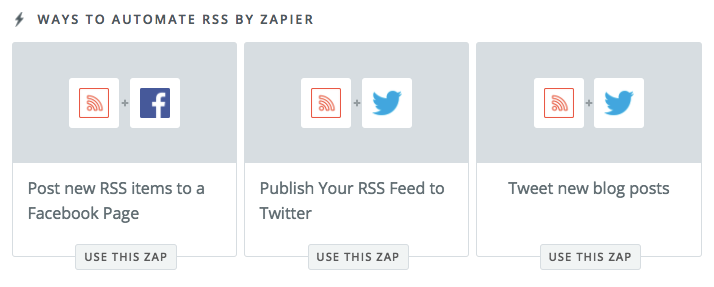
Once you have an RSS feed set up, you can also use it in combination with tools like Zapier to automate social posting.
This tool lets you create “Zaps,” or feeds within your feed, then automatically share to various platforms.
First, create an account and enter your feed URL.
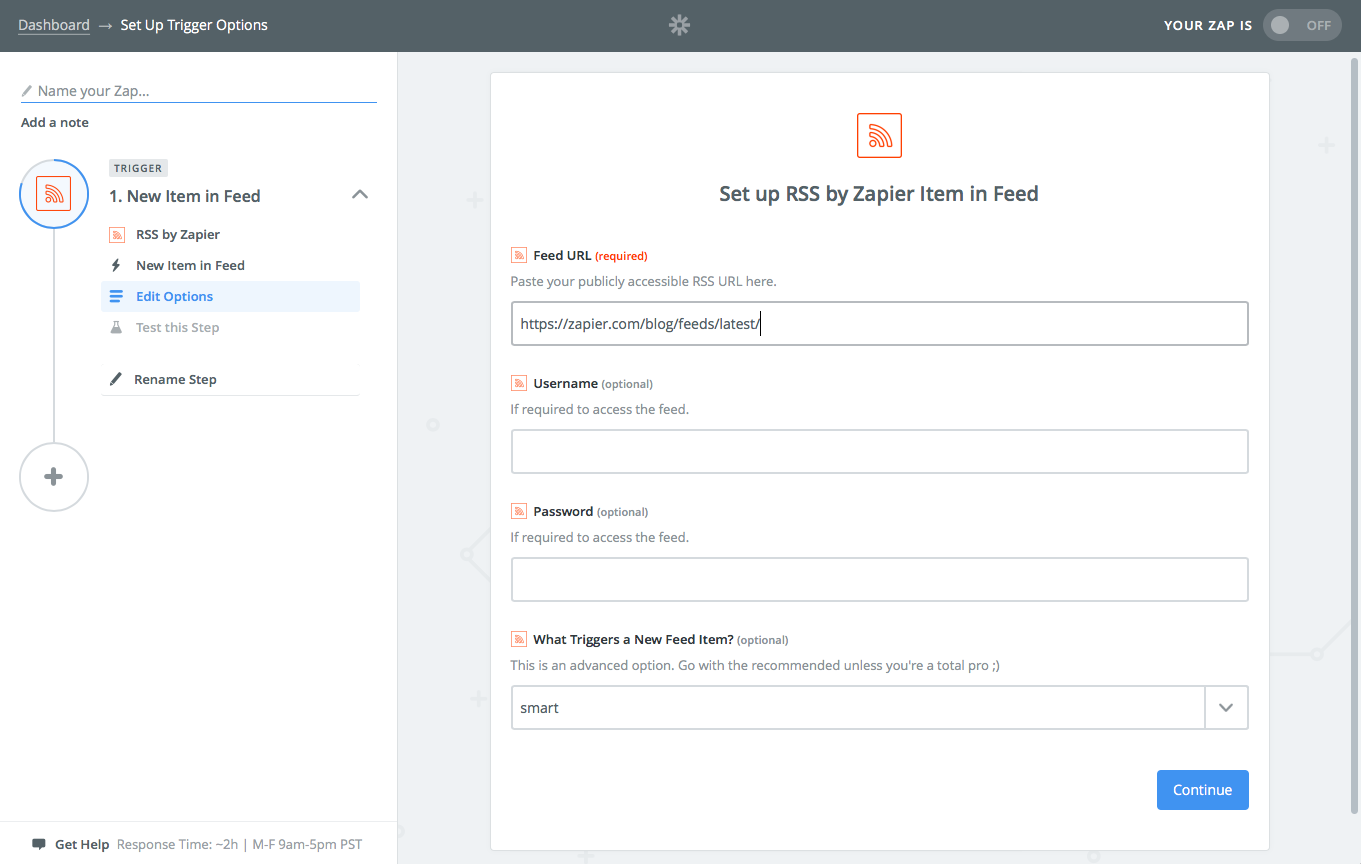
Then, you have the option to filter your feed for certain content or topics.
In most cases, you’ll want to include all of your posts.
But if, for example, you want to create a Zap that only includes posts about a certain topic, use the Title filter to only include posts with that word or phrase in the post title.

Once you’ve set up your filters, click “Continue” to finalize your Zap.
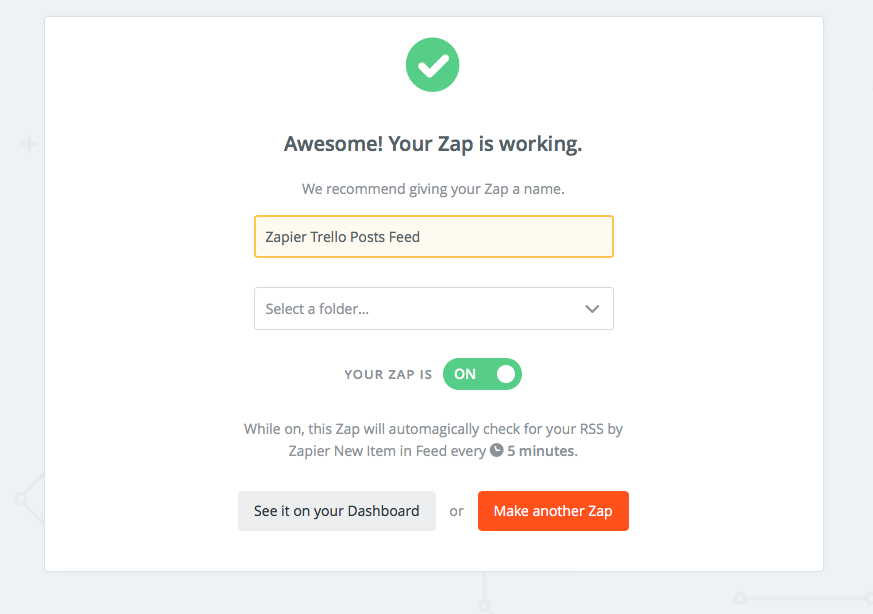
Once your Zap is working, you can use Zapier to automate a variety of tasks. The most common is publishing new RSS items to your social media accounts.
You can set your account so that every time you publish a new post, it’s automatically shared to the social media platforms of your choice. This is an easy way to save time — and jump-start the process of driving traffic and crawlers to your new content.
9. Check for crawl errors
As you work on and add new content to your site, it’s important to keep an eye on how it’s being crawled.
Just because your site is being crawled effectively now doesn’t mean you’ll never run into issues.
Crawl errors can happen, especially when you make significant changes to your website like adding, removing, or moving pages.
Fortunately, monitoring crawl errors is easy with Search Console.
Access your crawl errors report
You can identify issues by looking at your crawl errors report on a regular basis.
Here’s how:
- Open up Google Search Console and select your website
- Click on Crawl
- Click Crawl Errors
This report will show you any problems Google has had crawling your site over the past 90 days.
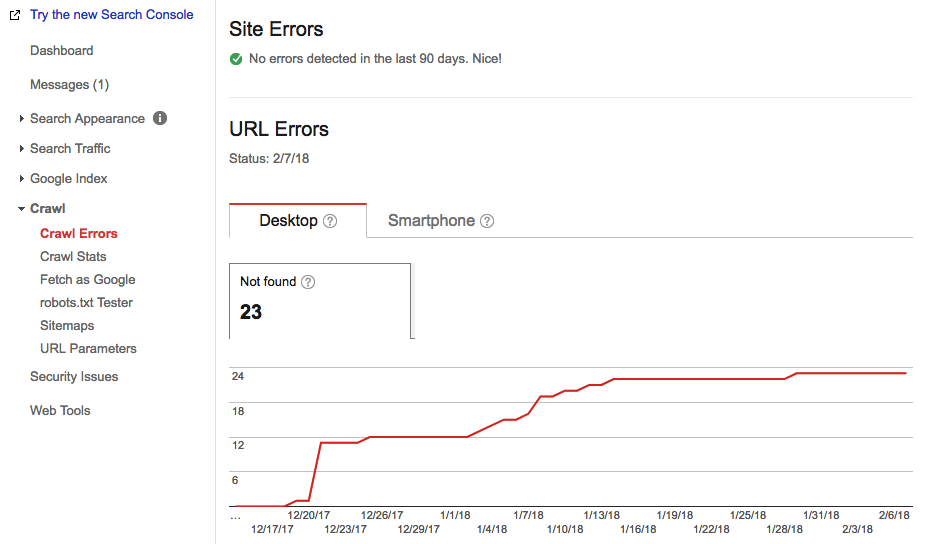
The “Site Errors” section at the top will show you any major issues that are impacting your entire site.
If you have any errors here, you’ll want to fix them immediately since they can prevent all of your pages from being indexed correctly.
If you have URL errors, however, these only affect specific pages on your site. These are often caused by broken links and redirect errors.
If you scroll down, Search Console provides a full list of these URLs and errors, so you can dig into any issues and fix them.
Use Screaming Frog to detect errors
You can also use tools like Screaming Frog to scan your site for issues that can affect how your site is crawled.
For example, if you’ve set up redirects on your site, this can sometimes cause crawl errors. You can use Screaming Frog to verify that all of your redirects are working properly — and not resulting in 404 errors.
Before crawling your site, go to the “Advanced” tab of the configuration settings and make sure that “Always Follow Redirects” is checked.
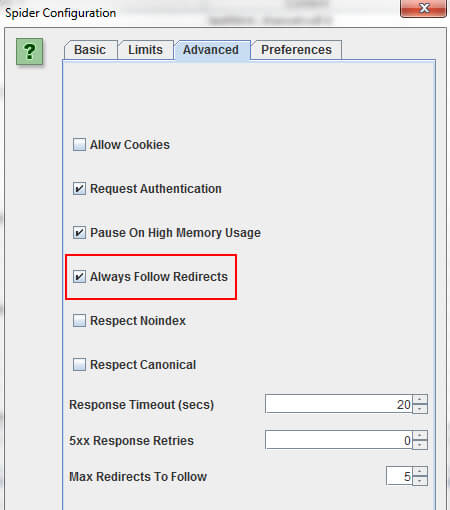
This tells Screaming Frog to follow all of your redirects and provide the full path and status code. Then, select “Reports” in the main menu, and click “Redirect Chains.”
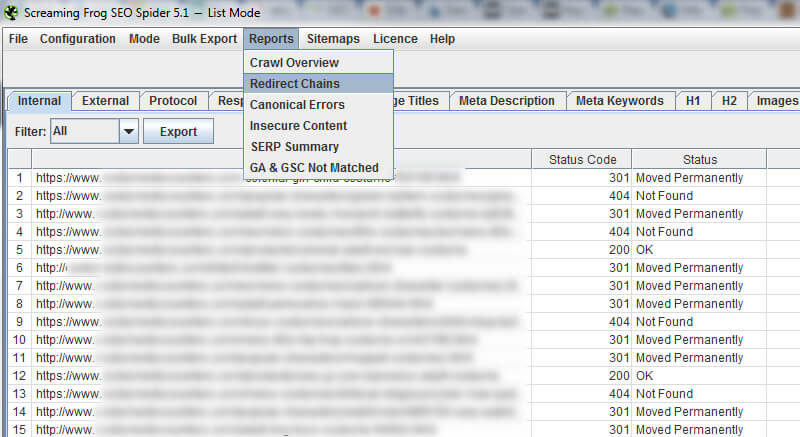
This will show you all of the redirects on your site and how they’re working.
Any redirects with 200 or 301 status are good to go. But if you see any 404s, you’ll want to fix them. Then, run the report again to verify that everything is working correctly.
If you’ve migrated to HTTPS, you can also use Screaming Frog to detect problems with “insecure content,” or pages that have HTTPS URLs, but HTTP elements.
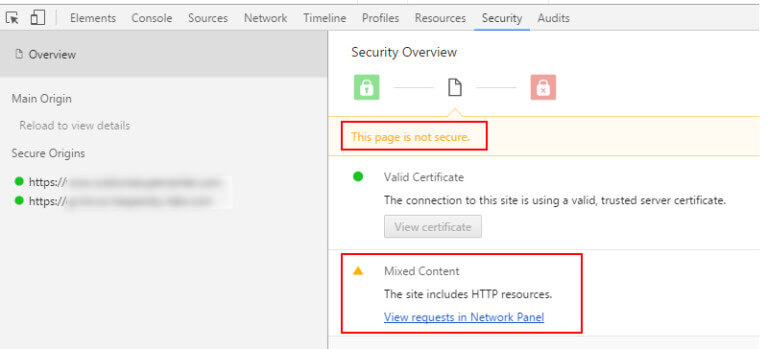
To access this information, select the “Insecure Content” option from the “Reports” menu.
If you see any issues, consult the developer who migrated your site so that they can fix those issues and make sure that your site is secure.
Finally, you can use Screaming Frog to detect canonical errors on your site.
The canonical tag tells crawlers which version of your domain you prefer, whether WWW or non-WWW, HTTP or HTTPS.
Much like setting a preferred domain in Search Console, it helps eliminate duplicate content issues and ensures that Google is indexing the correct version.
If it’s implemented incorrectly, though, it can cause some serious crawl errors.
You can make sure that your site’s canonical tags are working properly by selecting “Canonical Errors” from the “Reports” menu.

If you see any 404s, this is an issue you’ll want to fix immediately. Send the report to your developer so that they can determine the cause of the problem and get your crawl status back to error-free.
Conclusion
Getting indexed in Google is an essential first step to having a successful website. Your site can’t show up in search results without it — meaning that unless your pages are indexed, they’re unlikely to get any traffic.
Fortunately, you don’t need to leave indexation up to chance. Tools like Search Console and Yoast give you control over how your site is crawled and indexed and make it easy to keep an eye on your crawl status.
As you update your site, keep an eye on how it’s being crawled and indexed. Checking in on a regular basis is an easy step that lets you identify and issues and fix them before they cause issues with your search visibility.
Plus, following best practices like submitting a sitemap, building links, and publishing new content on a regular basis can help get your site crawled quickly and effectively.