An online store can unlock a global audience and customer base, even if you run a small shop out of your home or sell in a local brick-and-mortar location. We’re talking sold-out shelves, explosive growth, and access to a nigh-infinite stream of buyers worldwide. After building hundreds of websites and spending years managing various online businesses, we’ve figured out what steps to take (and in what order) to make the process as easy as possible. In this guide, we share everything we’ve learned about creating an ecommerce website… as fast as possible.
The Investment Needed to Create an Ecommerce Website

Wix
The #1 Website Builder
Get everything you need to build, launch, and scale your ecommerce website with ease. Includes a drag-and-drop builder, marketing and SEO tools, commission-free sales, hundreds of design templates, and more.
Pricing starts at $23 per month.
Wix is our #1 recommendation for creating an ecommerce website because it includes everything you need to get started in one package. Every plan comes with a free domain name for the first year, 0% transaction fees, 975+ free design templates, and a drag-and-drop site builder. So, you get it all in one place.
Pricing for ecommerce plans starts at $23 per month but you can start building your site, list all of your products, and get everything ready to go without paying a cent.
Wix’s free-forever plan means you can play around with the site builder, get comfortable using it, and build your entire site for free. Then, you can upgrade to a paid plan and unlock payment processing when you’re ready to launch your store.
If you’re looking for an ecommerce platform that’s easy, customizable, flexible, and scalable, Wix is the way to go.
Plus, it’s extra-reliable. With powerful data centers that maintain site uptime no matter what, auto-scaling to keep the user experience consistent when you experience traffic spikes, and automated backups of your site data, you’ll never have to worry about missing out on visitors or sales because of factors out of your hands.
Building a website from scratch can take anywhere from a few hours to several days or even weeks, depending on whether or not you have everything ready and your experience level. To help speed up the process, Wix offers a quick-start AI option that creates all the pages and demo content for you. I
f you don’t want to use the AI builder, you can still save a lot of time by starting with one of Wix’s 975+ templates. They’re all mobile responsive, 100% drag and drop, and fully customizable.
Either way, the amount of time it takes to customize your site, list your products, and launch varies.
1. Sign Up with Wix (1 Minute)
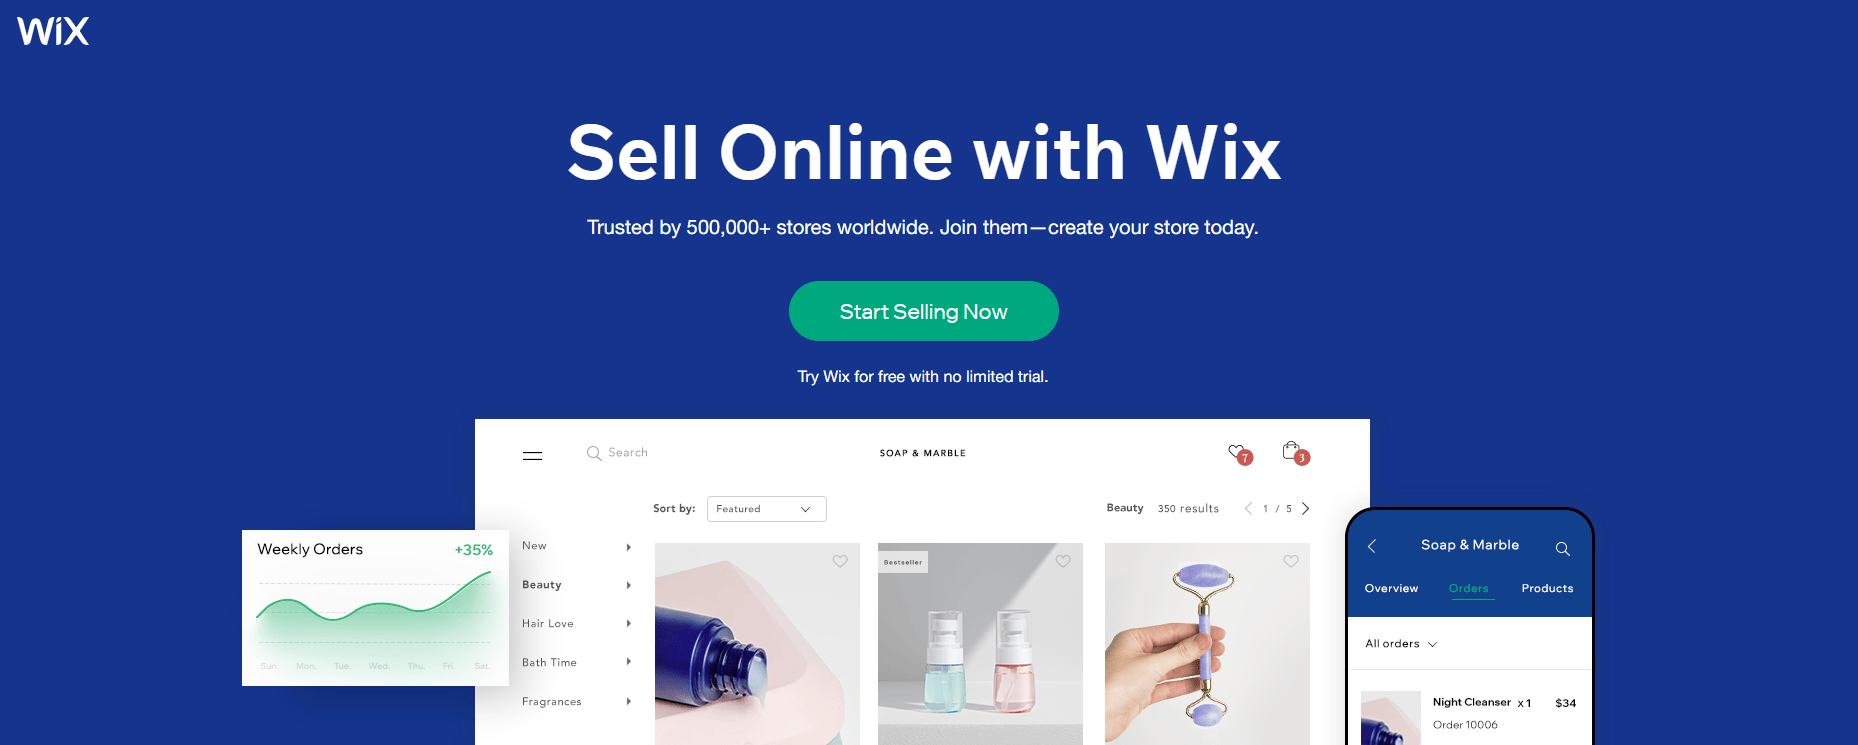
First, you need to create a Wix account. Head over to Wix and click “Start Selling Now.”
From there, you can sign in with a Facebook or Google account, or you can sign up directly with your email address. Either way works just fine.
Next, Wix asks you a series of questions to get to know you and your new website. The third question asks what type of website you need. Make sure you search for “ecommerce Store” in the search bar and select that option.
2. Choose How You Want to Set Up Your New Store (1 Minute)
After you answer the first few questions, you have the choice to use artificial intelligence to set up your store or create your website from scratch with the Wix editor.
We highly recommend choosing the ADI option because it’s the fastest and easiest route. It handles all the technical steps, including setting up all of your pages and menus, so you don’t have to worry about doing it yourself.
It also means you don’t have to worry about making minor mistakes that take time to troubleshoot and fix on your own.
Plus, you can always make changes and updates to your store later. Found a better image to use? Swap it out in a few seconds. Want to update the copy on your home page? No problem.
We’ve used both methods to start a store, and it’s much easier to start with the ADI wizard than build a brand-new website design from scratch. You also don’t have to worry about linking pages together or anything like that—the tool handles it all for you.
The Wix ADI tool works by tailoring designs to specific types of stores. For example, if you’re creating a store to sell glasses, the ADI tool is smart enough to know the types of designs that work best for selling glasses.
If you want to start an online bakery, the ADI tool creates designs made specifically for your industry.
It seriously takes just a few minutes to build your entire website. So if your goal is to start selling as quickly as possible, the ADI tool is the way to go.
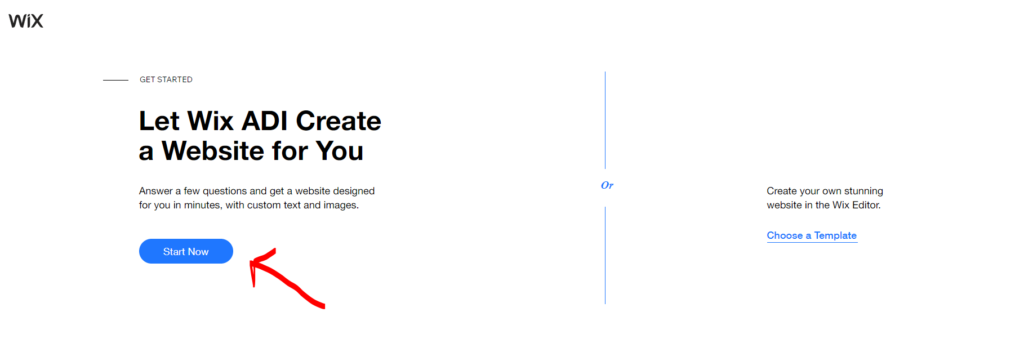
To get started, click the “Start Now” button on the left side of the screen.
3. Answer ADI Wizard Questions (2 Minutes)
Next, you’ll answer a few questions about your business so Wix can learn more about you.
The first question is “What do you need on your new website?” You can choose from several recommended choices and additional options based on the functionality you want for your store.
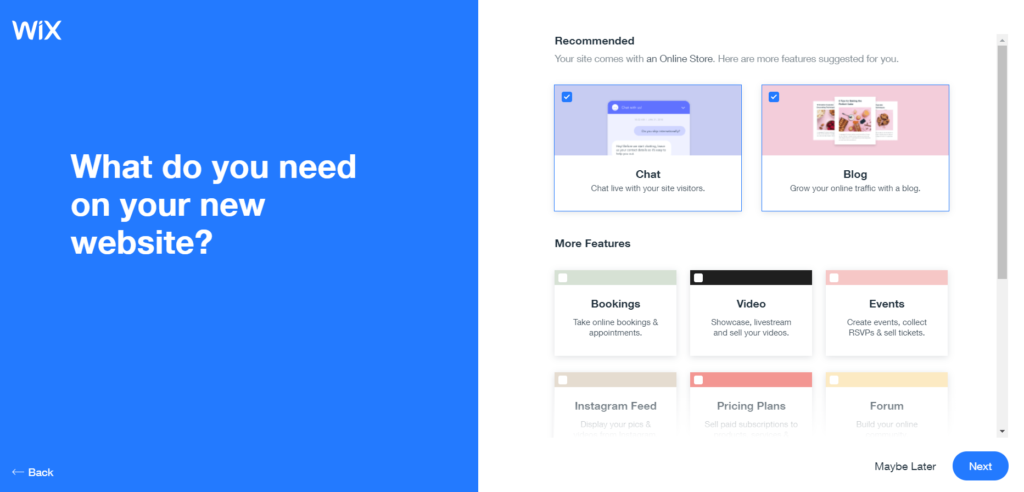
Be sure to go through all the options and check the options you’re interested in. Then click “Next”.
Next, you need to give your store a name. Then you have the option to import images and text if you have an existing website. You can decide if you want to use this but it may be easier to start fresh since it doesn’t always work perfectly (and you may not have an existing website).
Then, review your business information. Here you can add your logo, physical address, phone number, and social media accounts.
Then, when you’re ready, click “Next”.
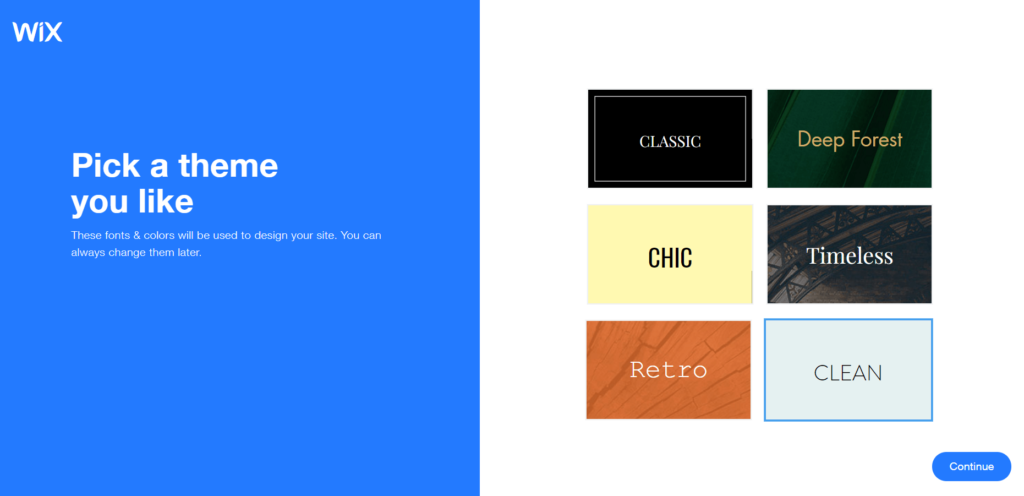
4. Pick a Theme (1 Minute)
Now it’s time to choose a color scheme and font combination (Wix calls this a theme). Doing so helps the ADI tool understand the specific style you’re looking for.
It may help to think about the types of products you sell and the styling your target audience appreciates.
However, don’t spend too much time overthinking this. Pick one you like and move on. You can always come back and change it later.
5. Select a Homepage Design (1 Minute)
The next step is choosing a homepage. If you were building a house, this would be the curbside view. It’s the first page customers see when they visit your site.
So, you want to make sure it looks good and nudges visitors to your most important pages or products.
Most of Wix’s pre-designed pages look nice out of the box. You don’t need to do much tweaking to get them launch-ready aside from swapping out the images, featured products, and copy.
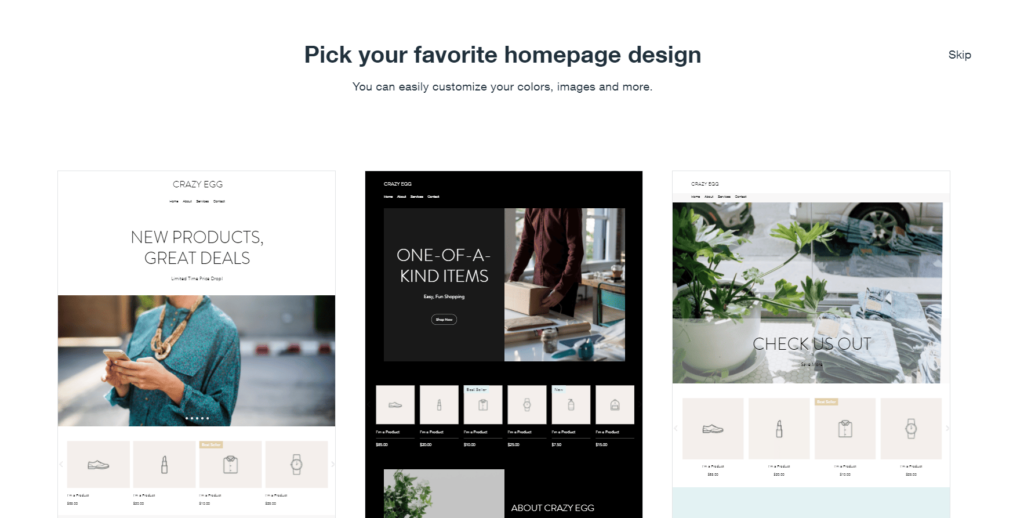
When choosing a design, focus on layout and functionality rather than details like colors, photos, or fonts since you can change these later. You can also reorder sections, add new sections, and remove sections you don’t need.
Wix’s drag-and-drop editor is very flexible, but these homepage templates offer an excellent place to start.
6. Add Pages to Your Site (1 Minute)
Now you have the option to add additional pages to your ecommerce website. We highly recommend adding (at least):
- An about page
- Store policies
- A FAQs page
- Contact page
- Privacy policy
- Terms and conditions
All of these pages make your site look complete, 100% legitimate, and safe for buyers to use. It’ll also help answer any of their questions and encourage them to overcome any hesitations they may have… immediately.
A privacy policy is required by law. You can use a free policy generator, pay for a premium template, or work with a lawyer to draft one up. We highly recommend working with an attorney, since that’s the only way to ensure you’ve done it correctly.
Terms and conditions are not required but it’s a smart idea to outline the conditions in which users are allowed to use your website.
Your lawyer can help with this page as well.
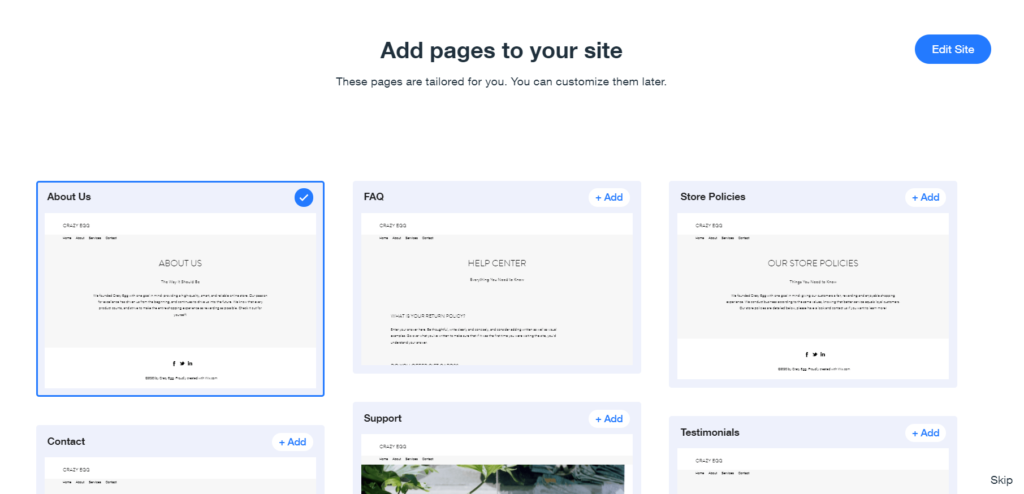
Thankfully Wix makes it easy to add all of the pages you need in a few clicks. Simply click on each page you want to add. When you’re done, click “Edit Site” in the top right corner and move on to step seven.
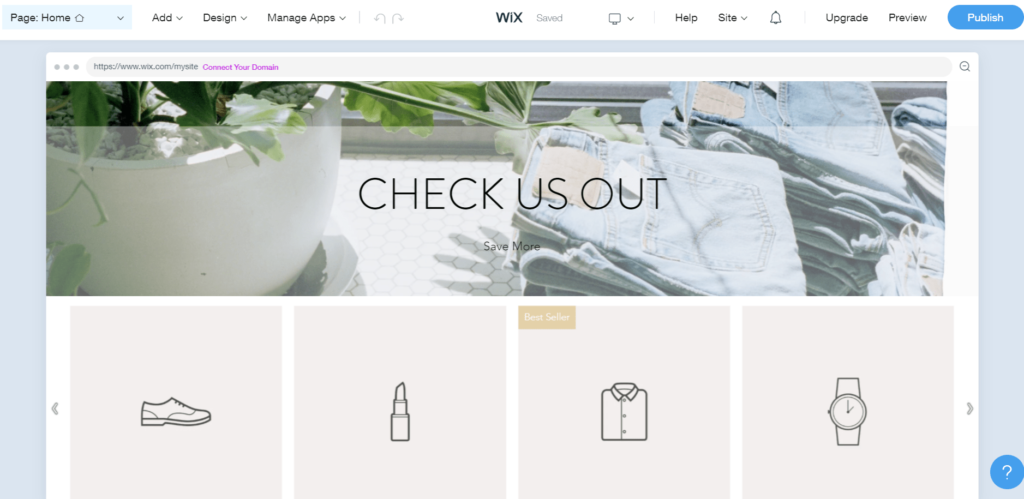
7. Customize Your Store (2 Minutes)
Good news! You’re ready to customize your new ecommerce store.
At this stage, you don’t need to spend a lot of time on customization. One of the advantages of building an ecommerce store with Wix is the ability to make quick and easy changes as your store grows and you learn more about your audience.
Over time, you’ll get a better understanding of who they are, what they like, and what they’re looking for.
Then, you can use what you learn to drive branding and website changes.
But until then, don’t spend too much time here. We know firsthand how hard it is to accept imperfection and move on, but it’s critical at this stage in your business.
You can edit and customize just about everything you see in a few clicks. It can feel overwhelming at first, but don’t let all the possibilities get in the way of what matters.
Spend some time playing around to get comfortable with Wix’s site builder. Once you get familiar, it becomes incredibly easy to make changes.
When you’re ready to start customizing, all you have to do is click on what you want to edit. A new menu will appear with specific parameters attached to what you’re working on.
For example, if you click the header, this will open a menu on the left side of your screen.
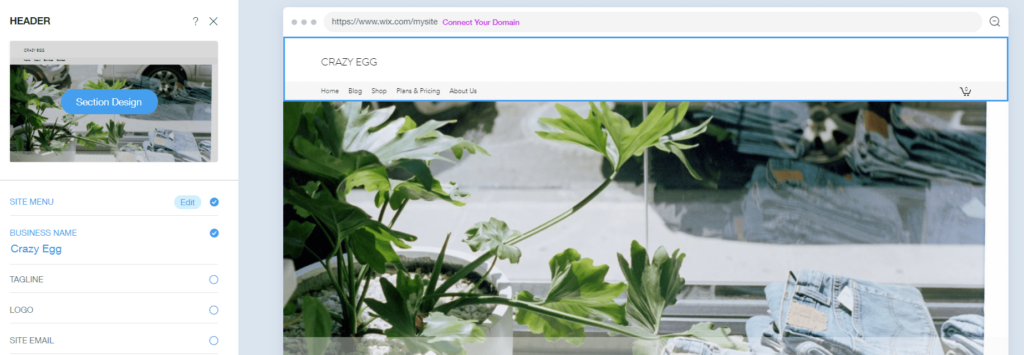
Within that menu, there are several options for customizing your site’s header.
You can add a store logo, a phone number, links to social media, and more.
Repeat this process in various sections around the main page. Each time you click on an area, a new customization menu opens on the left side of your screen.
Work your way through the homepage and additional pages, exploring the various sections and features.
Depending on the theme, homepage, and additional pages you chose, your design elements may look slightly different from the screenshots above.
For now, focus on big picture details. This includes things like your store’s name and basic info. Your ADI-generated site will include placeholder copy so you can see how it appears to visitors.
Be sure to replace this copy with text that applies to your store before publishing your ecommerce website.
8. Add Products (2 Minutes)
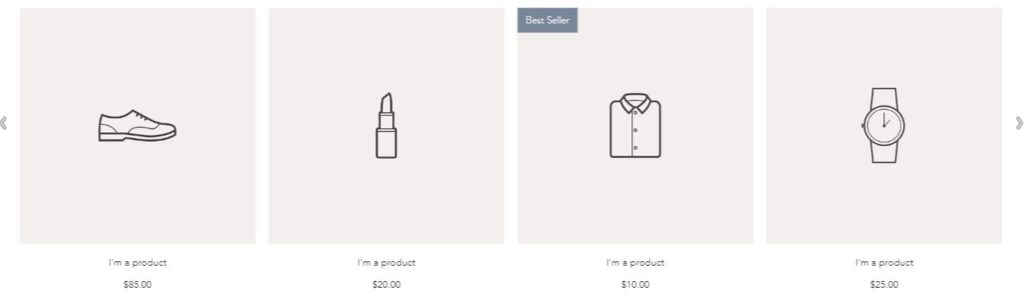
For this step, you’ll stay in the customization view. Your ecommerce site should include an area with “dummy” or placeholder products.
These placeholder products are there so you can easily click and change them to actual products you want to sell in your store.
Depending on the design you chose, the placeholders are in a variety of areas. Regardless of the overall design, however, you should see a section for products on the homepage.
When you find it, hover over it until a menu overlay appears. This overlay includes a button that says “manage.”
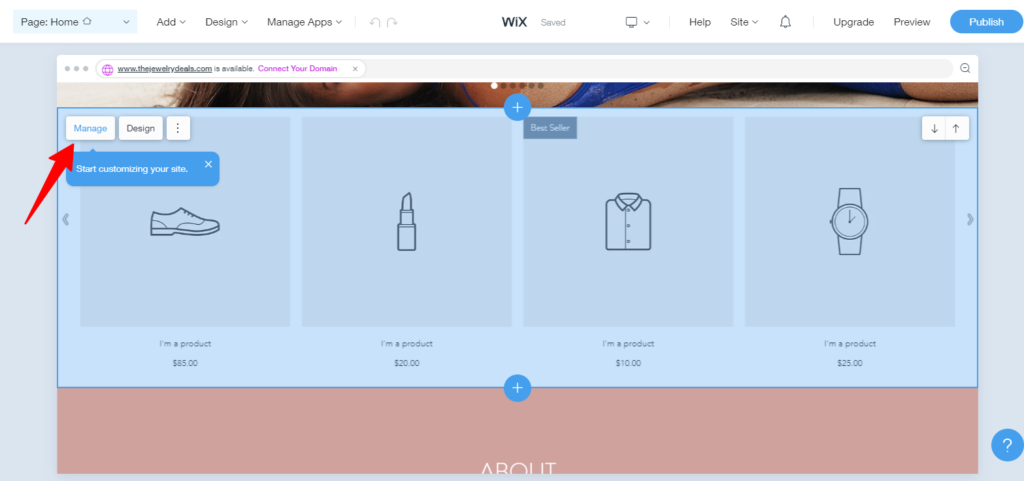
This opens up your user dashboard, which is where you can add individual products. At first glance, the dashboard might appear overwhelming. And there’s a lot of information here.
But this is where you can make changes to multiple parts of your ecommerce store and it’s a lot simpler than it may seem at first.
For right now, just focus on adding products to your store. The other elements will fall into place later when you have more time and a greater understanding of your audience.
To add a product, click on “Store Products”. Then look for the “+ New Product” button at the top right of your screen.

Furthermore, your Wix store design already has placeholder product listings in the dashboard. You can easily click one and change the information to reflect a real product you want to sell.
You can replace the photo, change the type (physical or digital), swap out the dummy SKU for a real one, and manage the inventory. This is also where you’ll add a product description, including the size and color, if applicable.
When it comes to product listings, t’s best to be as descriptive as possible. So take advantage of the various boxes and add as many details as you can. Put yourself in the consumer’s shoes.
What does a shopper want to know before they make a purchase? Try to anticipate your customers’ questions. This increases your likelihood of making sales.
When you’re done adding a product, make sure you click “save.” This adds the product to your store so shoppers can see it.
Note: if you prefer to add new products rather than replacing the dummy products, don’t forget to delete the dummy products from your dashboard.
After you load all your products, click the X in the top right corner of your dashboard to close it. Then you’re ready for the next step.
9. Customize Your Cart (1 Minute)
Every ecommerce store needs a virtual shopping cart. Just like a cart in a physical store, this is where customers can see all of their selected items at a glance.
And because you used the ADI tool, your Wix site automatically generates a shopping cart. This gives you a starting point for your cart design, which makes it easier to launch your store as quickly as possible.
However, you still need to make sure your cart functions properly and is set up the way you want it.
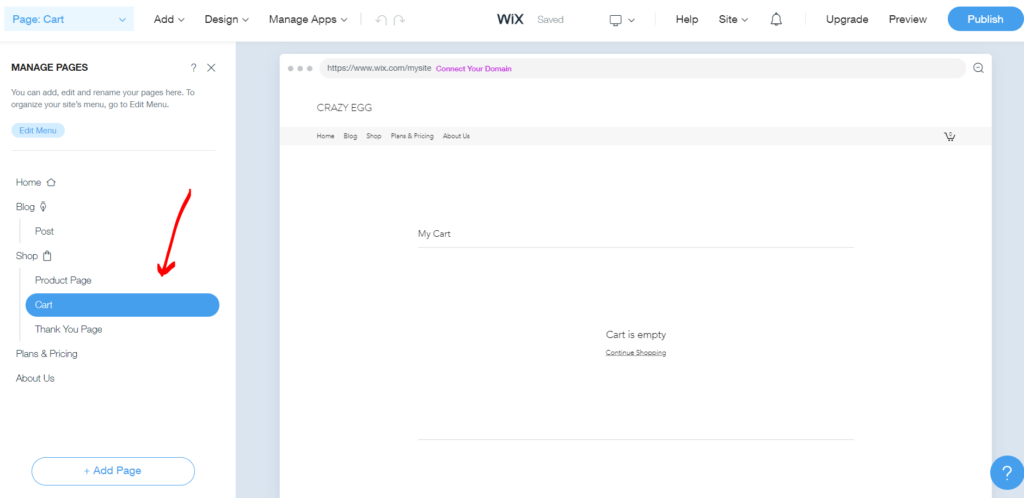
To edit your shopping cart features, click on the “Page Home” drop-down at the top left of the page editor.
This brings up a menu called “Manage Pages.”
Scroll down until you find “cart” and then click on it. From here, you can manage how your cart page appear to shoppers.
10. Set Up Shipping and Payment Methods (2 Minutes)
Finally, you need to review the settings for both shipping and payment.
When it comes to shipping, you’ll need to decide if you want to accept payments from overseas — which means you’ll also need to ship products to other countries.
Some ecommerce store owners get around this by only selling to customers in the United States.
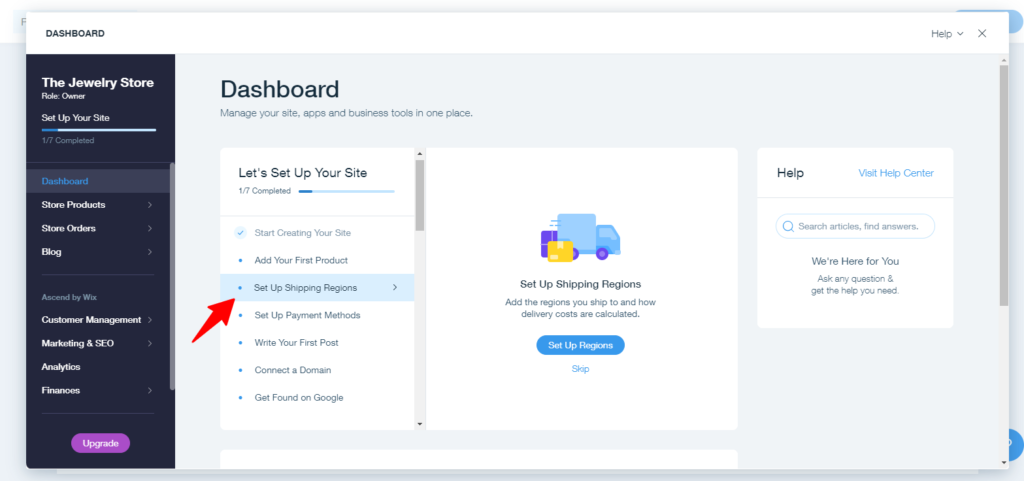
To change your shipping settings, go to the dashboard.
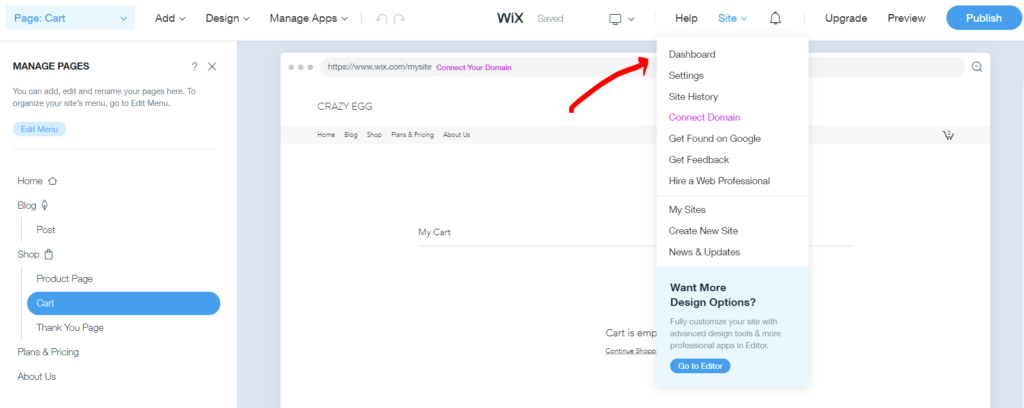
From there, you’ll see “set up shipping regions.”
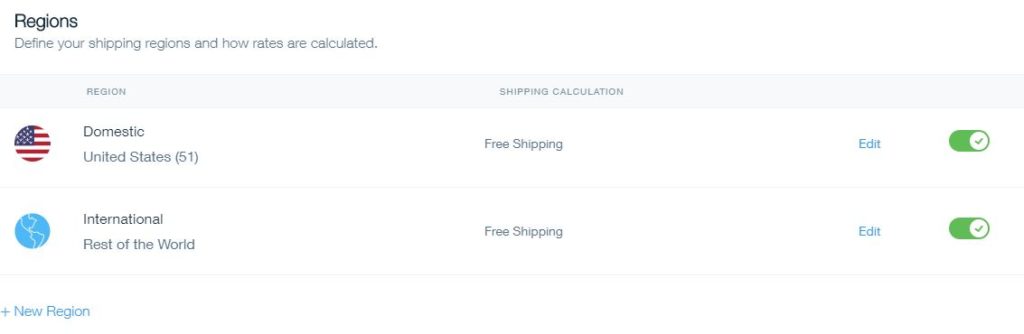
After that, you see a screen that lets you modify the settings for both U.S. and international destinations.
For example, you can offer free shipping, or you can choose to calculate shipping by weight, flat rate, or using real-time calculations from the Postal Service.
Once you’re happy with your shipping settings, it’s time to update your payment settings.
To modify your payment options, go to the dashboard and find “Accept Online Payments”.
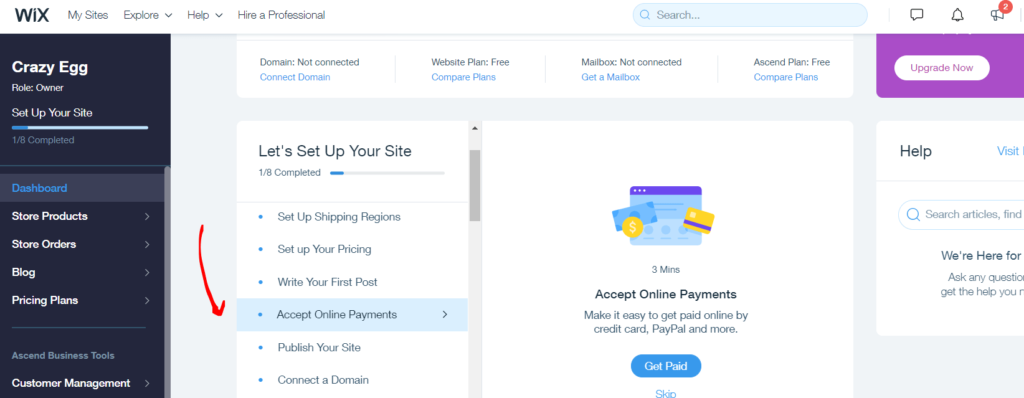
Wix makes getting paid easy. You can choose from a range of options, including credit card payments, PayPal, Wix point of sale payments, and more.
And, don’t worry, Wix delivers the highest grade of security for payment gateways. Your visitors’ payment and general data stay safe because of PCI DSS-compliant security measures and TLS 1.3 encryption.
If you choose to accept credit card payments, Wix does the behind the scenes work for you.
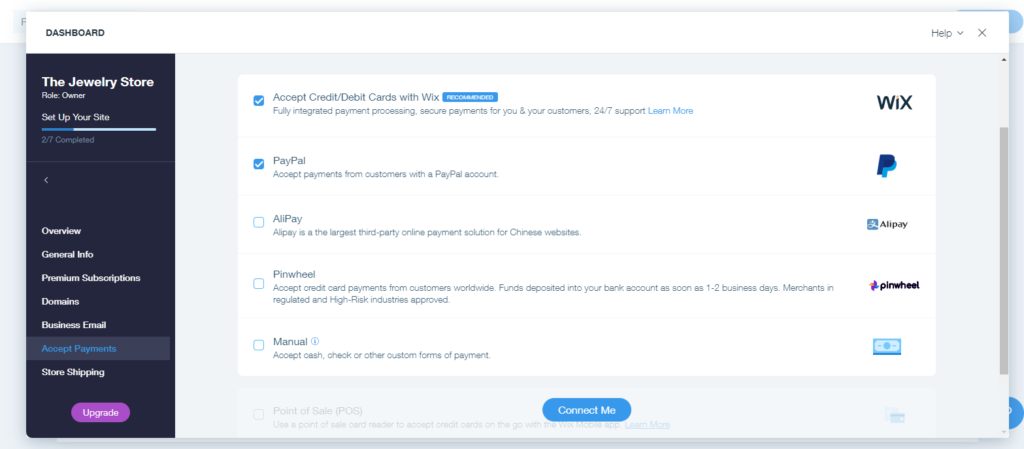
When you allow credit card payments in your ecommerce store, Wix provides protection to both buyers and sellers. Plus, they also accept all major credit cards.
Note: As a seller, you pay $0.30 plus 2.9% in transaction fees.
11. Upgrade to a Paid Plan and Launch Your Ecommerce Store (1 Minute)
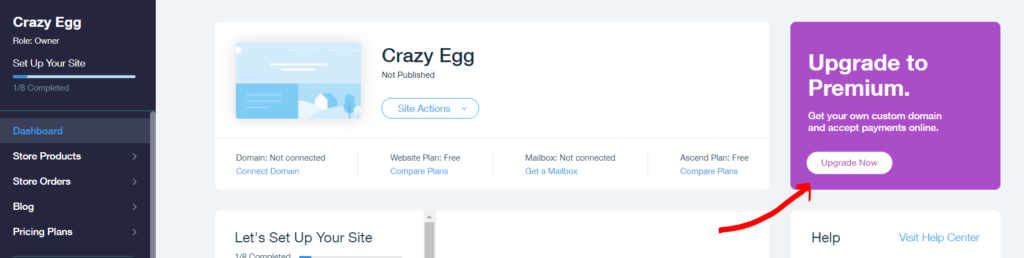
Now it’s time to upgrade to a paid plan. From your site dashboard, click “Upgrade Now” in the top right of your screen.
Next, you need to choose a premium plan. Head to the premium subscriptions page. And make sure you switch to the Business and ecommerce plans before making your decision (see the screenshot below).
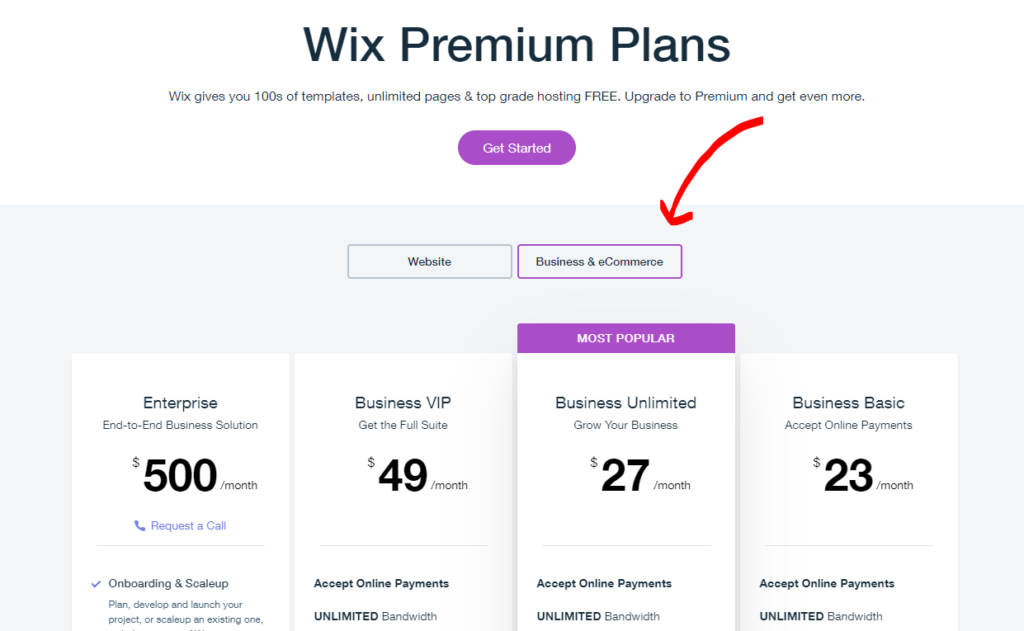
Wix offers four “business and ecommerce” tiers to choose from depending on what you need. And the cheapest one starts at $23 per month.
This is one of the main reasons I like Wix — it’s an affordable option for businesses of all sizes. And on the cheapest plan, you get:
- A free domain for one year
- 20GB of storage
- Unlimited bandwidth
- Acceptance of online payments
- An ad-free user experience
The good news is you can start with the cheapest plan and upgrade for more storage space and special features in the future (if you need to).
So I highly recommend starting with the Business Basic plan, for now.
However, make your decision based on the size of your business and your specific ecommerce needs. Bigger businesses may want to go with the Business VIP or Enterprise plans.
After you upgrade, head back to the site editor and click the “publish” button. This should be located in the upper right-hand corner.
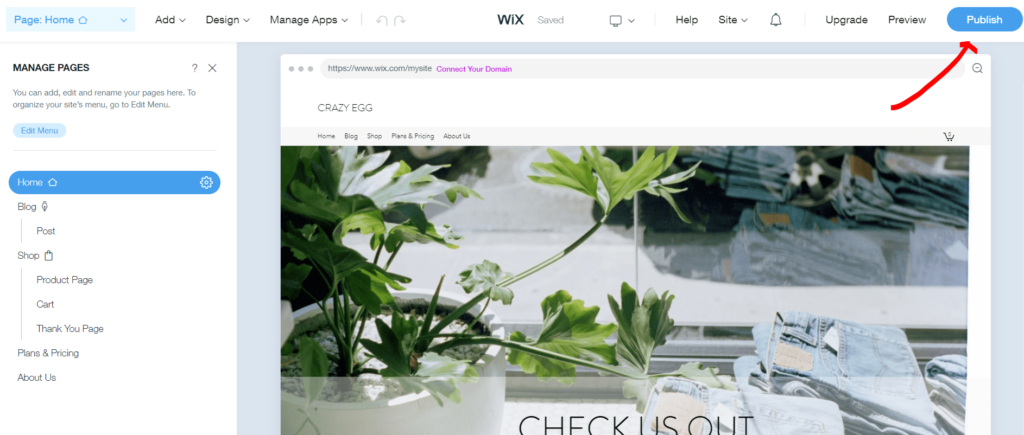
After you click “publish” Wix will ask whether you want to publish on a free Wix domain or a custom domain. Keep in mind that you can’t accept online payments through a free Wix domain.
This means you’ll need to purchase a custom domain and pay for hosting before you can launch your ecommerce website. Which is why we went through the process of upgrading to a paid plan first.

The good news is Wix offers a free domain when you sign up for a premium plan. Enter your new domain name here, click “Publish and Continue”, and follow the steps to claim your free domain.
After that, you’re ready to go. Congratulations on creating and launching your ecommerce website!
Wix
The #1 Website Builder
Get everything you need to build, launch, and scale your ecommerce website with ease. Includes a drag-and-drop builder, marketing and SEO tools, commission-free sales, hundreds of design templates, and more.
Pricing starts at $23 per month.
Ready to Start Selling Online?
While there are other ecommerce builders out there, Wix is our #1 choice because of how easy it is to create and publish an ecommerce website.
And remember: as your store starts to see visitors, you can fine-tune your website to suit your needs and help increase your sales over time.
Continuous improvement is key to ecommerce success.