Website popups, or site overlays, are a highly contested subject, although it shouldn’t be. With the average website seeing 98% of its traffic bounce, there aren’t many reasons not to use an exit-intent popup. Or you can think of it this way:
What ratio of that 98% plan on visiting your site a second time?
Gulp.
As a result, those that don’t implement a lead generation tool to convert visitors into leads are most likely stunting their business growth.
Now that we are all on the same page regarding the importance of site overlays, let’s get down to business. Here are the 5 of the best practices for exit-intent popups and awesome lead generation.
1. Know User Behavior
What do your first time visitors want? How are they getting to your site? Are they clicking on anything? These are all important questions that must be answered if you are going to create an exit-intent popup that actually converts at a high rate.
By analyzing the user behavior you not only get insights into what may or may not be working, you can also use this to discover what customers want or what catches their attention. Use that information to create your popups, whether it be in your copy or as useful information in creating an offer that people want.
Here’s an example of why you need to use analytics. You’ve got people leaving your homepage and people leaving your product pages (but let’s say they all initially landed on your homepage). One type of user already took an action while the other did not.
Don’t you think it would take a different message to convert each one?
Alternatively, how long are people staying on your site? If the duration is too low, then maybe there is information overload, in which case you want to attack that in your exit-intent popup.
If you want to be insanely effective with your lead generation efforts, consider creating multiple exit-intent popups for different pages. Why? Someone leaving your homepage needs a different offer than someone leaving your checkout page without completing the purchase.
If the exit-intent technology you’re using is limited and you’re finding it difficult to use different CTAs on different URLS (webpages), then try using Google Tag Manager.
How Google Tag Manager Works
To get started, you will need to create an account for your business with GTM. After you’ve named your account (best to name if after your business), you’ll then create what is known as a container (which should be named after your site for convenience purposes). This is for your website, so select “web pages” and not “mobile app”.

The container is your “digital Tupperware” for all the snippets on the site. This is where you manage – add/edit/remove – all of the snippets that you need to add an exit-intent pop-up.
After setting up the container, you will then be shown a few lines of code. You are to copy it all to your site to all the relevant pages that you want to add snippets to. This “container” (the snippet that you copied) needs to be pasted directly below the <body>. You want the one that appears on every page of your site (that’s the point of using GTM). Almost every content management system has a plugin for GTM that makes the copy and paste process even simpler, so be sure to see if anything is available.

From here on out, you will not need to add any more snippets to your site! Any and all code will now be added directly into GTM. As you can see below, there are certain services that are integrated with GTM. Either select a service that appears or select “Custom HTML Tag”.

Below you can see that I have added my custom snippet directly from the StoreYa dashboard (I’m using StoreYa in this example because I want to trigger a unique coupon popup). You should be able to do the same with your exit-intent pop-ups.

Once you’ve got all of that taken care of, you’ll then select “Configure Tag” to customize the snippets for your needs. I will select “Some Pages” from step 3 because I want different triggers on different pages.
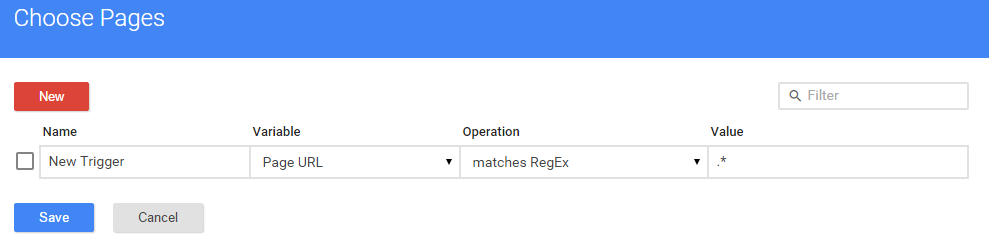
For example sake, I will create a tag and trigger for the product pages and another for my homepage. For product pages I will add “contains” and the word “product”, while for the homepage I’ll select “equals” and I’ll add the exact URL.

You can create a different tag for each and every page (or multiple ones) on your site. Once you publish the tag (“Fire on”), you’re all good to go (as long as your container is published).
If you want to make sure that you have added your container properly, check out Tag Assistant (by Google). It’ll notify you in your web browser if there is a container added to your site.
Google Tag Manager can do wonders, and the things that can be done with it are almost limitless. For more on GTM, be sure to check out Google’s tutorials.
2. Popup Design
“I hate popups”, “those popups drive me crazy”, and other similar statements are made when the design of the popup being used is just plain bad. In an attempt to get people’s attention, marketers have created popups that miss hitting the nail on the head.
In short, your popup should blend into the site’s theme, and should not stand out awkwardly (that’s what leads to such disdain for popups in general).
Take a look at this popup from Tiger Mist. If you visit their site, you won’t find the popup “annoying.” It is created to stimulate the senses of their buyer persona in order to optimize email signups.
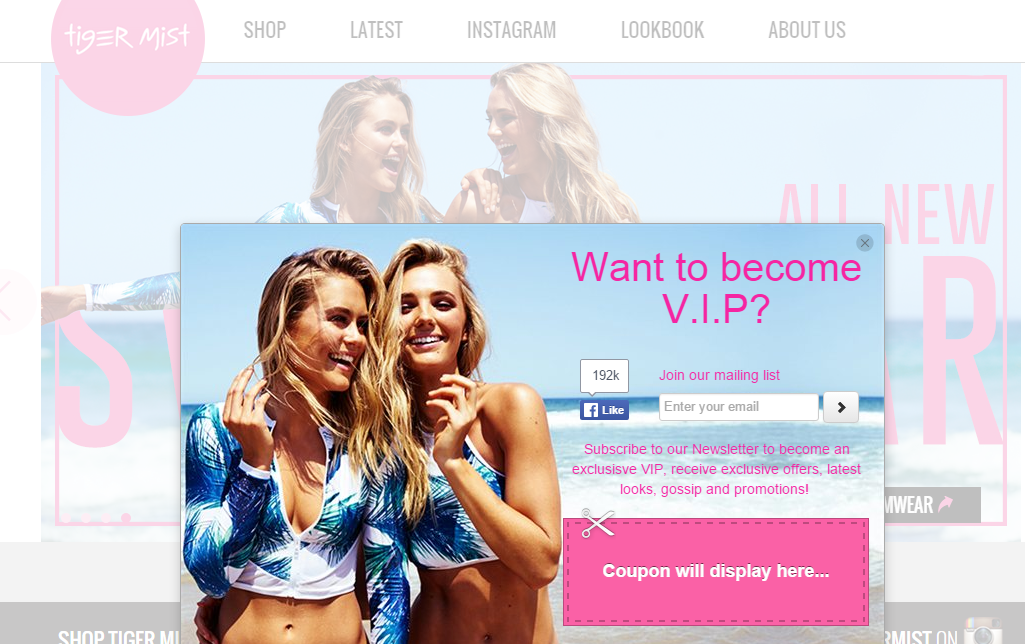
This popup from Tiger Mist is designed to match the rest of their website
What do they get right in terms of design? First of all, the girls in the promo are the same ones featured several times on the site. On top of keeping it simple with their models, this brand also keeps the coloring correct. As you can see behind the popup, this brand loves pink and they stay true to that in their popup.
This exit-intent popup from AdEspresso gets an A+ for design as well, with an old-school postcard styled popup and an espresso post stamp. They use a green button for their call to action in this popup just like many of their other call to actions on their site. AdEspresso could place this somewhere on their site, and it would fit in with the rest of what they do. That’s a sign that the overall design is on target.

The elements used in this exit-intent popup reflects the same practices they use on other pages
A well designed exit-intent popup should be able to blend in with the website and not stand out like a polar bear at the beach.
The Bottom Line: Don’t try to recreate your brand. KISS → Keep it simple silly
3. Short Text
The average attention span is 8.25 seconds. That is not a lot of time, but it is definitely enough time to get people’s attention. This does require that you cut down on the amount of text you want to use.
When it comes to utilizing the right amount of text, this exit-intent popup from Amaura Jewelry is a great example. This is a prime example of how a small amount of text can do more than a large amount of text, “Stay and get 10% off for your purchase”. I might have removed the word “for”, but all in all the text is right on the spot, and forgoes adding meaningless adjectives.
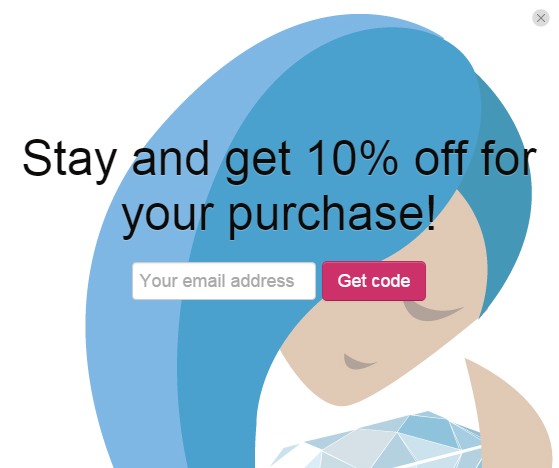
Amaura Jewelry keeps the text to a minimum
Here’s another example from Buffer. Aside from the simple design that gets the point across, Buffer does an exceptional job of presenting the text in a legible manner. They use social proof in their headline (“2 million”) and tell the visitor what the results of using their product will be (“save time”).
Instead of just adding a paragraph of text with an image, they wisely choose to add three keywords as titles to act as attention grabbers. If we were to use a heatmap to track mouse movement on the popup used by Buffer, we’d probably see movement over the headlines, three keywords, and the call to action. All the rest is just for show.

Buffer powers its popup with effective keywords
The Bottom Line: We are skimmers and not readers. Implement relevant keywords
4. The Offer
No matter what your business does – whether just blogging, ecommerce, or a digital service – you’ve got to be able to offer something to visitors.
Optimized exit-intent popups offer both the website and the visitor something new. As a business, you generate more leads. As a new lead in a business funnel, the visitor should receive something in return.
Here’s a great example of how to generate a boatload of new leads. Mistobox is running a giveaway. What did I get by signing up? Hope of winning, and they are probably raking in leads at a record pace.

Mistobox uses power of the giveaway
Raw Generation is no stranger to creating awesome deals. Instead of offering the usual 5-10% off, they offer 60% off! Is that something every business can offer on a daily basis? I am not sure, but they know the lifetime value of customers – they know it’s worth their time to earn less now and more later.
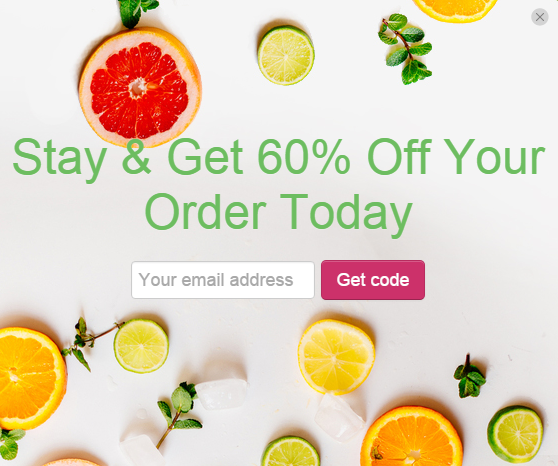
Raw Generation offers a can’t-miss offer for anyone that might be interested in their products
If you are not in ecommerce or you have a “boring” niche that does not work as an excuse for not implementing a great offer. Your niche exists because someone demands that product or service. It’s your job to trigger emotion. Websites that trigger the right emotion are the ones that see the best conversion rates.
The Bottom Line: If you make sure the offer is a “win” for visitors, you’ll be on the right path
5. Call to Action
Even if you create a perfectly branded popup with an eye-catching headline and a great offer, if the call to action is not fitting, your popup won’t bring optimal results. Going back to Mistobox, they not only rock a great offer, but also pair the offer with the right call to action. Instead of adding “sign up,” “join,” or some variation, they’ve used “pick me” which falls in line perfectly with the offer.
The following popup from Unbounce gets their CTA right on the money. Why? It is designed using the same shade of orange as the product and, of course, uses an action “get” to ensure action by visitors. Obviously reminding people that the ebook is free in the CTA was also a tactic that has helped them optimize the popup for better results.
There are those that will ask why they used orange and not red or some other color. As other Crazy Egg contributors have tried to point out, the CTA button color is not, in itself, what will make or break the ROI.
What you do need to do when it comes to the colors, is make sure to stick with your brand’s message and to use a color that accents the CTA.

Unbounce uses the same color for the CTA and the image of the offer
If your CTA is going to be successful, then it must be designed around the rest of the elements in the exit-intent popup. Here are 6 tips to make sure you get this crucial element right.
- make it clear
- make it an action
- add a keyword/buzzword (they aren’t just for Google)
- create a sense of urgency
- make it a button
- use an arrow or a successful design flow to point towards the CTA

Dollar Shave Club: That’s a CTA that hits the nail on the head
The Bottom Line: they don’t call it a “call to action” for nothing. Trigger action with design and copy.
Convert More Visitors to Leads with Exit-Intent Popups
Now that you know what needs to go into your campaign, it’s your turn to act. With conversion rates seeing an increase of up to 1375% more subscribers thanks to popups, now is the time to get in the game.
After reading this post, the first thing you should do is sign into your analytics dashboard and start analyzing what traffic (social, direct, referral) is taking what specific actions. Are different types of traffic taking different actions?
The Steps:
- Get an understanding of user behavior
- Create a simple design for your popup
- Keep the text short and avoid unnecessary words
- Make sure to offer something of value (ask yourself if this is a “win/win” offer)
- Create a relevant call to action
When all the steps are completed, you are left with an exit-intent popup that will get visitors thinking they love popups and not disdaining them. The Amen Clinics skyrocketed their lead generation (nearly 20% of abandoning visitors that saw the popup signed up) by implementing an exit-intent popup that hit on all of the mentioned steps.
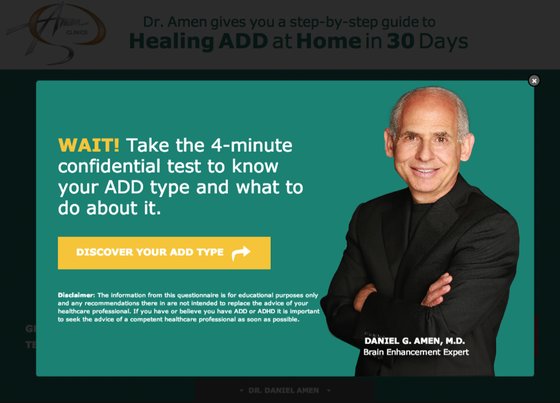
All the elements of a successful pop (image via Unbounce)
For those of you that are sold on implementing an exit-intent popup (should be all of you), make sure you pick a service that is right for you! Not all exit-intent popups are created equally (and in this case that is good). I’d love to hear what you’ve got to say on the subject – whether you agree or disagree on any of the points.
About the Author: Ty is a digital marketing enthusiast that can’t get enough social media marketing and content marketing. He is the inbound marketing manager at StoreYa where he spends his days searching for the newest social marketing scoop and creating amazingly awesome content. If you’d like to chat with him, feel free to connect with him on any social platform. Twitter: @AmitiRothstein
Featured Image Source


